
‘Beat the buzzer’ – Pin inputs and outputs
Getting started with the BBC micro:bit - Lesson 4
Objectives
- Build and program a physical game that utilises inputs and outputs.
- Understand what conditional statements are, and why and when to use them in a program
- Designs algorithms that use variables, and selection and arithmetic operators
Lesson Resources
- Lesson Slides
- Each group will need:
- 1 micro:bit and USB cable
- Two lumps of Blue tac,
- Any kind of insulating tape,
- 2 lengths of kitchen foil, one approx 1m, the other approx 40 cm in length
- 2 crocodile clip wires (5 if using an external micro:bit speaker)
- Micro:bit speaker (optional - and built into the v2 micro:bit)
Lesson 1 - Getting started and the LED Grid
Lesson 2 - Inputs and outputs
Lesson 3 - More inputs and outputs
Lesson 4 - ‘Beat the buzzer’ – Pin inputs and outputs
Lesson 5 - Using conditions and random numbers
Lesson 6 - Variables: Building a scorekeeper
Introduction
One of the input options we found in lesson 2 was using the pins on the micro:bit. Creating a circuit from the numbered pins to the GND pin can act as an input and trigger actions based upon your code.
Take a look at this video from Microsoft Makecode which takes a deeper look at how the input pins work:
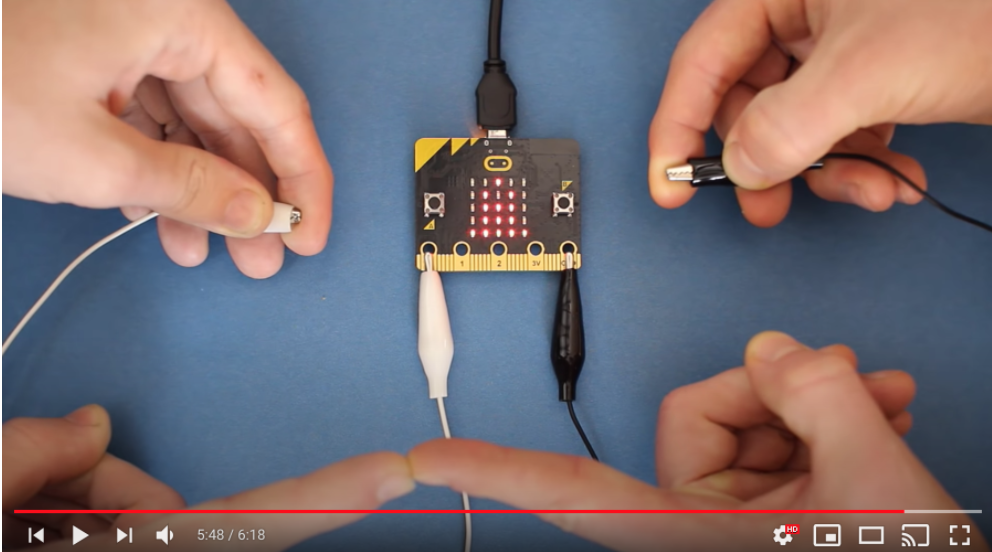
Start by asking the students to build the simple code from the video and try it out (with or without the fruit/veg - carrots are a good non-messy option for this!) by connecting a wire to Pin 0 and a second wire to the GND pin.
Each partner should hold the metal end of their wire and then touch hands to complete the circuit:
Beat the buzzer
In this lesson the students are going to use the pins feature to build and code a classic fairground game called ‘Beat the buzzer’.
Show the class this image of the game and ask - is anyone familiar with this game? What do you need to do and how do you think it works?
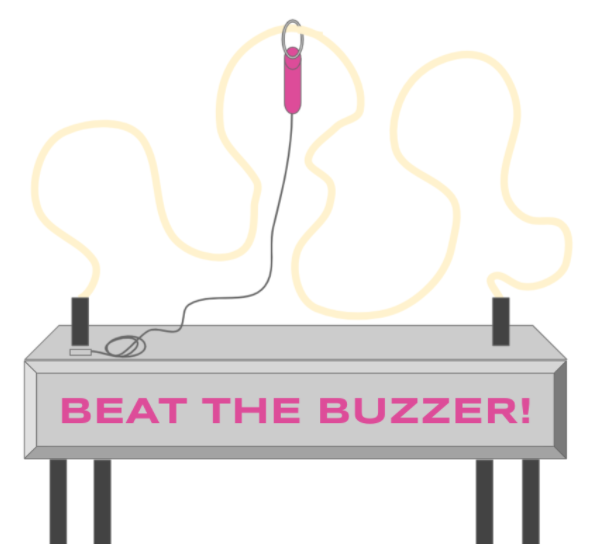
A player must guide the circular wand over and around the wavy wire, from one end to the other, without touching the wire. If you do touch the wire a buzzer will sound and you must go back to the start or lose a life.
An electrical current runs through the curvy wire but the wire is an open circuit, when the wand touches the wire the circuit is closed which makes the buzzer sound.
Each group will need:
- 1 micro:bit,
- two lumps of Blue tac,
- any kind of insulating tape,
- Two lengths of kitchen foil, one approx 1m, the other approx 40 cm in length
- Two crocodile clip wires (five if using an external micro:bit speaker)
- Micro:bit speaker (optional - and built into the v2 micro:bit)
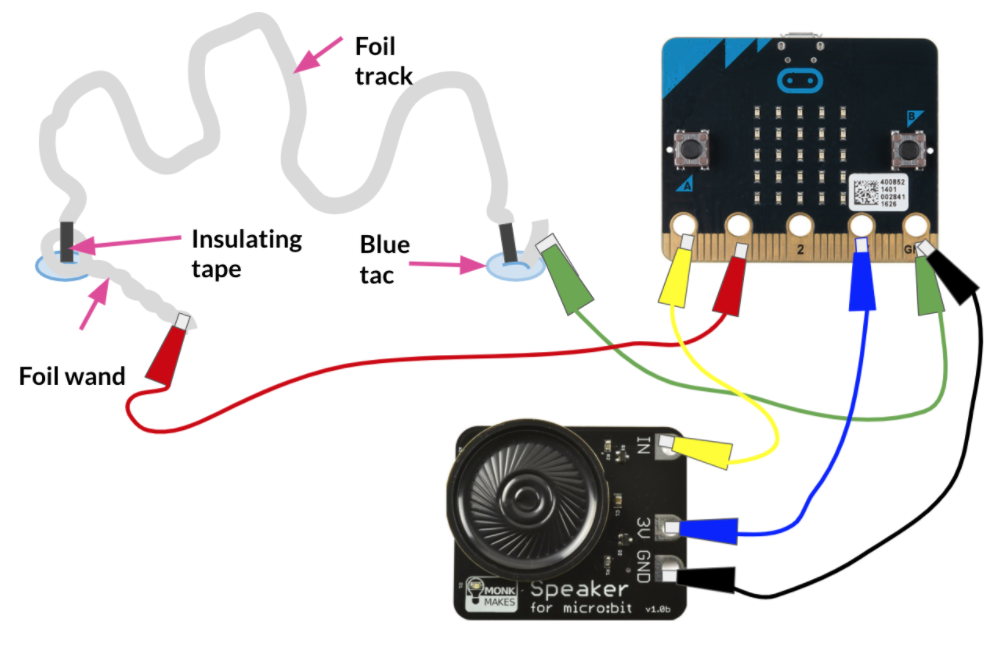
Start by rolling the long sheet of foil into a thin strip. Scrunch it as tightly as you can. Do the same with the shorter length of foil and then curve one end around to make a ‘P’ shape. Wrap one end around the handle so the loop stays in place.
Next, wrap a piece of insulation tape around one end of the longer foil strip, and do the same at the other end but leave a few centimeters of foil showing.
Curve the long foil strip into a wavy wire and place one end through the loop in the wand. Use the Blue tac to make the track stand up vertically on the desk as shown below:
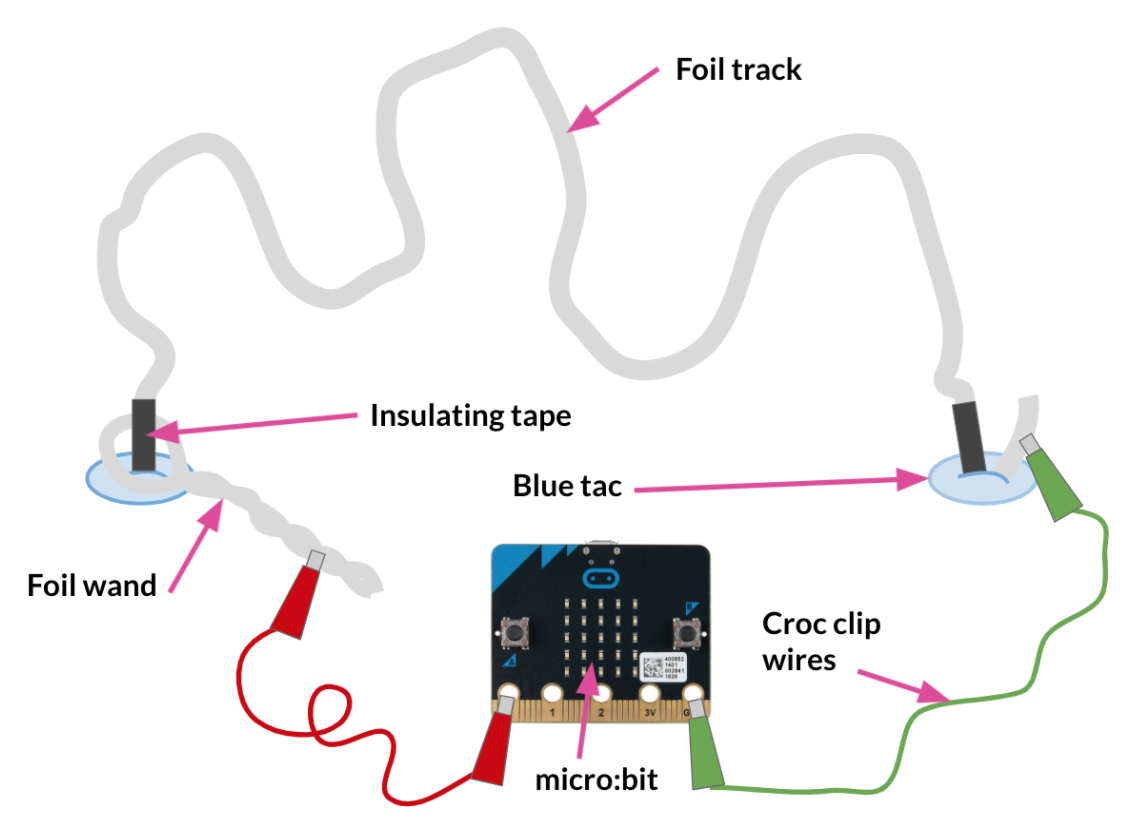
Finally, connect the crocodile clip wires as shown: one from the end of the wand to pin 0 on the micro:bit, the other from the GND pin to the other end of the foil track where you left a small amount of foil exposed beyond the insulating tape.
If you are adding in an external speaker (optional) for v1 micro:bits, you will need three extra crocodile clip wires. Connect the speaker in as shown in the diagram below. Note that the black and green wires in the diagram both connect to the GND pin. The best way to do this is to connect one clip through the hole and then attach the second clip to the first clip.
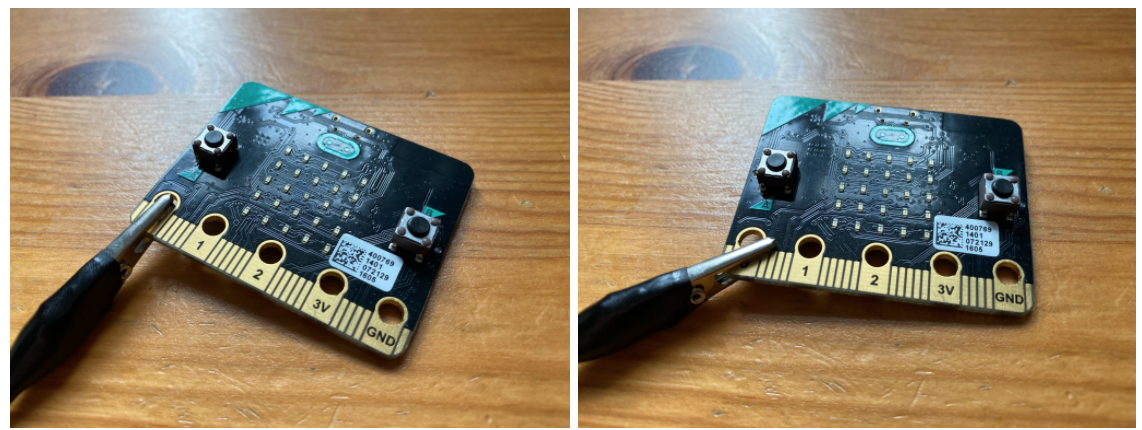
Clipping all wires through the holes will provide a more secure connection than clipping over them, for example:
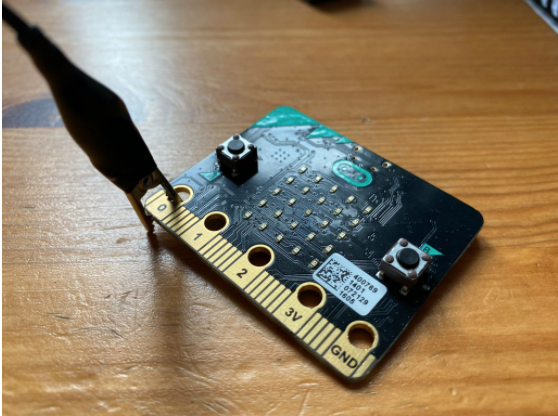
Not like this as the clip can easily slip left and right, which can break the connection and stop things working.
Creating the pseudo code for the game
A good first step for any coding project is to create the pseudo code, which is simply what we want to happen, and the order in which we want it to happen.
Ask the students to talk to their partner and try and come up with a series of very clear, logical steps for what the code should do when the game is played. They do not need to worry about how to code it, or the blocks needed, just what they want to happen.
Take some feedback from them at the end. It might look a bit like this:
- The player gets 3 lives at the start.
- The player then starts and loses a life when the wand touches the track (when the circuit is completed).
- A life should be taken away, and a sad face, X symbol, or something similar is displayed on the LEDs when the circuit is completed. A noise could also sound if you are using a speaker.
- It should know when the player loses all their lives and show ‘GAME OVER’ on the LEDs
- The game ends.
Next let’s consider how we can make this all happen with code. We’re going to break things into three sections; the set up, losing lives and ending the game.
The set up
To be able to create and track how many lives the player has during the game we need to use a variable. This is a concept that the students should have come across before while using Scratch.
Variables are a named place in a computer’s memory that can store a value, think of it like a notepad that can hold some information for us to use again later.
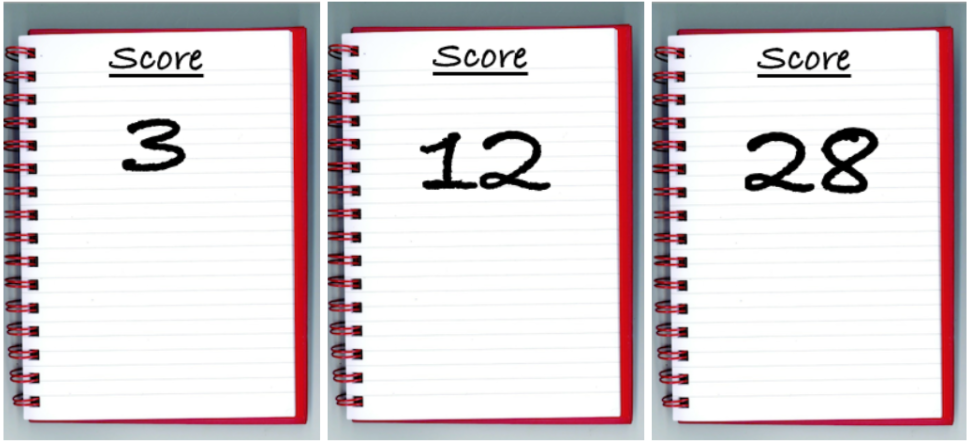
We give each variable we use a name and can then refer to it at any point we like in our code to apply and use its current value in our code. On the notepads above, the variable’s name is ‘Score’. The value of Score could change but it will still be the same variable, and someone could ask “What’s the score?” at any point, which could be checked and reported back. Or the value of the variable could dictate how or when things happen, for example, the game ends when the score gets to 30. All this (and much more) can be done with variables in code.
The information a variable holds can be different things such as numbers, text, punctuation, or a True/False value. But they are most commonly numbers.
Algebra is another good example of variables in practise. Here the name of the variable is Y, but what is its value?
15 + Y = 22
3 x Y = ?
21 - Y = ?
We can tell from the first calculation that its value must be 7 (as 15 + 7 = 22). Once we know the value of Y we can then apply it to other calculations, such as the other two above. We read the name of the variable but we always apply its value to where it's being used.
In Scratch a variable could be used in code like this, all three of these blocks would normally have a number value, but here it has been replaced by a variable called Y.
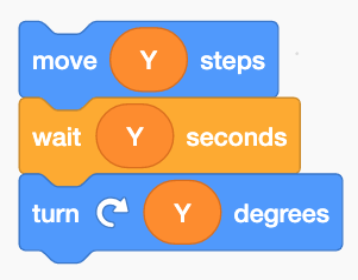
So if Y still = 7, the sprite would move 7 steps, wait 7 seconds and then turn 7 degrees. But we can, of course, change the value of the variable at any point we like and the code will apply its new value to anywhere it has been used in the code.
So when we create a variable the first thing we must do is name it. Then, at the beginning of the code, we must always give it a value to start with. We call that assigning a variable. You can also assign a new value to the variable at any other point in the code.
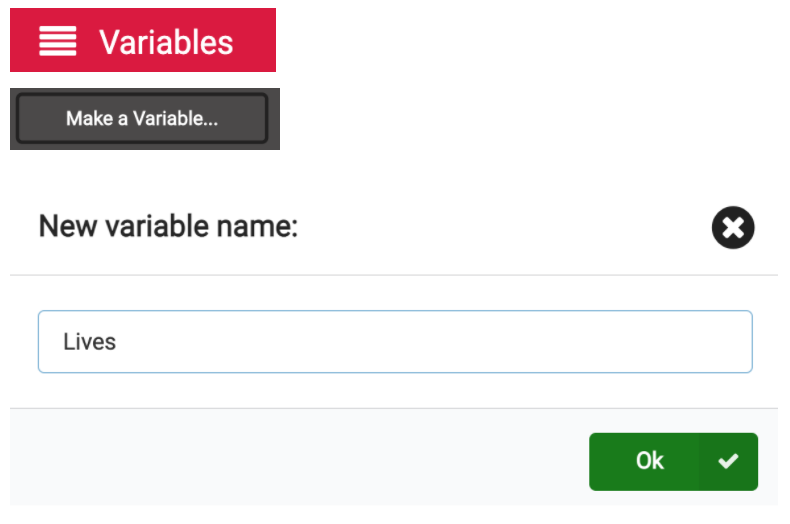
In the Makecode editor, go to the variables section, click make a variable and name it ‘lives’.
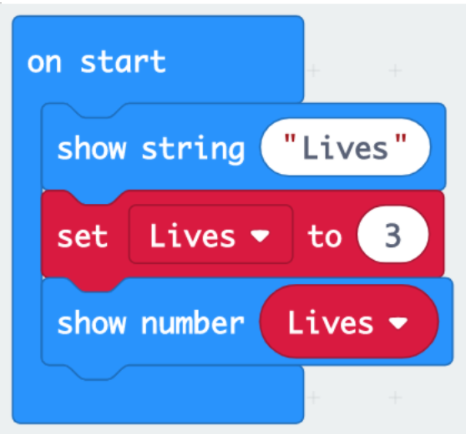
Our first stack of code sets things up to start the game. It begins by displaying the word ‘lives’ on the LEDs, then the variable is set to a value of 3 (you can have more or less if you like) and then that value is displayed on the LEDs so the player just sees ‘Lives 3’.
Losing lives
Now the player is ready to start playing their game and test how steady their hand is. However, our game must be able to detect when the player touches the foil track with the foil wand.
Ask the students - Let’s think back to our pseudocode, what do we want to happen at this point? The player should lose a life, but there should also be some feedback to the player that that has happened. That could be a visual message or image on the LEDs, a sound, or both.
The key to it working though, is the circuit being closed: power going from the micro:bit, to the wand, from the wand to the track, and back to the micro:bit.

When the circuit is closed the code can be triggered by using the pin pressed block.
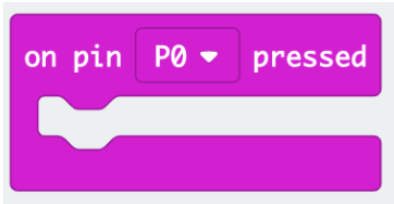
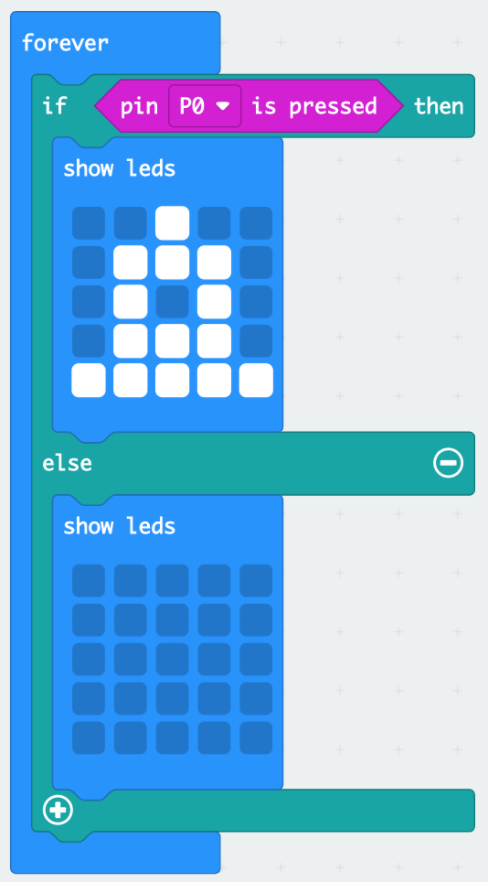
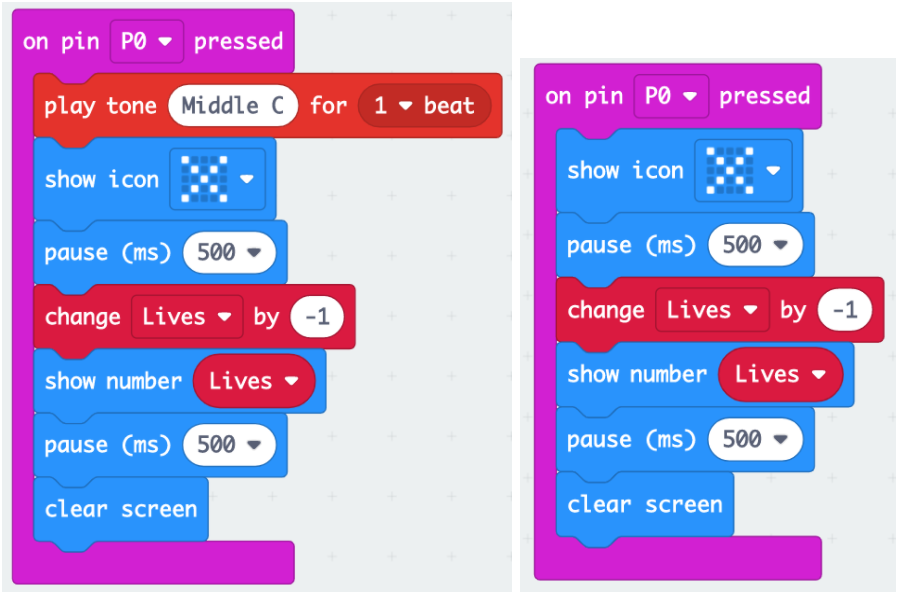
So ask the students - Starting with this block, can you write the code to make it:
- Show an icon that indicates a life is lost
- Make a sound (if you have speakers available for your micro:bits)
- Take a life away from the player
- Display the new number of lives the player has.
Here are two versions of a possible solution, one of which has a sound included (for those with micro:bit speakers).
Ask the students to download all their code so far to the micro:bit and try out the game. To test its working, tell them to touch the track with the wand and check they are losing lives. But what happens when the player runs out of lives? Well nothing happens at the moment as we haven’t coded anything to happen! The lives variable will continue to decrease by 1 each time the circuit completes, which will eventually take it to a negative value.
To us we understand that our variable means lives and that in games, when you run out of lives the game is over, but to the micro:bit, the variable is just a number in its memory. So we must write a final section of code to tell it to finish the game when the lives reach zero.
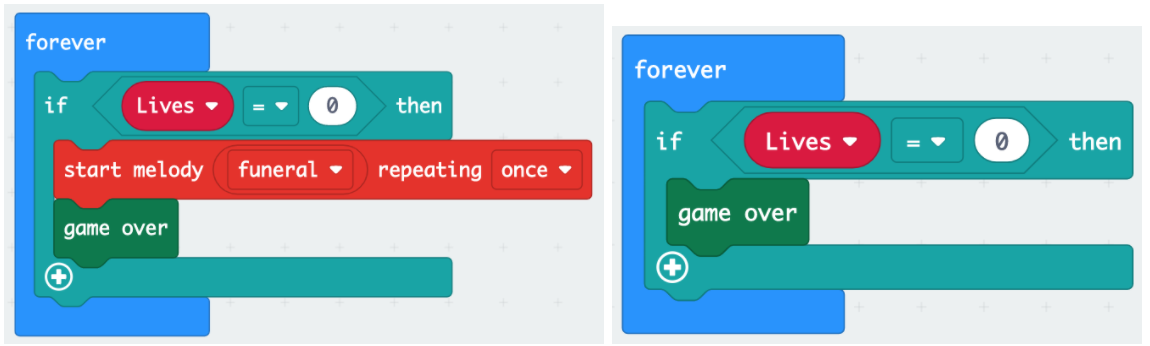
Ending the game
This is fairly straightforward, but can be done in different ways, depending on how creative your students wish to be. It relies on a condition being used to test and measure when our variable hits a certain point (zero). So we’ll use an ‘If then’ block to create the condition and an = comparison block to measure the variable.
In the advanced options of blocks you will find a category called Game. In here is a ‘Game over’ block which produces a nice animation and ‘Game over’ message automatically. If the students prefer, and have time, they could design their own animation instead. The melody block can also be added if you have micro:bit speakers.
Ask the students to download all their finished code and test out their games.
Plenary
In this project we have made use of the following things, ask the students to take it in turn with the list and explain to their partner what each thing is and how it was used it the project:
- Inputs and outputs
- Variables
- A loop
- A condition
Ask for feedback from the class at the end to gauge their understanding.