
Getting started and the LED Grid
Getting started with the BBC micro:bit - Lesson 1
Objectives
- To create simple programs to control the LED matrix on the micro:bit
- To edit and adapt simple programs on the micro:bit
- To download, load and test the .hex file on the micro:bit.
Lesson Resources
- micro:bits and USB cables (approximately 1 between 2 students)
- Lesson Slides
Lesson 1 - Getting started and the LED Grid
Lesson 2 - Inputs and outputs
Lesson 3 - More inputs and outputs
Lesson 4 - ‘Beat the buzzer’ – Pin inputs and outputs
Lesson 5 - Using conditions and random numbers
Lesson 6 - Variables: Building a scorekeeper
What is the BBC micro:bit?
“The BBC micro:bit is a pocket-sized codeable computer with motion detection, a built-in compass and Bluetooth technology, which was given free to every child in year 7 or equivalent across the UK in 2016.
A collaboration between 29 partners, the BBC micro:bit is the BBC's most ambitious education initiative in 30 years, with an ambition to inspire digital creativity and develop a new generation of tech pioneers.
The UK currently faces a critical skills shortage in the technology sector and the BBC and partners aim to help change that. In the 1980s, the BBC Micro introduced many children to computing for the first time and the BBC micro:bit, part of the BBC’s Make it Digital initiative, will build on the legacy of that project for the digital age. It aims to inspire young people to get creative with digital and develop core skills in science, technology and engineering”
Read the full article here: http://www.bbc.co.uk/programmes/articles/4hVG2Br1W1LKCmw8nSm9WnQ/the-bbc-micro-bit
It is now available to buy for around £15 which makes it a fantastic and affordable piece of technology for schools to buy to allow students to get into physical computing projects.
While originally pitched at year 7 pupils for its rollout, the micro:bit is equally suitable for younger children in KS2, as well as KS3 and beyond, due to it’s versatility, the variety of projects it can be used for and the different programming languages that can be used to code it.
All coding is done via the official website: microbit.org, where you will find a Javascript built block-based editor (similar to Scratch). This is perfect for younger or less experienced users, but as this also allows coding in, and translation to Javascript itself, it allows for progression and comparison between the two.
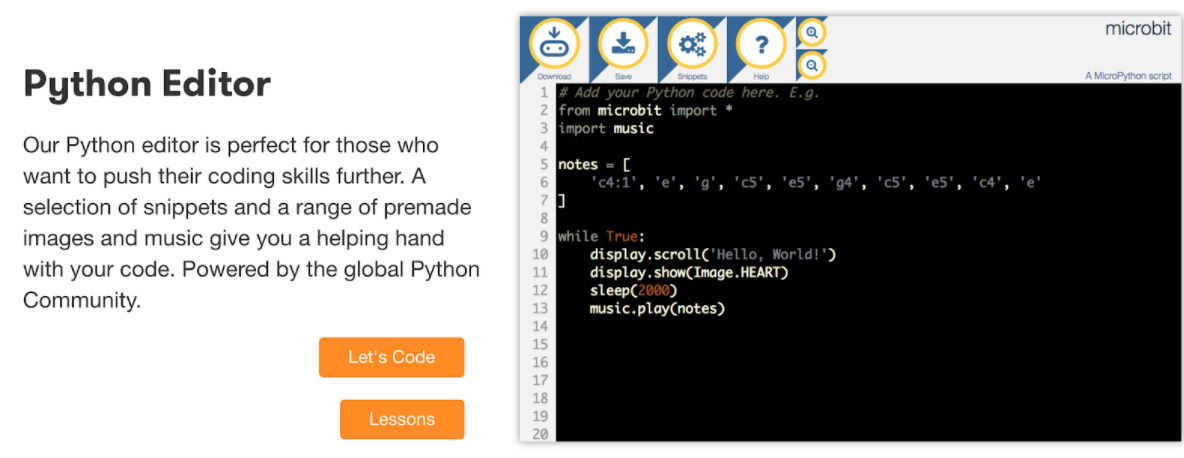
A Python editor is also available for coding your micro:bit with a text based language:
And the latest version of Scratch also now offers micro:bit compatibility through the block extensions.

Android and iOS apps are also available for coding and pushing your programs to your micro:bit via your tablet or phone.
You can find out more about the BBC micro:bit at the official website: microbit.org. The website also contains lots of brilliant resources for teaching and learning with the micro:bit.
This video also offers a nice introduction to using it in the classroom as well:
As a result, this unit of work contains a selection of lessons that have been adapted from the website. There are also many other projects to choose from with varying degrees of difficulty.
Safety with your micro:bit
This safety page covers everything you need to know about being safe with your micro:bit and passing on good practice to your students.
A couple of key points are also highlighted with this passage from the micro:bit website:
“To start with... Naturally, the BBC micro:bit is designed to be safe to use. However, unlike electronics you might buy in a shop, there's no protective case - all the electronics are exposed. We designed it this way so you can see how the electronics are assembled. It looks neat, but needs to be handled with care. With the electronics accessible like this, it's important to avoid generating static electricity. You can discharge any static you've built up by touching a metal object to 'earth' yourself. A chair or table leg would be a good choice. No need to cling on to it for dear life - just a quick touch is all you need.
Once you're sure you're static-free, you can start handling your micro:bit and get it plugged-in! Examine the board for any damage and monitor it when it is first switched on. Your micro:bit is designed to run cold, if it becomes hot to the touch please stop using it and report this fault through our Support site.”
Introduction
Introduce the micro:bit and some of its key features, has anyone seen or used one before? Take a look at it with your partner, discuss what you think it is, what it can do and the features that it has.
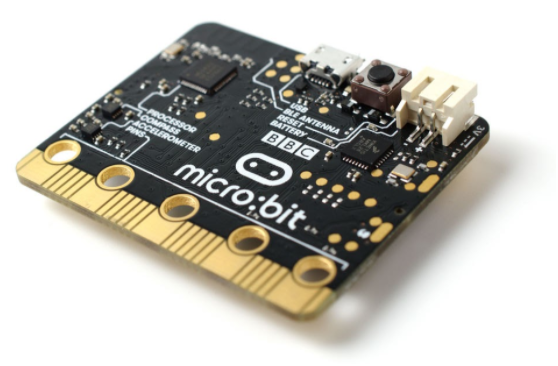
Conveniently, the back of the micro:bit is labelled so students should be able to spot some of the most important features.
micro:bit v1
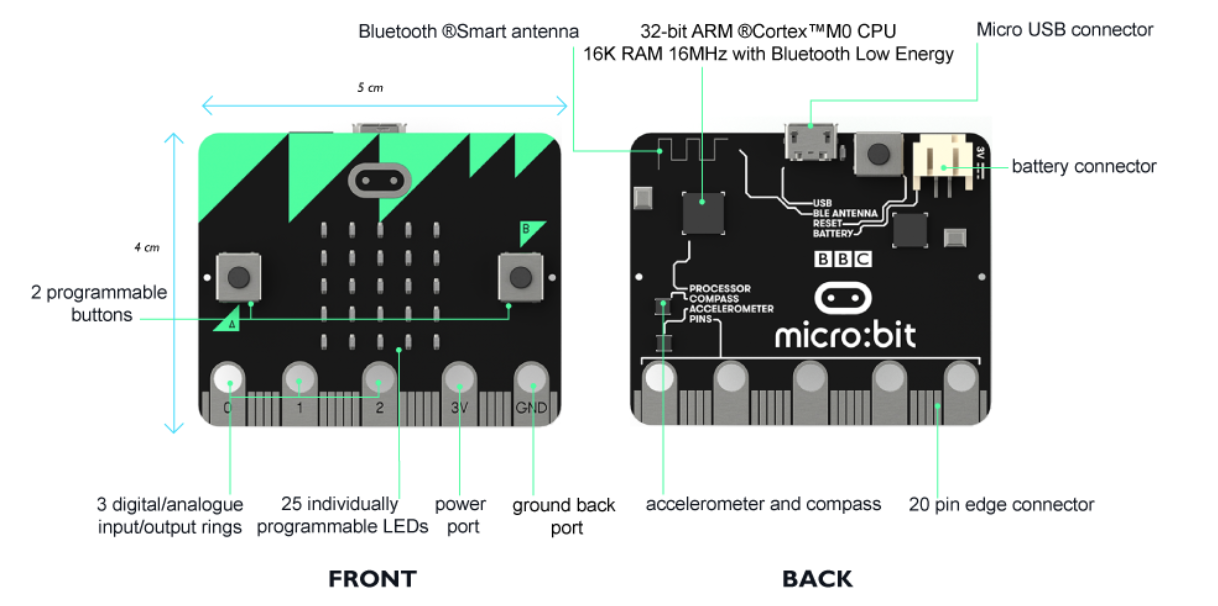
Source: https://microbit.org/get-started/user-guide/overview/#hardware-specifications
Discuss what they find and some of the micro:bit’s key features:
- 25 red LEDs to light up, flash messages, create games and invent digital stories.
- Two programmable buttons activated when pressed. Use the micro:bit as a games controller. Pause or skip songs on a playlist.
- On-board motion detector or “accelerometer” that can detect movement and tell other devices you’re on the go. Featured actions include shake, tilt and freefall. Turn the micro:bit into a spirit level. Light it up when something is moved. Use it for motion-activated games.
- A built-in compass or “magnetometer” to sense which direction you’re facing, your movement in degrees, and where you are. Includes an in-built magnet, and can sense certain types of metal.
- Bluetooth Smart Technology to connect to the internet and interact with the world around you. Connect the micro:bit to other micro:bits, devices, kits, phones, tablets, cameras and everyday objects all around. Share creations or join forces to create multi-micro:bit masterpieces. Take a selfie. Pause a DVD or control your playlist.
- Five Input and Output (I/O) rings to connect the micro:bit to devices or sensors using crocodile clips or 4mm banana plugs. Use the micro:bit to send commands to and from the rings, to power devices like robots and motors.
micro:bit v2 (released October 2020)
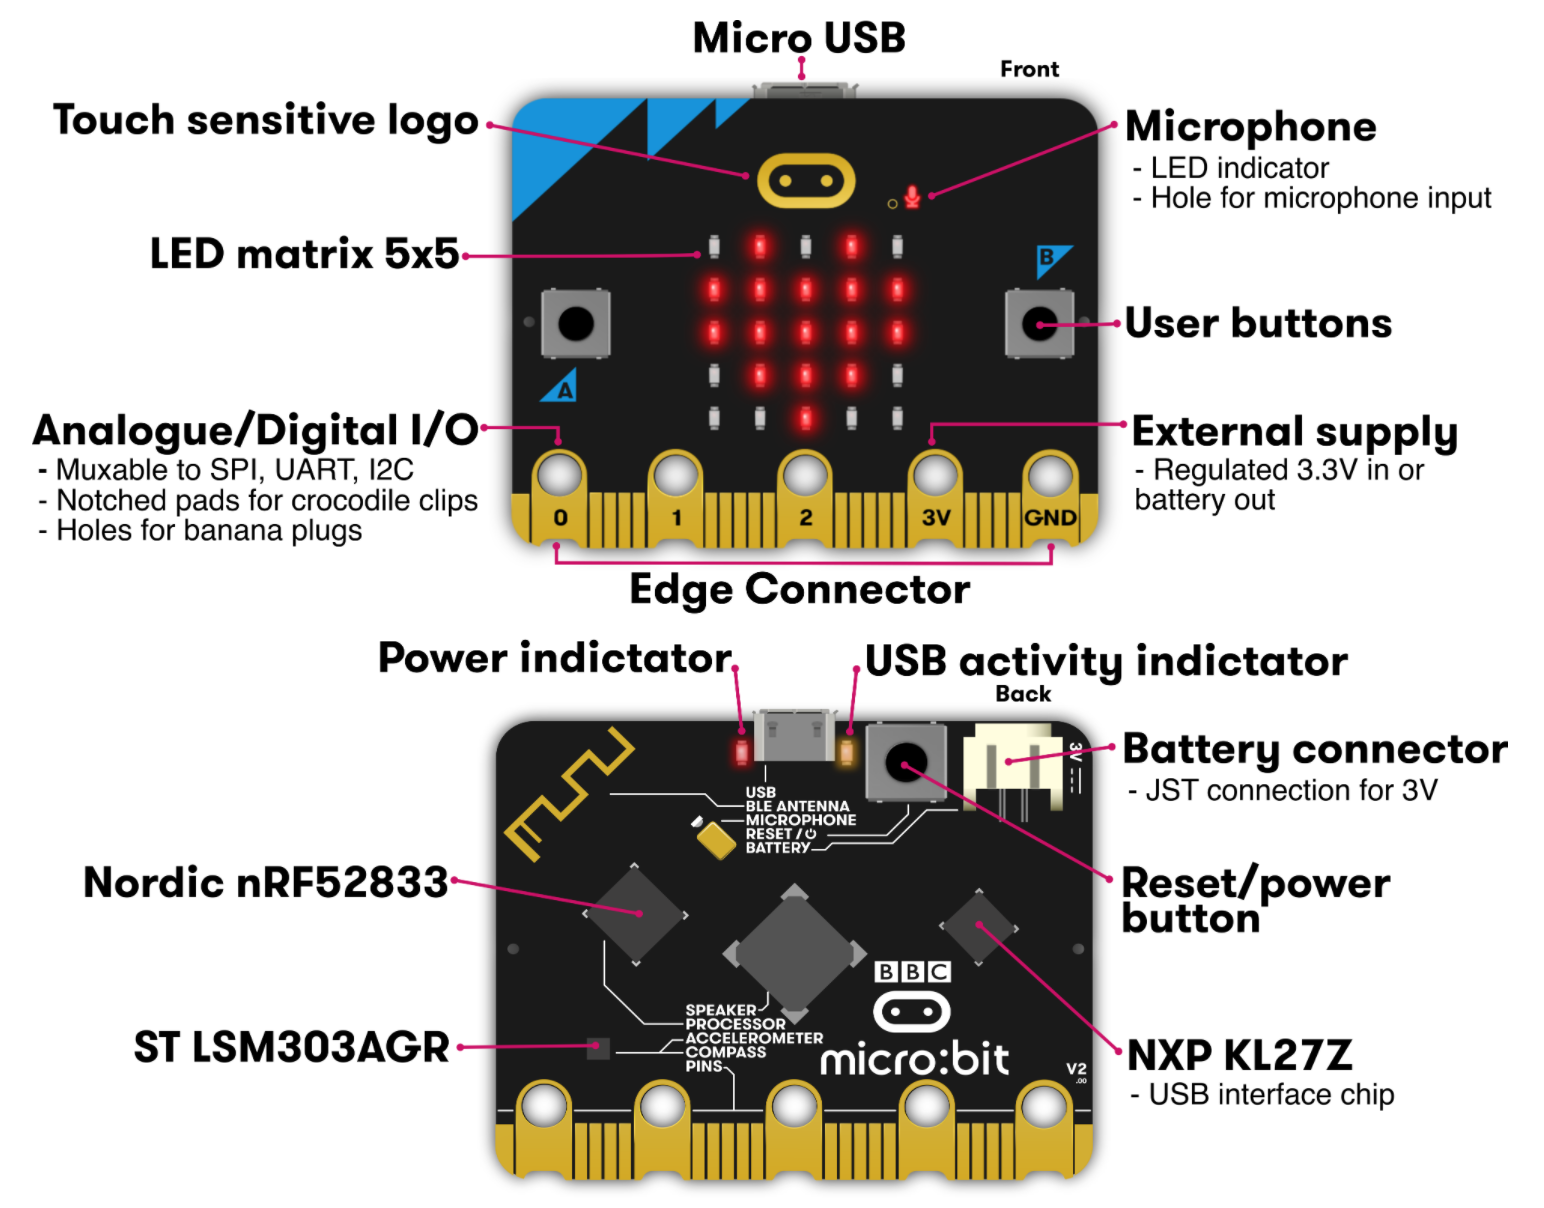
Version 2 has the same features as above, plus:
- a microphone,
- a speaker,
- a touch sensor,
- power saving mode.
The micro:bit is a microcomputer and so cannot run software in the same way a standard PC or Raspberry Pi can, but it can be programmed as an output device or be used as an input device for other things.
Explain that in this lesson they are going to be learning how to connect it to another device so that they can write some simple code to control the micro:bit, then they will be downloading, testing and editing their code.
Your first code
We’ll start with controlling the LED matrix. There are 25 red LEDs built into the micro:bit and these can be individually controlled to light up and show simple images or letter strings. There are different ways to do this, but we’ll start with the simplest option:
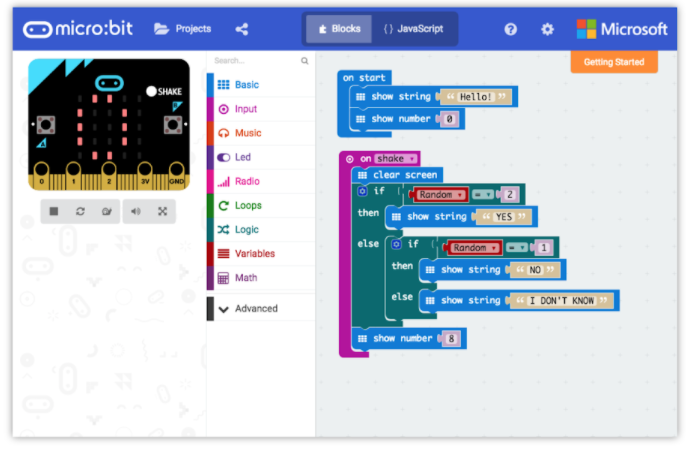
Go to microbit.org/code and open up the JavaScript Blocks editor, by clicking ‘Let’s code’ at the top of the screen.
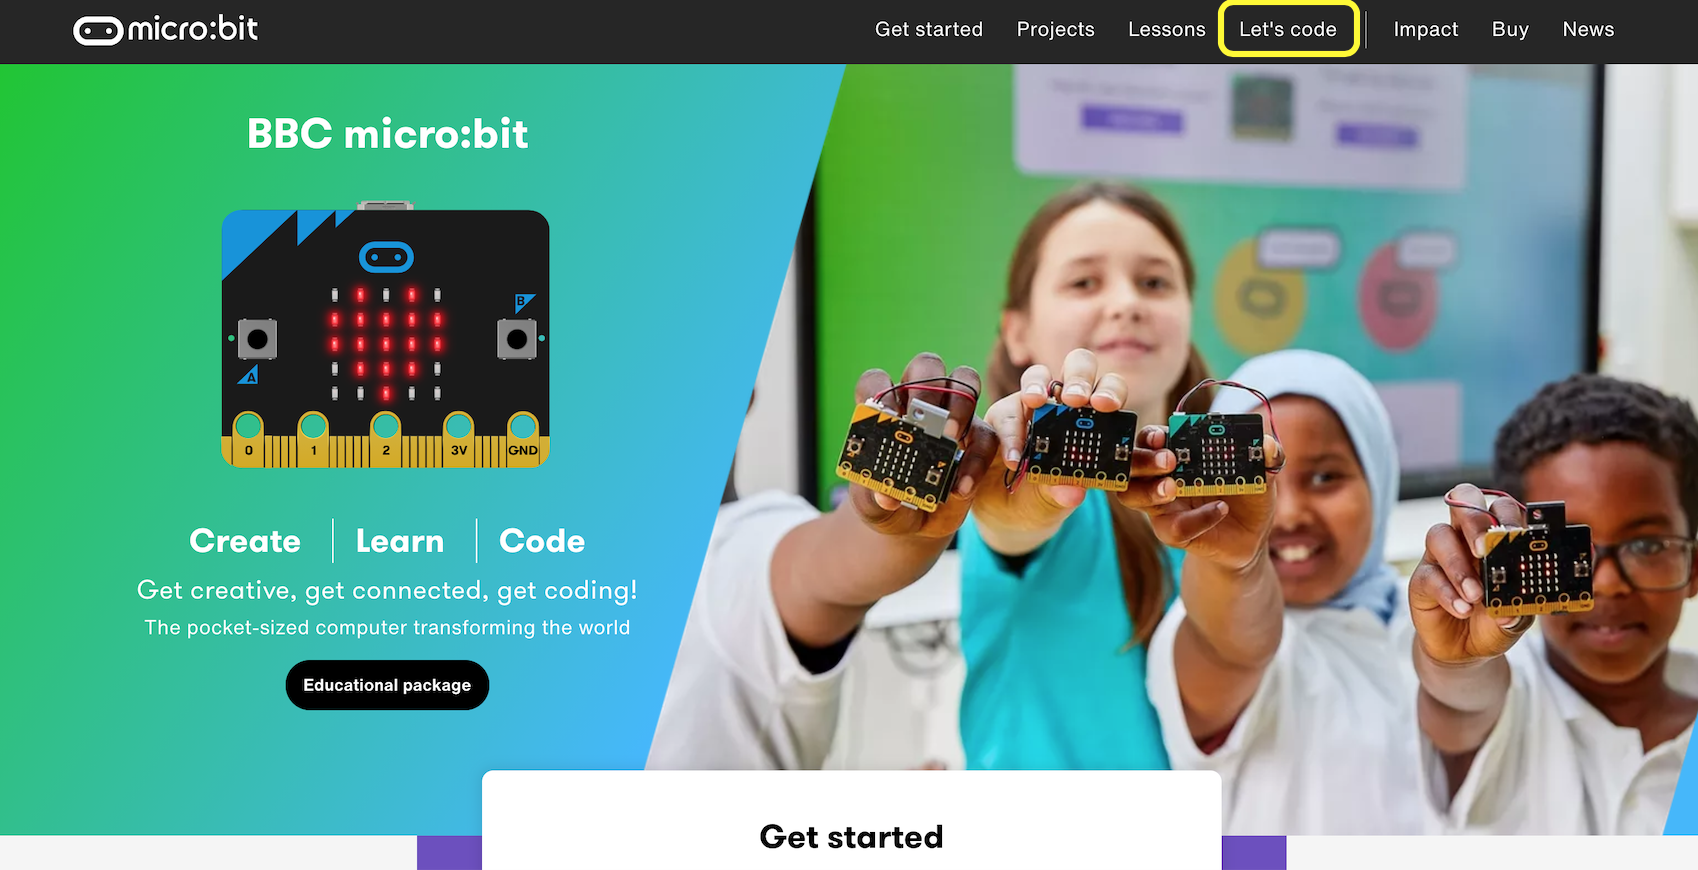
Then choose the MakeCode editor.
Start a new project.
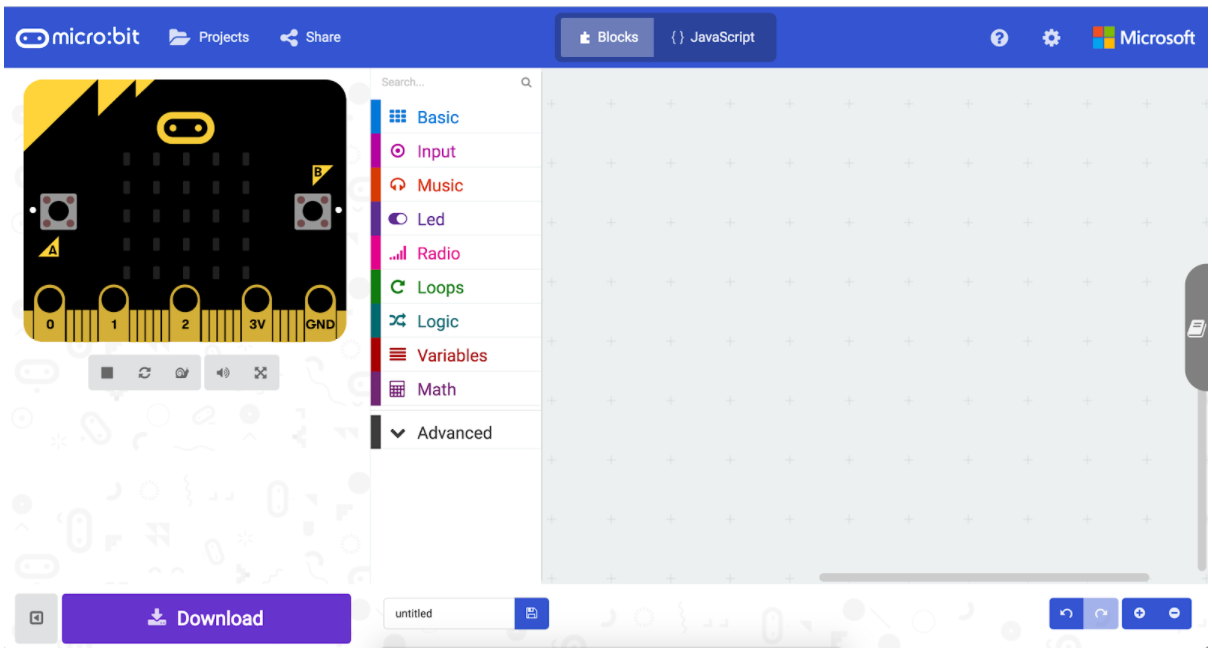
Ask the students to have a look around the screen. If they have used other block based editors, like Scratch, they should find the layout fairly familiar. The picture of the micro:bit on the left is a full emulator (simulation), so you don’t even need a micro:bit with you to write and test your code! Which means they can do it from home if they want to practise and try other things out.
Before we add any code, connect your micro:bit so we can easily download the code to the device.
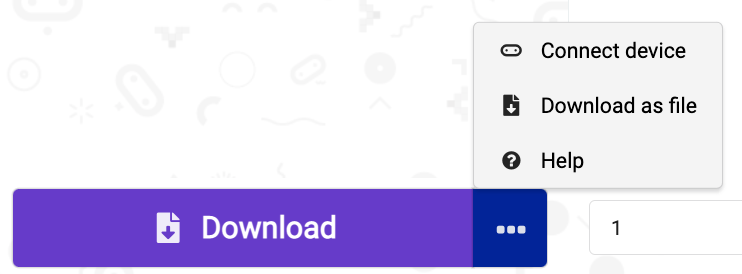
First plug it in with the USB cable. Then, next to the downloads button, click the three dots and choose Connect device from the menu.
Click the purple Next button on the next two windows that pop up.
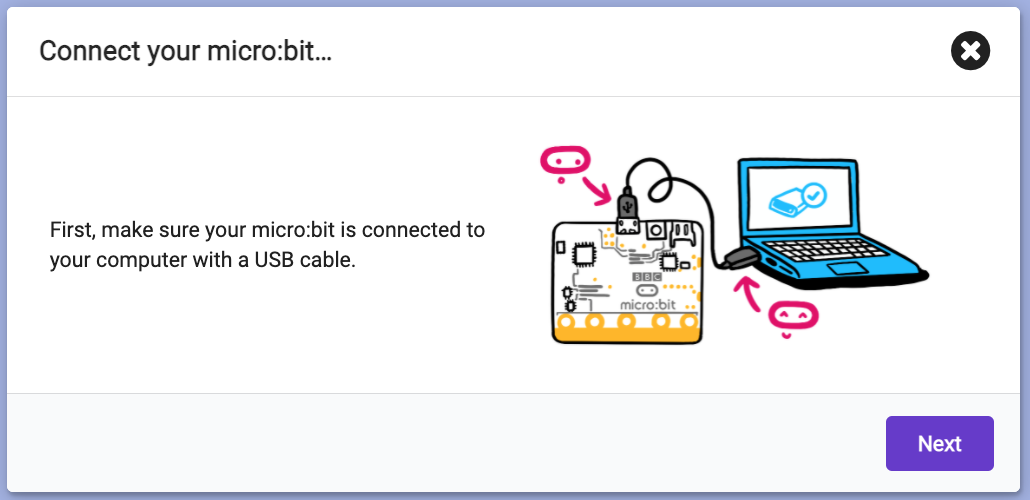
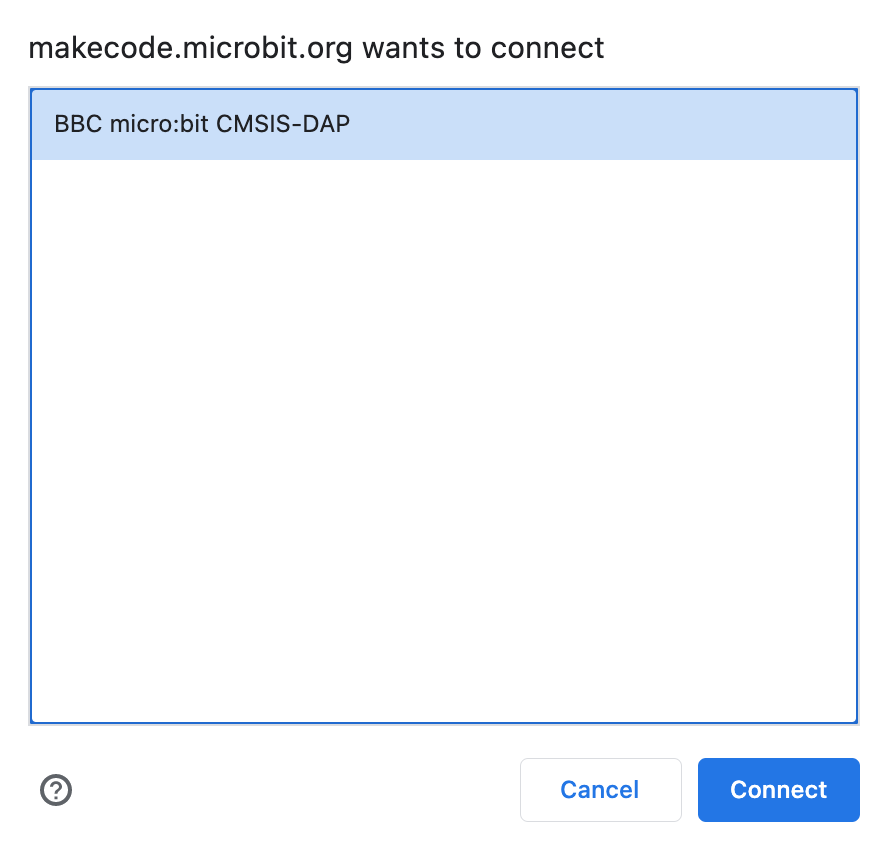
Then select your device when is shows up in this window. It should go blue as shown below. Finally, click the Connect button and Done.
Now go to the to Basic blocks and drag out these blocks:
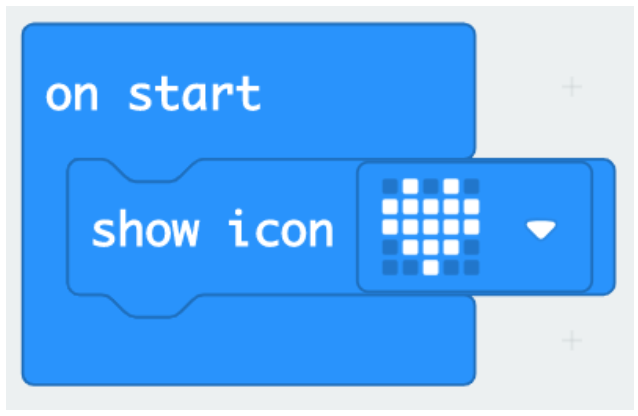
Ask - What do you think will happen when we run this code?
The icon shown will be displayed on the micro:bit LED grid when the code runs. There are lots of other pre-made icons available too from the dropdown arrow next to the icon.
Downloading your code
Demonstrate the process of how to send this code to your micro:bit. If you were able to connect the micro:bit to your browser, as described above, all you need to do is click download each time. However, if you have any problems connecting to the browser, very detailed instructions for other methods can be found here.
By copying the script onto the 'MICROBIT' drive, you have programmed it into the flash memory on the micro:bit, which means even after you unplug the micro:bit, your script will still run if the micro:bit is powered by battery.
Each time you make a change to your program you need to download and transfer the code to your micro:bit again to see the changes take effect.
A new picture
Ask the students to try changing the icon to something different and re-downloading their code to the micro:bit.
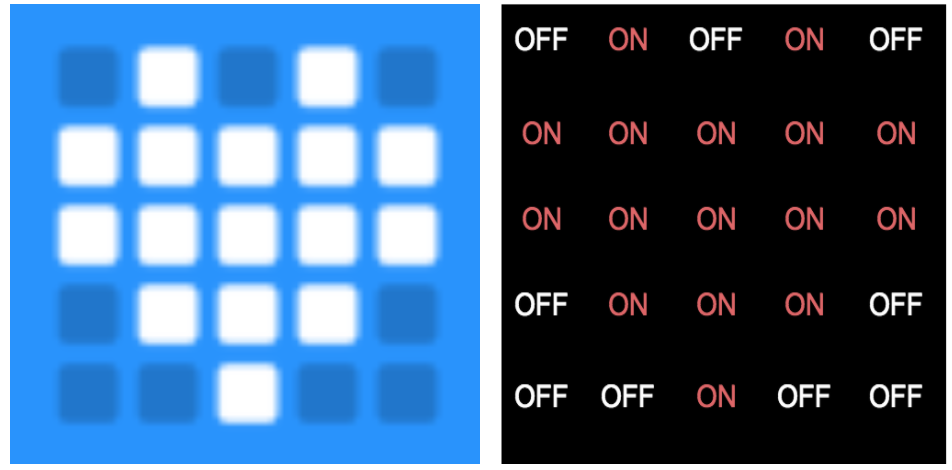
But what is really happening when we run the code? It seems a very simple bit of code, just two instructions: ‘On start’, ‘show icon’, simple right? Not quite. Block based coding is an example of abstraction (where detail is removed from code to simplify things). And this is a prime example of that. Rather than just two instructions being sent, there are many.
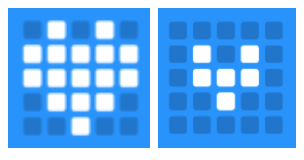
Each LED on the micro:bit’s matrix receives an instruction. If we zoom in on the heart icon we can see the picture is made up of pixels, just like any screen, some are on, some are off. For the heart 16 are on, 9 are turned off.
What are LEDs and how do they work?
So we’ve seen that we can light up the LEDs on our microbit, but what exactly are LEDs and how do they work? Take a look at this video from Microsoft Makecode to find out more.
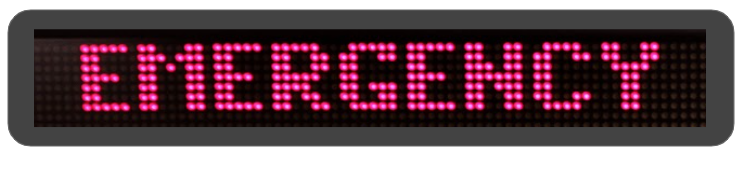
All other screens work in a similar way. In LED signs like the ones below there are hundreds or thousands of LEDs. Each one receives an instruction telling it whether to be on or off, or what colour it needs to be. Our eyes don’t often take in that detail, just the shape of the pictures or characters created on the screen as we read the messages. So when we break down the code to a deeper level, many more instructions form the algorithm to create an image on the screen.


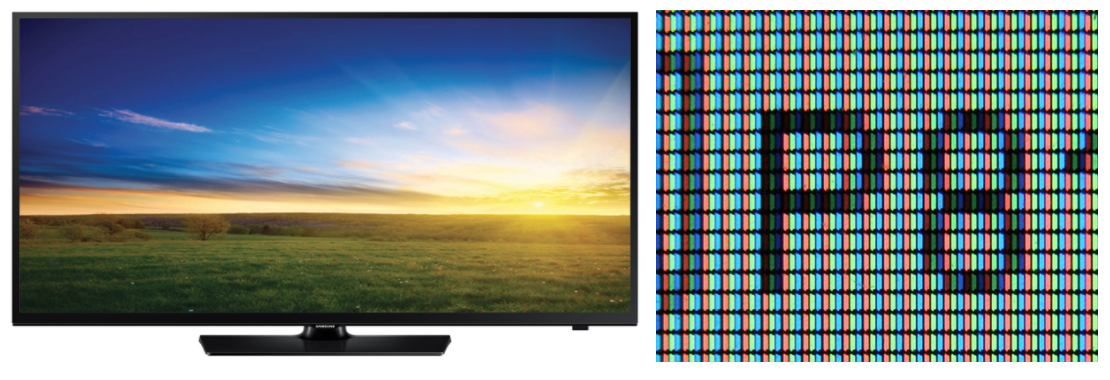
Our televisions and computer monitors also work in this way. Their screens are made up of even smaller pixels that can’t be seen unless you get really close. And even then it’s pretty hard to see them in the latest screens where the pixels are tiny and many. 4K Ultra High Definition TVs have a resolution of 3840 pixels × 2160 pixels, that’s 8,294,400 pixels and every one of them needs to be told what colour it should be, not just once, but every split second as the screen displays moving images.
Now we know a bit more about how it’s working, let’s extend things a bit. Let’s make a flashing heart. There are two heart icons that can be used together.
But ask the students, what other blocks have we added here?
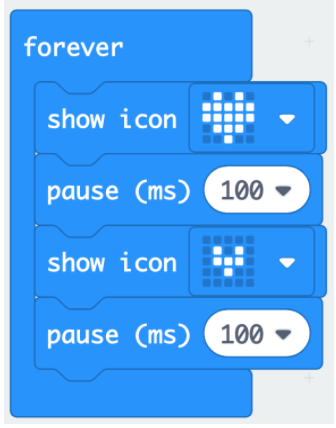
If they have used Scratch, they should recognise the Forever block as a loop that will infinitely repeat the commands inside it. They should also recognise the function of the pause blocks, what do you think the ‘(ms)’ means? ms is the number of milliseconds that you want to pause (100 milliseconds = 1/10 second, and 1000 milliseconds = 1 second).
Why do we need two of these blocks? Because it’s a loop and it runs from top to bottom then restarts, so we need a pause between the two icons twice. Ask them to experiment with the times in this loop to slow it down or speed up the flashing.
We can extend this sequence a bit further by using the ‘show LEDs’ block. This allows you to create any image you like by clicking the dots that represent the 25 LEDs, in this example we’ve added an empty heart shape.
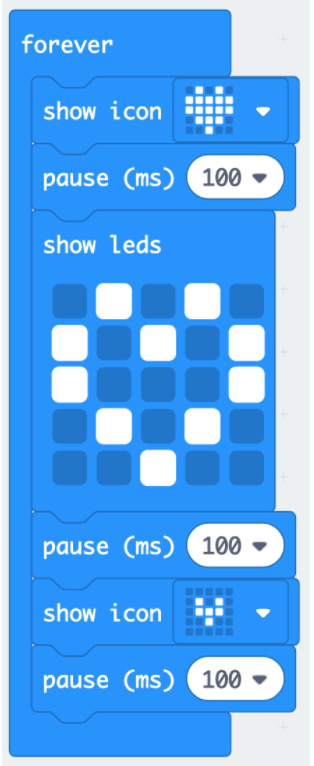
Ask the students to have a go at this, and perhaps also experiment with the order that the three images appear and the timing of switching between the images.
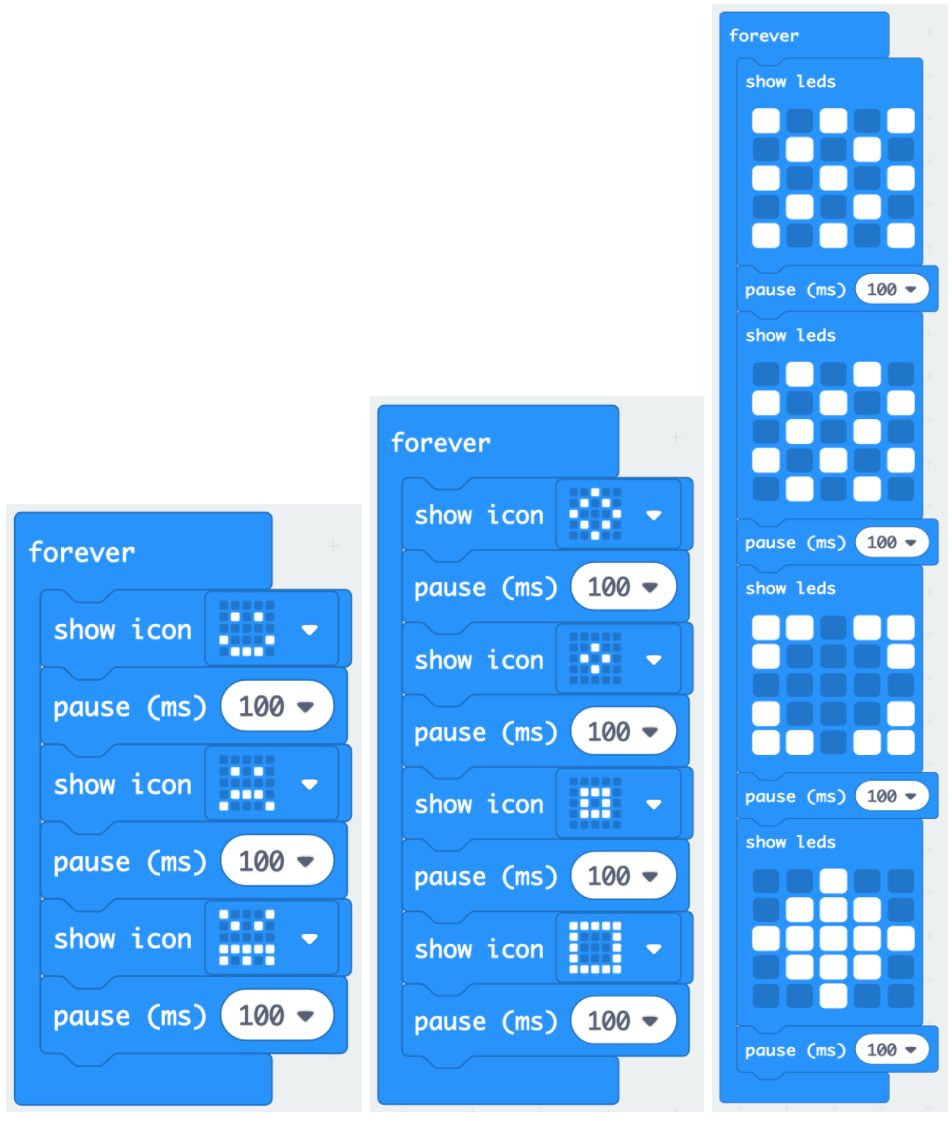
Then ask the students to create their own sequence of icons, either from the provided collection or by using the show LEDs block and creating their own patterns or images.
Here’s a few examples:
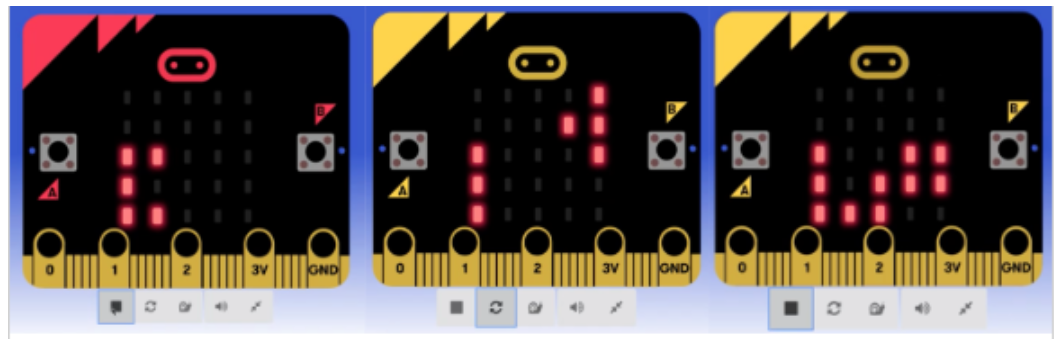
Finally, show the students this short animation, it’s based on the classic mobile phone game called Snake.
Ask - How do you think it was created? How is the ‘snake’ made to look like it’s moving?
Discuss how adding and removing LEDs in sequence can create the illusion of movement. There is only ever 5 LEDs lit up, so as they add a new one at the front they should remove one from the back.
Other classic video games work well for this too, here are animation examples for the games Pong and Tetris.
Pong
Tetris
Ask the students to have a go at creating their own animation based on one of these games or an idea of their own. For Snake, they can start anywhere on the grid but should begin with an empty screen, make the snake gradually appear, wiggle around the screen and then gradually disappear.
Plenary
Summarise the lesson and assess the children's understanding by asking:
- What do you now know about the micro:bit?
- How are pictures created on the micro:bit’s screen?
- Discuss with your partner what you have learned today.
Ask some students to share their thoughts.
Review the objectives and consider how successful they have been: