Is Seeing Believing?
Digital Literacy and Online Safety (Y4) - Lesson 6
A note about this lesson

This lesson is taken from Common Sense Education’s excellent Digital Citizenship curriculum. Their resources are shared for free under A Creative Commons Attribution- NonCommercial- NoDerivatives 4.0 International License.
You can find the original resources HERE.
Objectives
- Recognise that photos and videos can be altered digitally.
- Identify different reasons why someone might alter a photo or video.
- Analyze altered photos and videos to try to determine why.
Lesson Resources
- Is Seeing, Believing? - Lesson Slides
- Is Seeing, Believing? - Photo Fake, Example 1 Student Handout
- Is Seeing, Believing? - Photo Fake, Example 1 Student Handout (TEACHER VERSION)
- Is Seeing, Believing? - Photo Fake, Example 2 Student Handout
- Is Seeing, Believing? - Photo Fake, Example 2 Student Handout (TEACHER VERSION)
- Is Seeing, Believing? - Photo Fake, Example 3 Student Handout
- Is Seeing, Believing? - Photo Fake, Example 3 Student Handout (TEACHER VERSION)
- Is Seeing, Believing? - Photo Fake, Example 4 Student Handout
- Is Seeing, Believing? - Photo Fake, Example 4 Student Handout (TEACHER VERSION)
Lesson 1 - Your Rings of Responsibility
Lesson 2 - Password Power-Up
Lesson 3 - This Is Me
Lesson 4 - Our Digital Citizenship Pledge
Lesson 5 - The Power of Words
Lesson 6 - Is Seeing Believing?
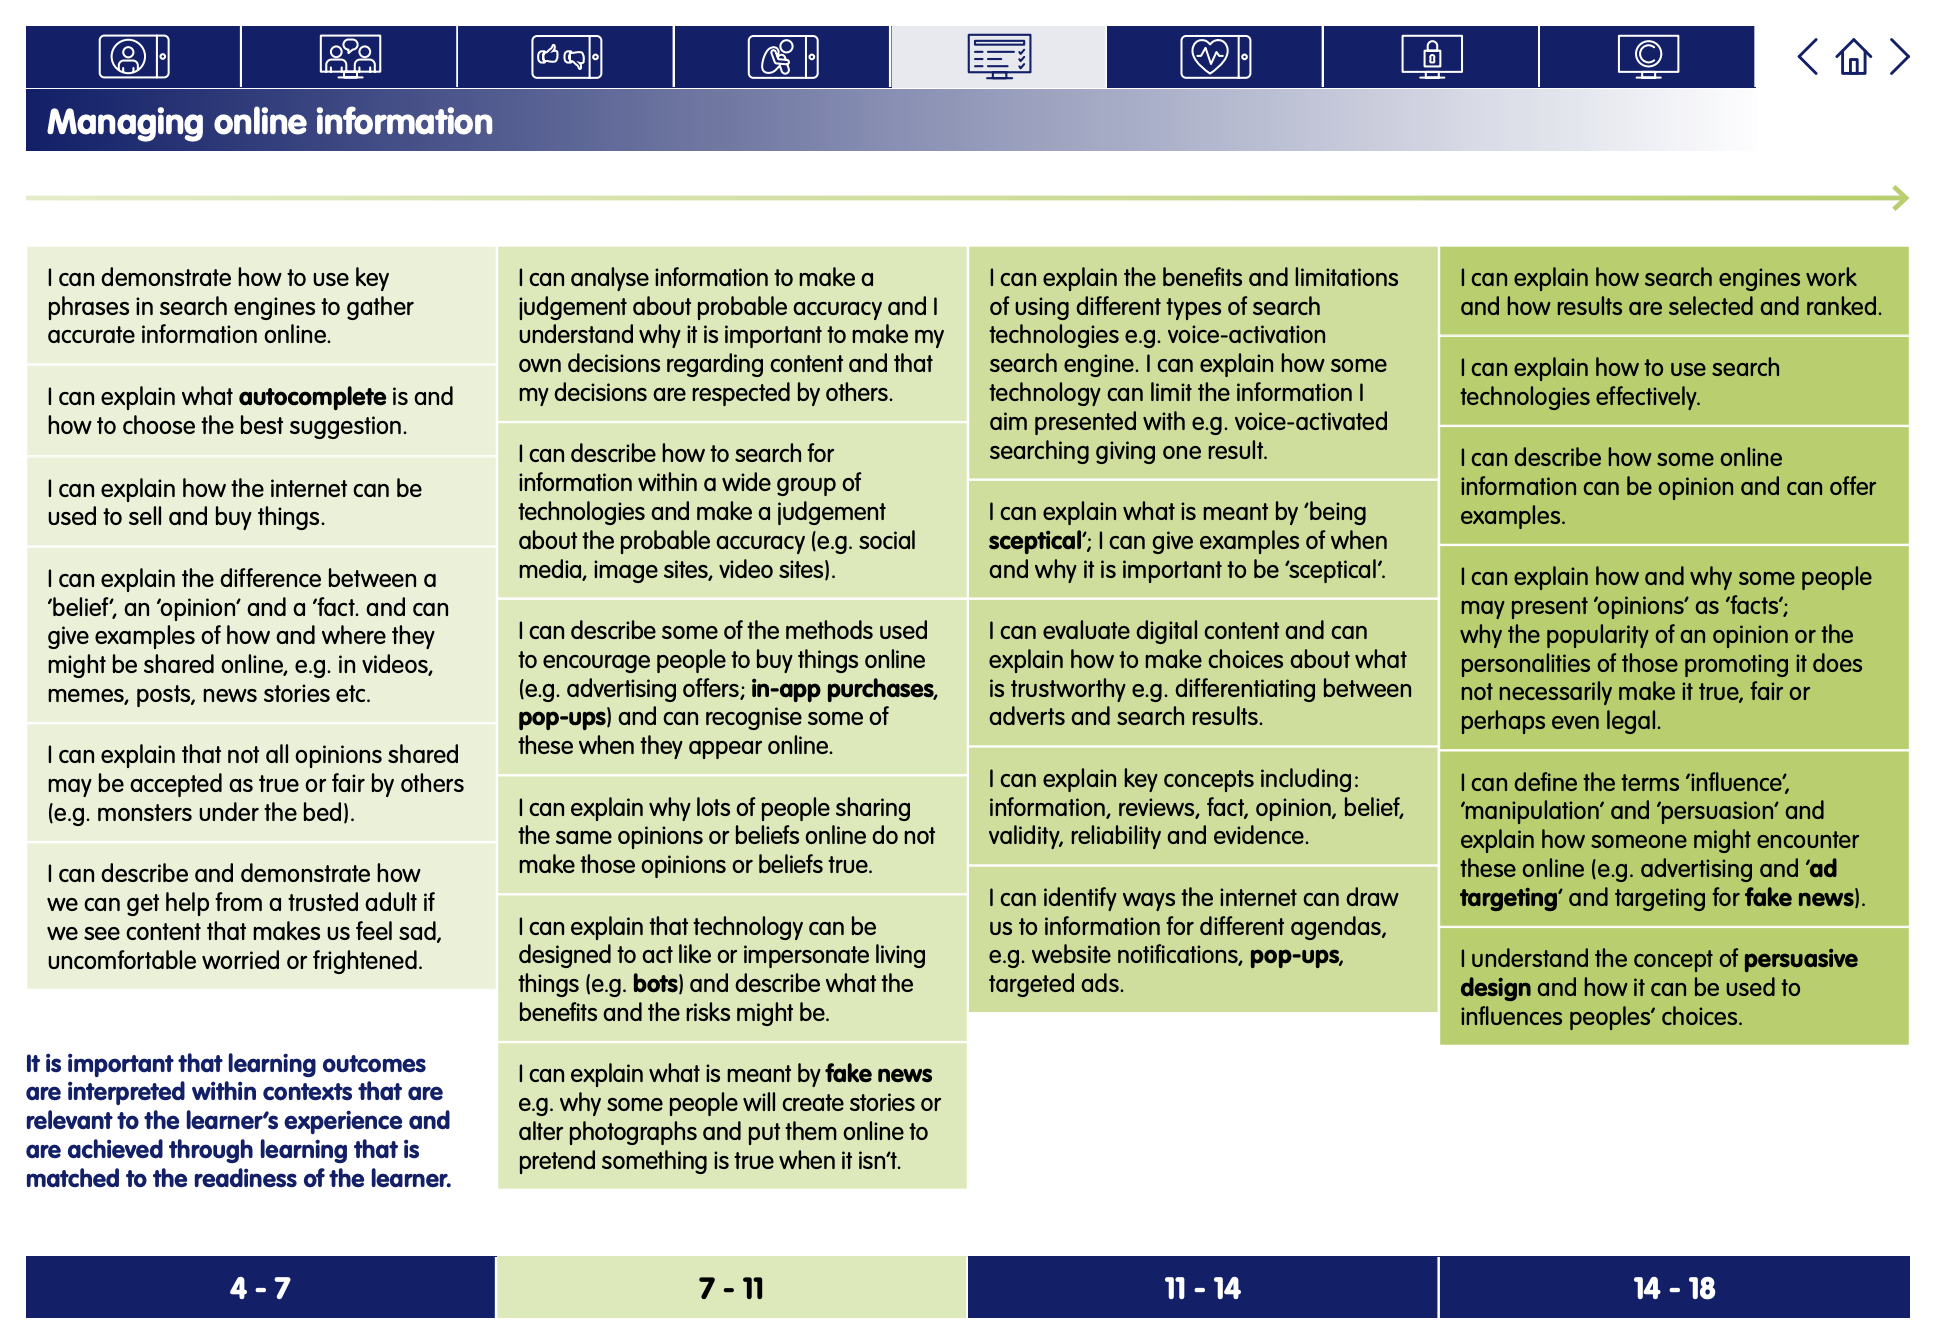
Links to Education for a Connected World.
This lesson from Common Sense Media's Digital Citizenship curriculum links to the following strands from the Managing online information section of the Education for a Connected World framework.
Introduction - Rainbow Lemons
The web is full of photos, and even videos, that are digitally altered. And it's often hard to tell the difference between what's real and what's fake. Help your students ask critical questions about why someone might alter a photo or video in the first place.
Project the colourful lemon image on Slide 4 and say: Imagine that someone posted this photo of a lemon online. Do you think the lemon is real or fake?
Hold a vote in your classroom on whether students think the photo is real or fake. Invite students from both sides (real and fake) to explain their reasoning.
Say: This photo was indeed altered on a computer. Alter means to change the way something looks, sometimes using a computer or other digital tools. Even if you added food colouring, a lemon wouldn't look like this. Another way to say this is that it was "digitally altered." (Slide 5)
Say: Why do you think this photo was altered this way? What was the person who altered it trying to accomplish? Take turns sharing your idea with your partner. (Slide 6)
Invite students to share their responses. Example responses might be to get your attention, to be creative, or to make you believe something that isn't true.
Say: There are many reasons why someone might alter a photo or video. Sometimes people alter photos just to be creative and to have fun. Other times, it's to make people believe something. This is called persuading. (Slide 7)
Show Slide 8 and say: One way to figure out why an alteration was made is to see how obvious the alteration is. Sometimes, when it's really obvious, the goal is to entertain or to be creative, like this tiger-parrot on the left. When it's not so obvious, sometimes the intention is more to persuade, like this image on the right. This isn't always the case, but it can be a clue.
Analyse - Photo Fakes
Project Slide 9 and ask: What was altered in these photos? Why do you think they were altered?
Invite students to answer. Follow up by explaining to students that image 1 is an example of photo retouching, which is when a photo is digitally altered to enhance the way someone or something looks.
Say: Photo retouching is often used in advertising, where photos of people are altered to make them look skinnier, have clearer skin, or look younger. Advertisements are messages or photos that are made to persuade someone to buy a certain product.
Consider following up by asking: Why would an advertiser make these types of alterations to an image?
Assemble students into groups of three to four and distribute different Photo Fake Examples handouts to each. It's OK for multiple groups to work on the same handouts. Read the directions from one of the handouts aloud. (Slide 10)
Explain to students that they'll have 15 minutes to work together, discuss the questions, and answer them. If students are using handouts and having trouble seeing the photos, you can use Slides 11-14 to project them.
Invite as many groups as time allows to share their answers and ideas with the class. Use the responses in the teacher versions to support students in identifying what the alterations were and why they might have been done.
Watch and Discuss - Unbelievable Videos
Note: This activity includes two (very short) YouTube videos. If your classroom's access to YouTube is restricted, consider downloading the videos beforehand so that you're able to show them easily during the lesson.
Ask: Now that we know that images can be digitally altered, have you ever seen a video that's been altered to seem like it's something that it's not?
Invite students to share responses.
Show students the short video: How to Change Your Shirt by Zach King on YouTube. This video is very short -- less than 10 seconds long. Be ready to pause and/or show the video multiple times to help students process what they're seeing. (Slide 15)
Ask: How was this video altered? Why do you think Zach King created this video? Take turns sharing your ideas with your partner.
Invite students to share their answers.
Show students another video by Zach King, How to Hitchhike. This video is also very short. Offer students multiple viewings to help them process what's happening. (Slide 16)
Ask: How was this video altered? Why do you think Zach King created this video? Take turns sharing your ideas with your partner. How could this potentially be dangerous to others?
Call on students to share their answers.
Plenary - Final Thoughts
Ask: We just saw lots of examples of photos and videos that were altered. And there were many different reasons for those alterations. What do you think about altering photos? Is it OK to do? Does it depend on the type of alteration? How so?
Take turns sharing your ideas with your partner.
Invite students to share their responses. Follow up by prompting them to include specific examples in their responses, including how obvious the alteration is and what the end goal of the person doing the alteration is.
Have students complete the Lesson Quiz. Send home the Family Activity and Family Tips.
Extension Activity:
Have students use Facetune or another airbrushing app to edit one of their selfies. Prompt them to reflect on what alterations they made and why.


