
Measure and Move
LEGO Robotics - Lesson 1
Objectives
- Understand and explain what a robot is and how they are used
- Design and write algorithms to control a robot
- Understand and change variables to change the movements of a robot
Lesson Resources
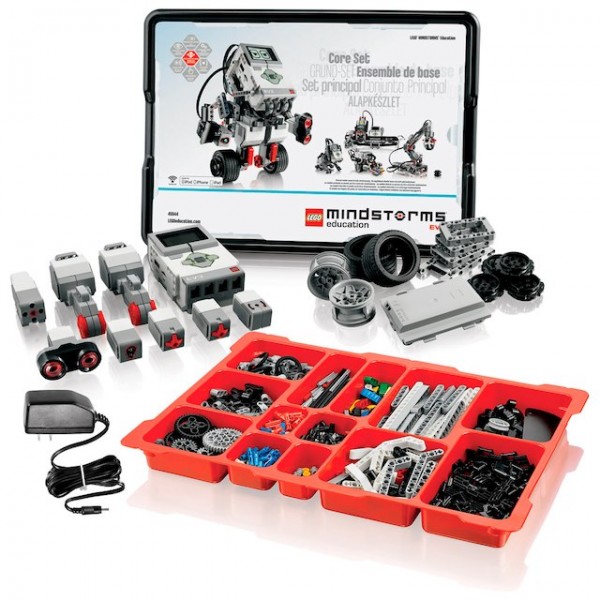
- 1 EV3 Education Core set or Spike Prime set per group of 3 children
- 1 computer, laptop or tablet with EV3 classroom or Spike Prime app installed per group
- 1 USB cable per group (not needed if you are using a Bluetooth connection)
- Metre sticks or measuring tapes (1 per group)
- Masking tape
- Lesson slides (EV3 version)
- Lesson slides (Spike Prime version)
- EV3 LEGO Education User Guide
- Spike Prime LEGO support page
Lesson 1 - Measure and move
Lesson 2 - Time to turn
Lesson 3 - Get in shape
Lesson 4 - Lifting and moving
Lesson 5 - Sensors
Lesson 6 - Sensors and Robot challenges
Introduction - Which LEGO kit?
There are a number of LEGO robotic kits available. Our plans are primarily written around the LEGO EV3 kit, but we have now also added teacher slides for the new LEGO Spike Prime kit. The lesson are broadly the same for both versions, but there are some small differences in the app and the code, so please choose the version that is correct for your equipment.
LEGO EV3
LEGO Spike Prime

Both the EV3 and Spike Prime robots can be programmed from either a computer or tablet. If your device is Bluetooth enabled, this is by far the easiest and best way to send code to your robot. Alternatively you can use the supplied USB cable if you do not have Bluetooth.
Both the EV3 classroom and Spike Prime apps are free to download HERE.
What is a robot?
Begin by asking the children what they already know about robots. What are robots? What separates a robot from other kinds of technology or normal computers?
Wikipedia defines a robot as:
“A robot is a machine—especially one programmable by a computer— capable of carrying out a complex series of actions automatically. Robots can be guided by an external control device or the control may be embedded within.”
They are machines that SENSE, THINK and ACT. They need a computer to let them do that and will always have one in or attached to the robot.
Where do we use robots? Why do we use them? (strength, precision of movements, repeated functions, dangerous situations) - they don’t get tired, bored, angry, frustrated, so in some ways can be better than humans at many things.
If you have time, take a look at some of the video examples of incredible robots in the teacher slides. They show how important robots are in a car factory, a robot vacuum cleaner, some of the amazing and eerie creations from Boston Dynamics, and a link to SMD’s website, a Newcastle based underwater robotics company. Tharsus are also based in Blyth and design and build a wide variety of custom made robots to perform many different tasks for different customers.
They developed these incredible robots for online grocery store Ocado, the video is a staggering demonstration of many robots working together for amazing efficiency:
Meet your robot
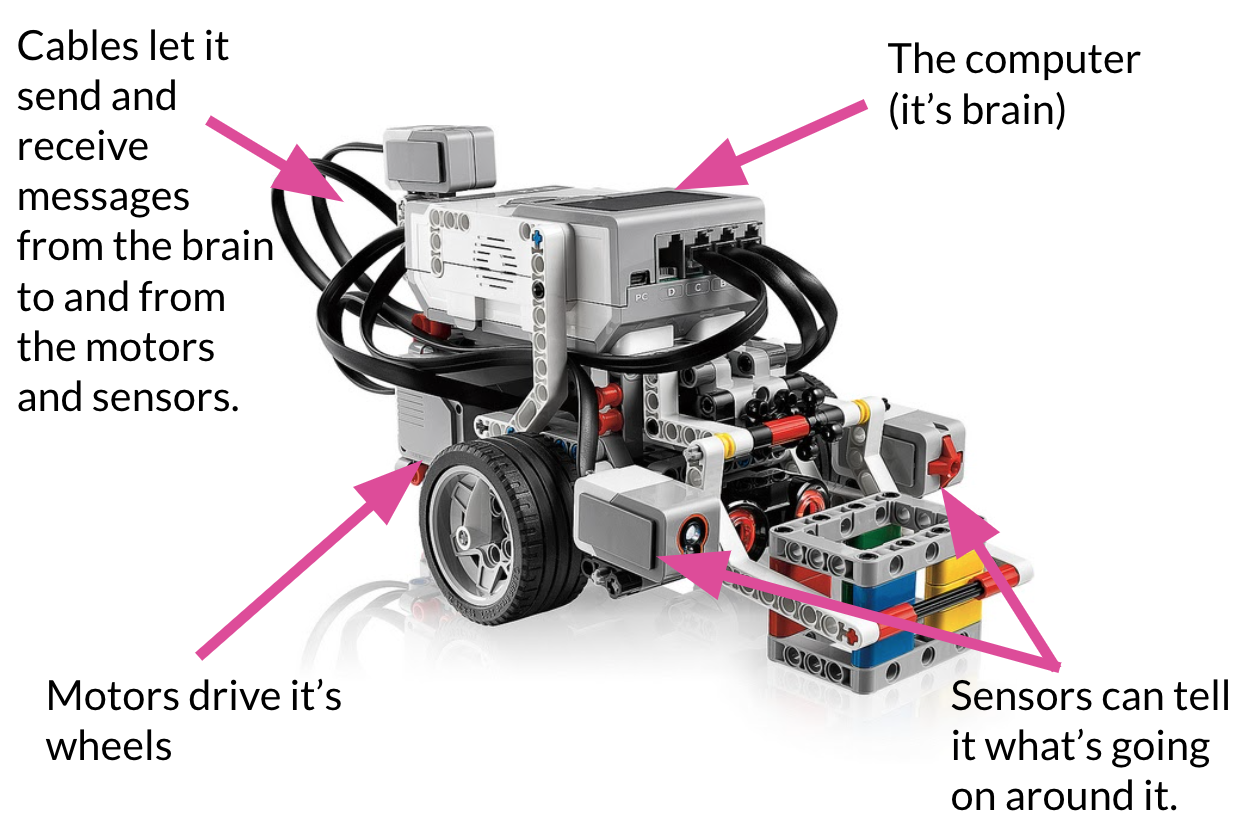
Next, introduce them to the robot and in particular the EV3 brick; it’s ‘brain’. Briefly discuss what it does and the key buttons on the front, as well as how to connect the USB cable (if you are not using Bluetooth) and the motor cables. You may wish to touch upon INPUTS and OUTPUTS in reference to these cables, although we will go into this in more detail in lesson 3.
EV3
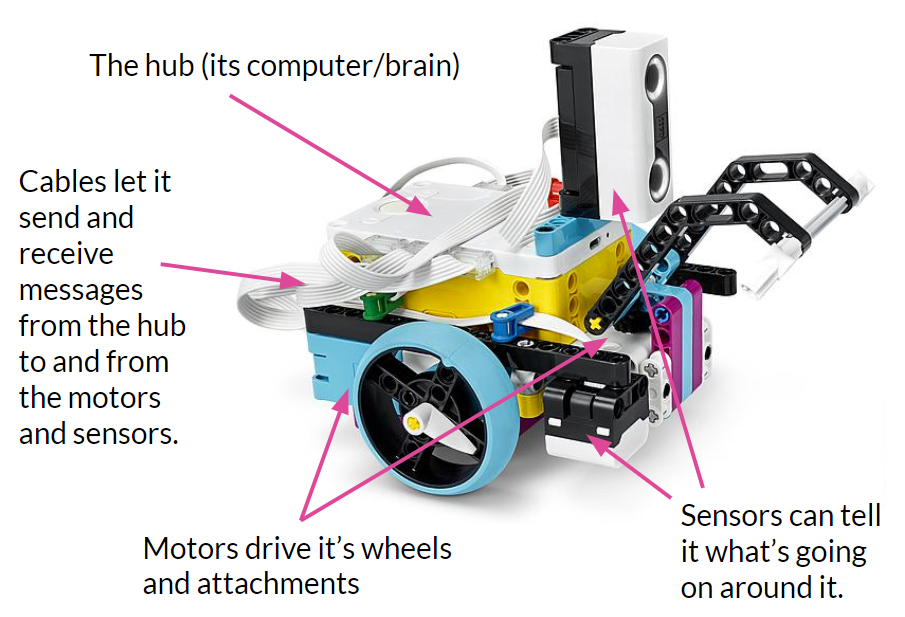
Spike Prime
Connecting your robot
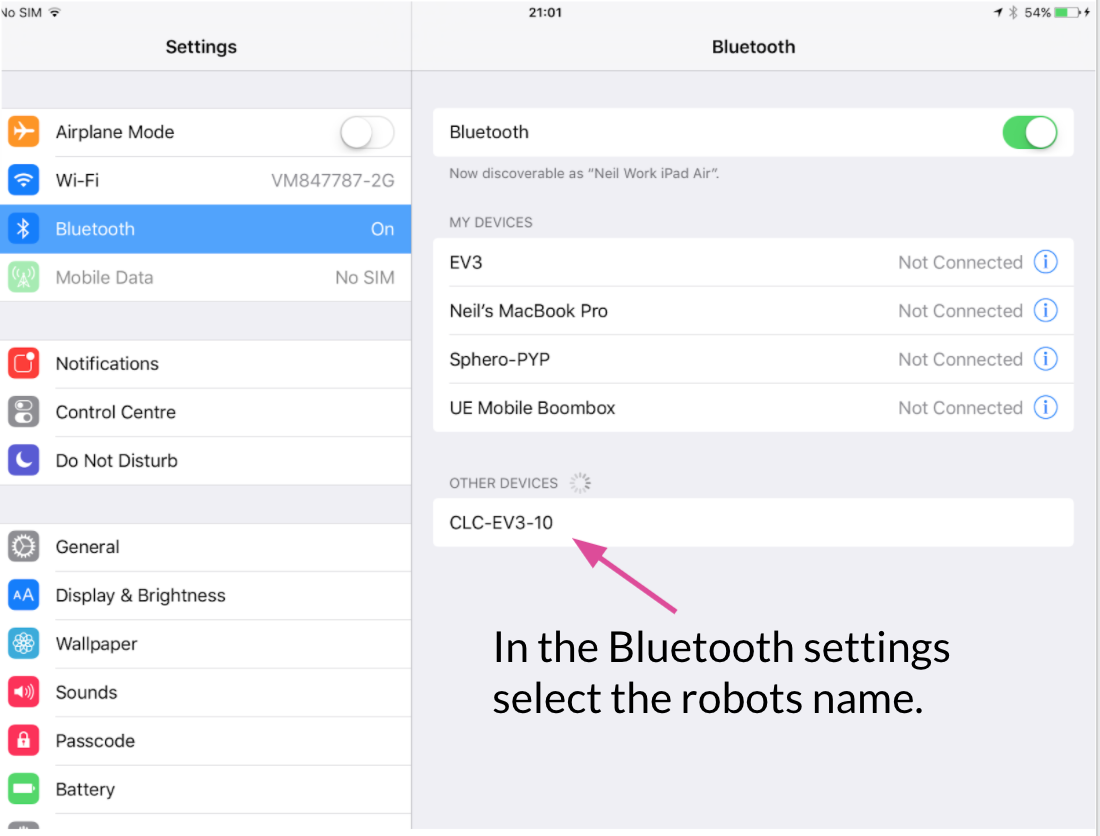
Your robot can be programmed with a computer or tablet. The EV3 Classroom and Spike Prime software is available for a wide range of devices. The robot can be connected to a PC or Mac via a USB cable or Bluetooth and connected to tablets via Bluetooth only. Bluetooth is by far the best option if possible as it allows wireless connection to the robot and save a lot of time and effort plugging in and then unplugging the robot every time you want to download code.
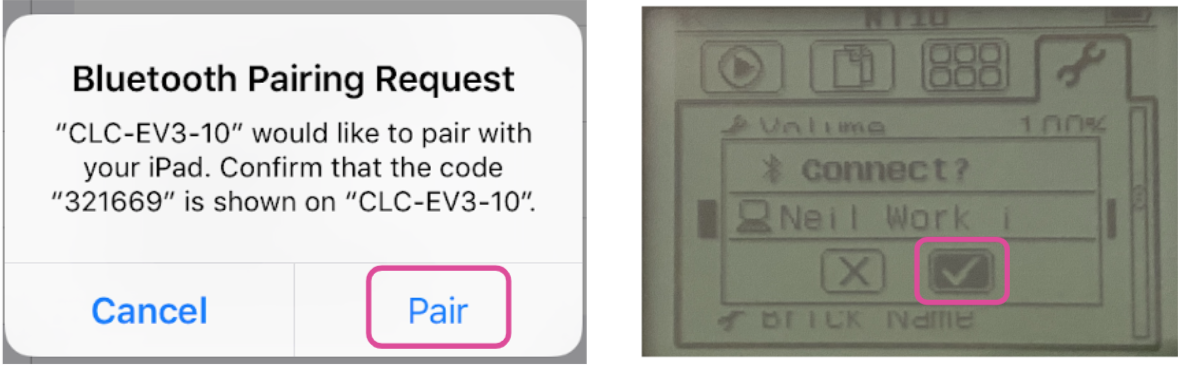
The robot can usually be connected from your device's Bluetooth settings (an iPad in this example), by selecting the robot's name in the device list:
Then approve the pairing request on your device and also on the robot's screen by using the brick's buttons:
Make a move

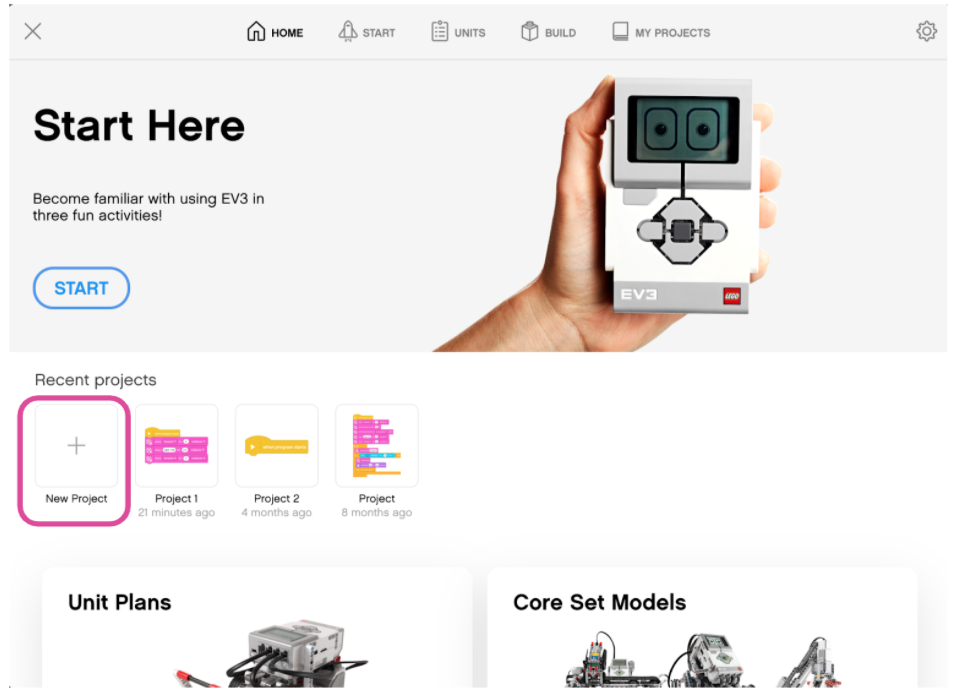
Ask each group to open the EV3 Classroom app, start a new program.
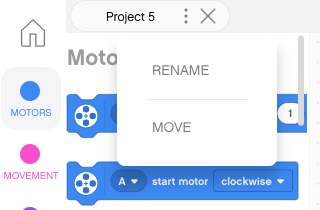
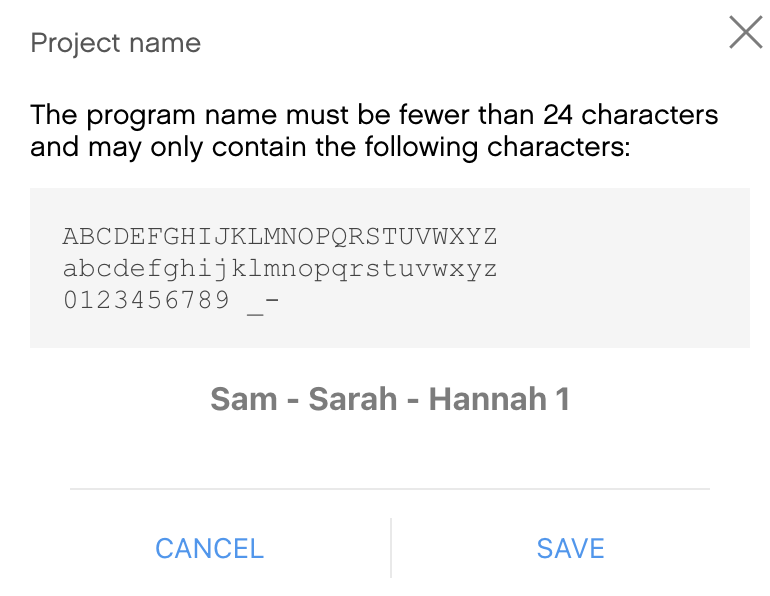
They should then name their project with their team name or individual names. You can edit the program name from the three dots next to the default numbered project name in the top left of the screen:
Explain that EV3 Classroom is built on the framework for Scratch, and so looks very similar, but as we are controlling a robot instead of a sprite on the screen, all the blocks are quite different. If they are familiar with Scratch though, there's plenty of common elements that will help them pick things up quickly.
All the programming blocks are found on the left of the screen. You can scroll through all the blocks or use the coloured categories to jump to each section.
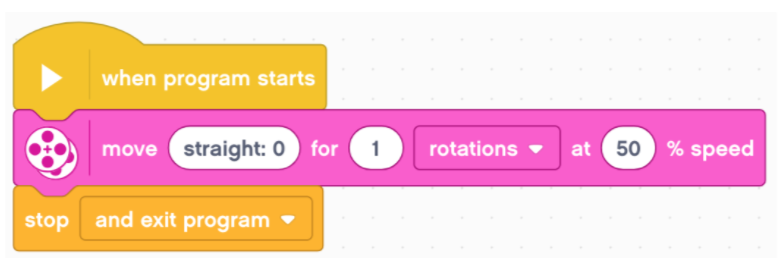
Ask them to build this simple code, it's the key to everything we can do to make our robot move:
Downloading code

Show them the download options and discuss which might be best to use. Download and wait (the downward arrow) lets you activate the program from the robot when you are ready, so can sometimes be better to use as you can ensure the robot is in a safe place before it starts moving, download and run (the play icon) is quicker to use if you’re happy the robot is in a safe place and ready to move..
Ask the children to download the instructions to the robot without changing anything. Run the code. Ask the class what does it do? Why does it do that?
Collect descriptions of its movement from the children. Discuss the short movement and why this happened (note - if the children’s robot does not move, check all the cables are firmly inserted on the robot, you hear a 'click' when they are fully in).
Movement variables
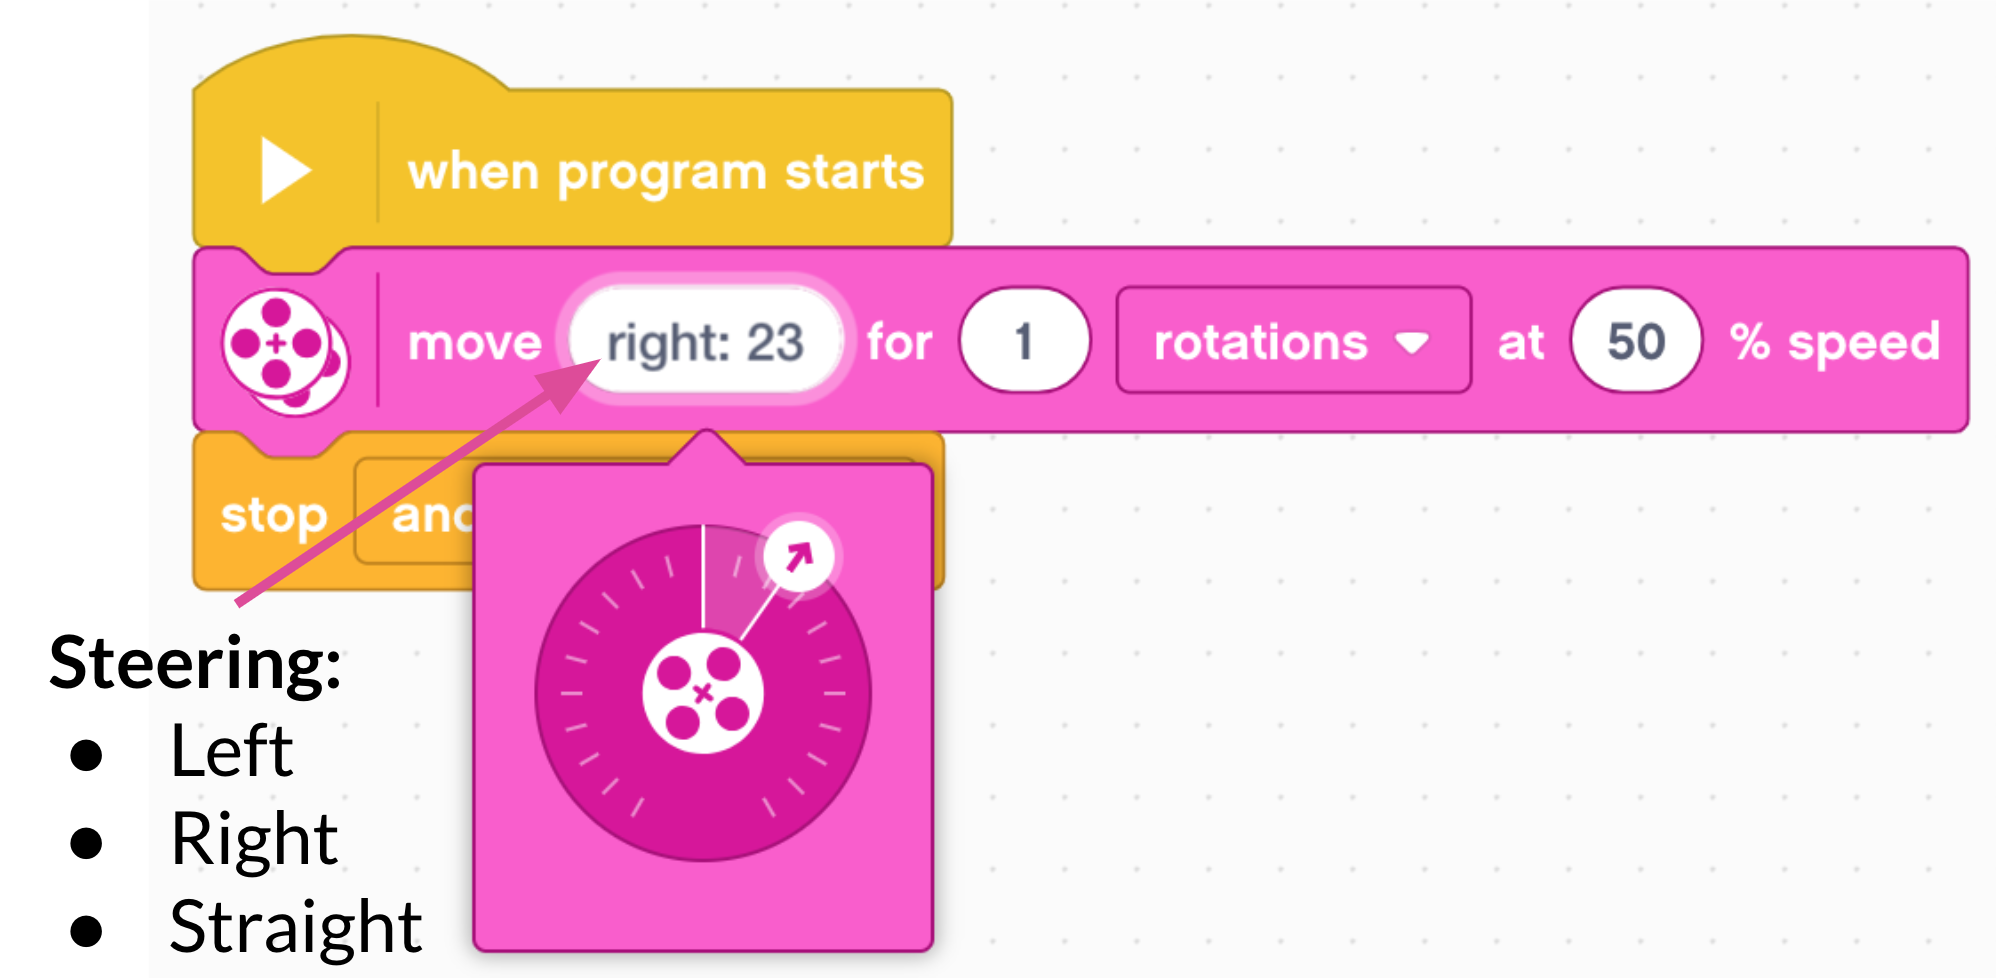
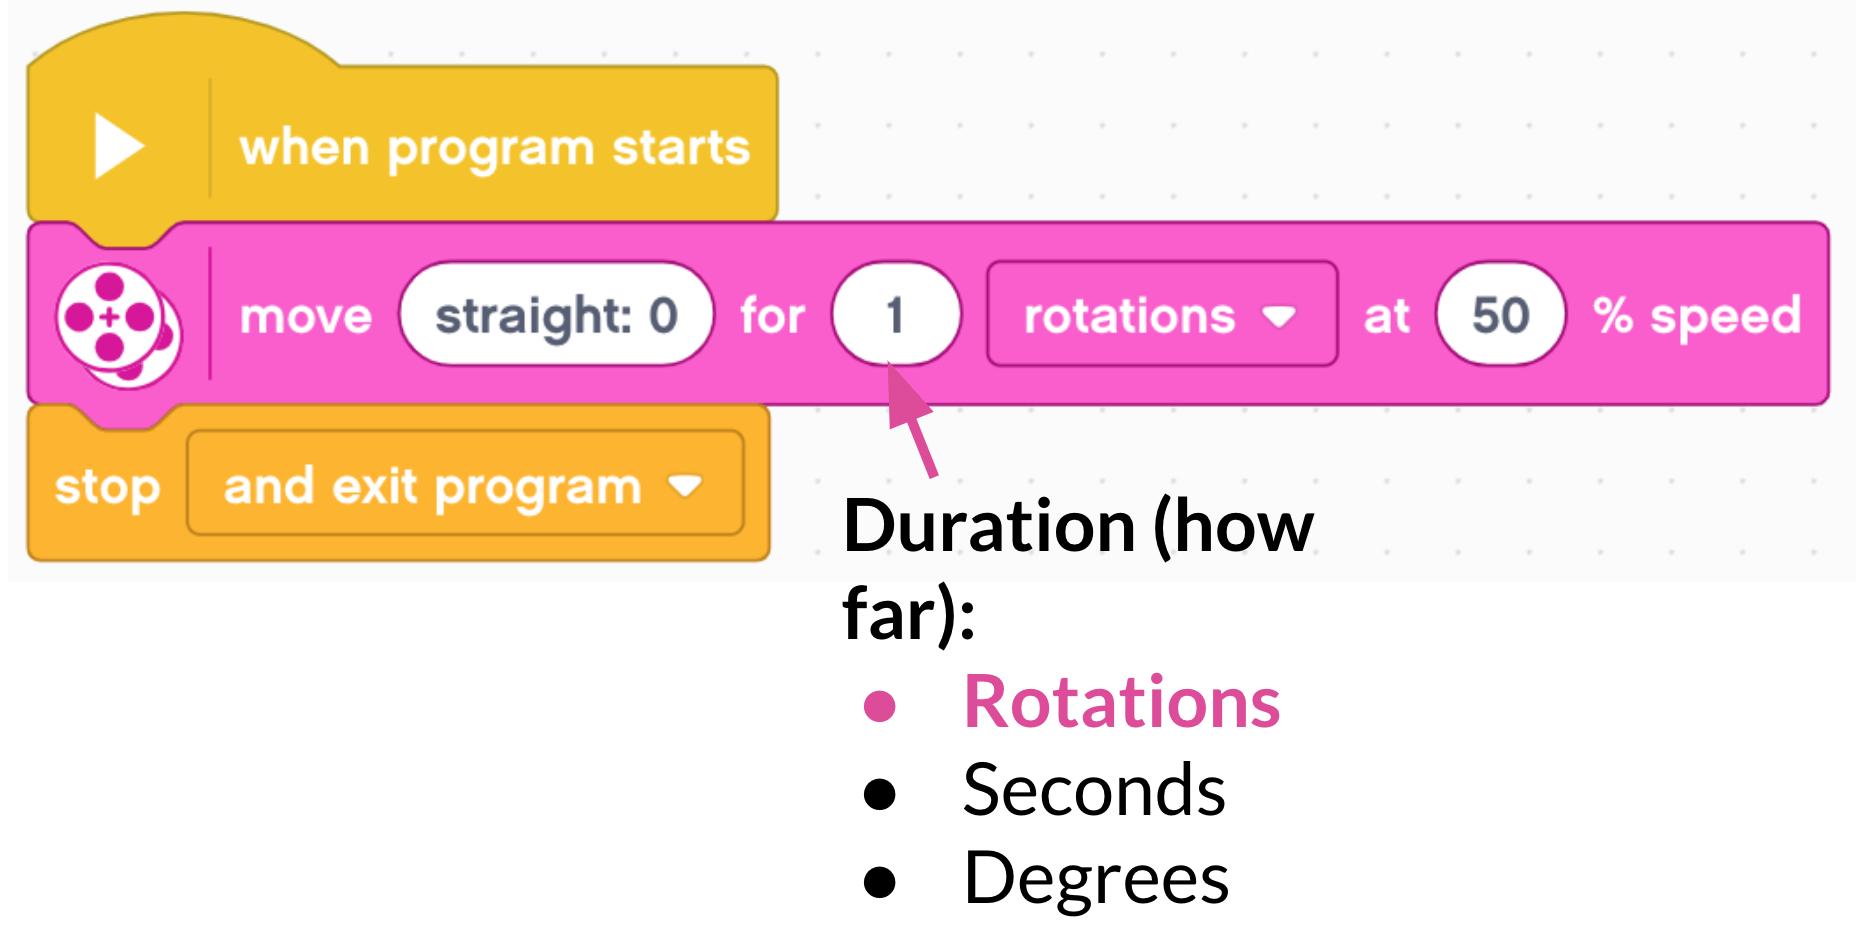
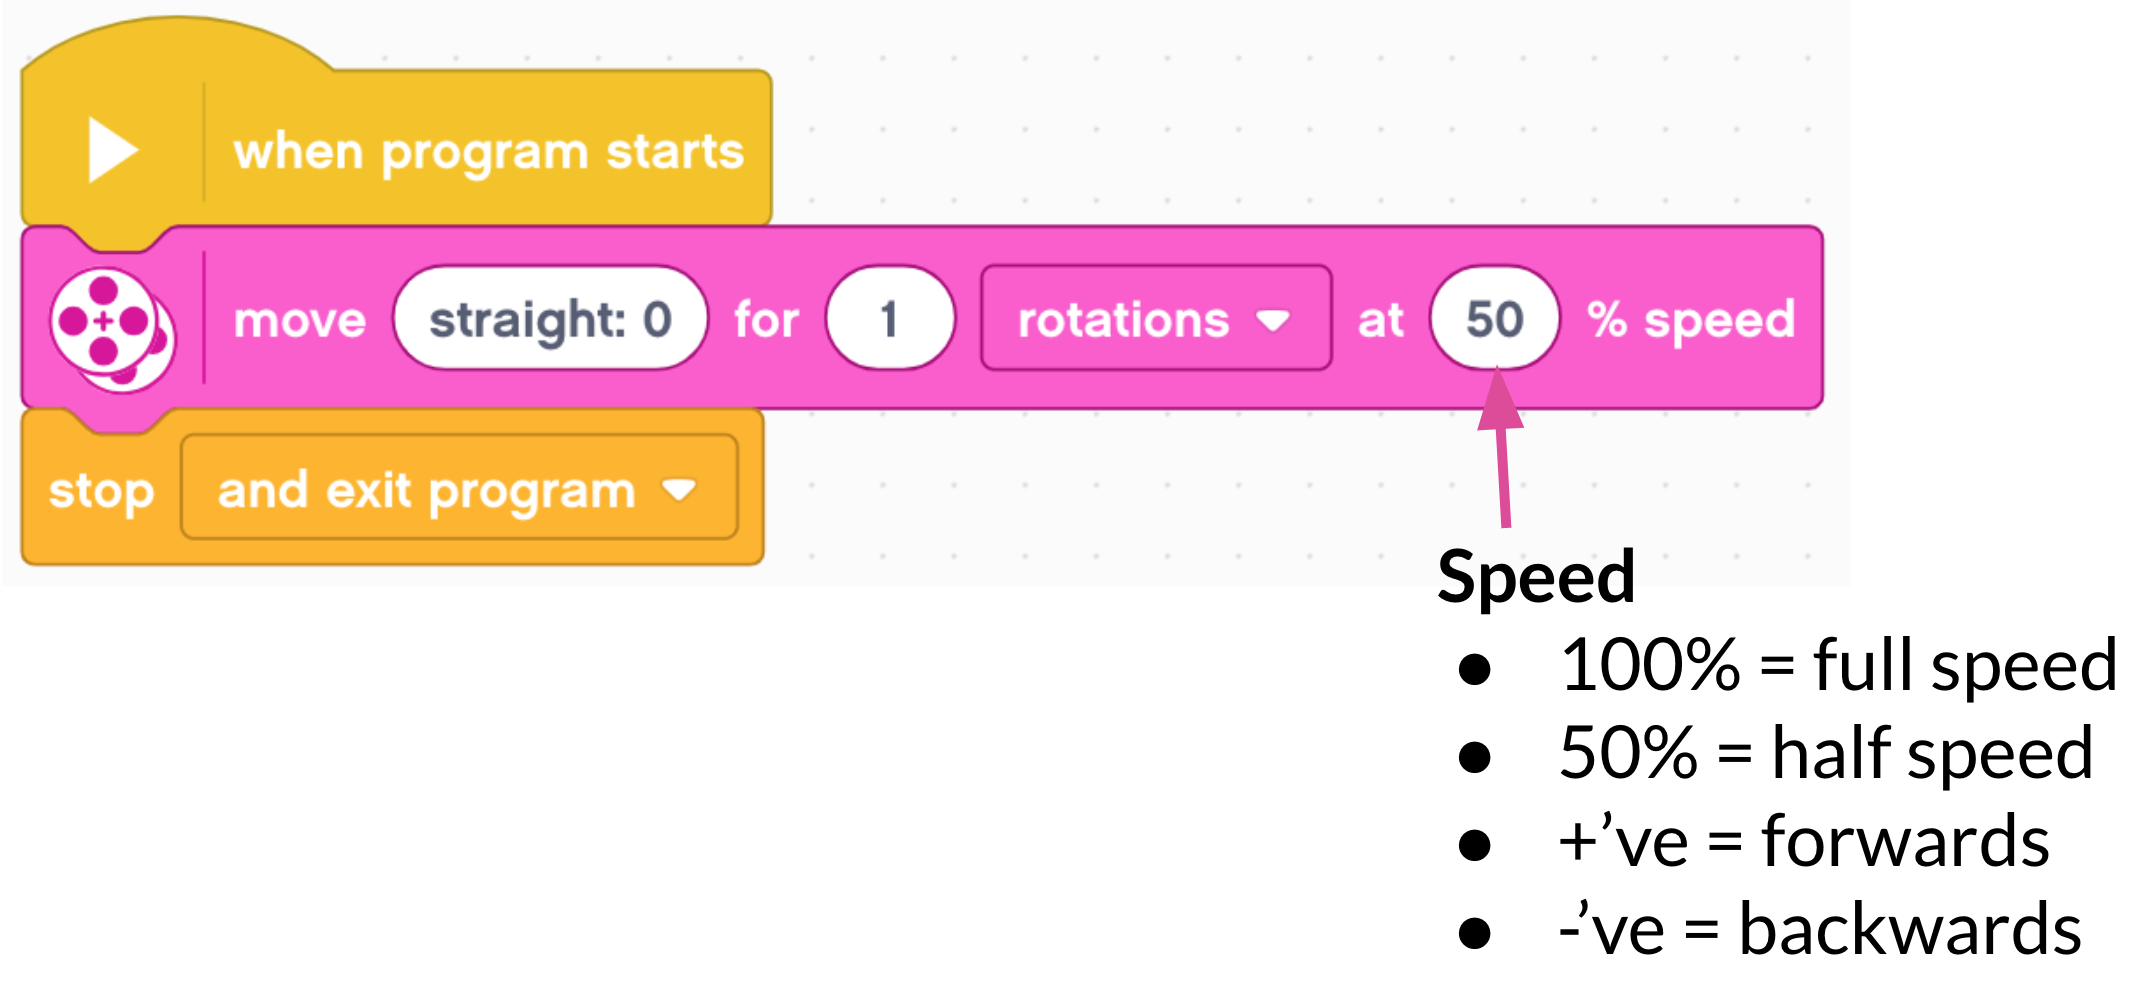
Look at the variables (properties) on the motor block we added, go through what each part does:
Steering
The first variable you can change lets you steer the robot. A value of 0 will go straight, positive numbers will steer right and negative numbers will steer left. The more you move the slider clockwise or anticlockwise, the tighter the turn. A good analogy to use when explaining this is the handlebars on a bike, the more you turn them, the tighter the turn you will do.
Duration
The third setting lets you specify how many rotations of the wheels you want your robot to complete. In other words, how far it will travel. This 'duration' can also be measured in other ways which we will look at later, but for now, stick to rotations.
Power/speed
The second option is the power delivered to the motors, and therefore, how fast it goes. A positive number will make it move forwards, a negative number will make it move backwards.
Experiment with variables
Give the children time to experiment with their robot using just these blocks, but by changing the properties on the block. Suggest just changing one thing at a time to see what difference it makes but to try some of the following:
- Moving forwards (positive number for power)
- Moving backwards (negative number for power)
- Steering left and right
- what happens if you move the slider different distances along?
- what happens when the slider is right at either end?
- Moving fast
- Moving slow
- what is the lowest amount of power that will still make the robot move?
- is it/would it be the same on different surfaces? (science friction links)
- Moving with the different numbers of rotations
- How far does two rotations go?
- How far does twenty rotations go?
Precision movements
The best way to get better at programming your robot is to avoid guess work where possible and instead use maths to make the movements calculated and precise. Ask the students to reset any changes they made in the pink movement block and put it back to straight steering, 1 rotation, 50% speed.
Emphasise that they should not change any of the settings in the block.
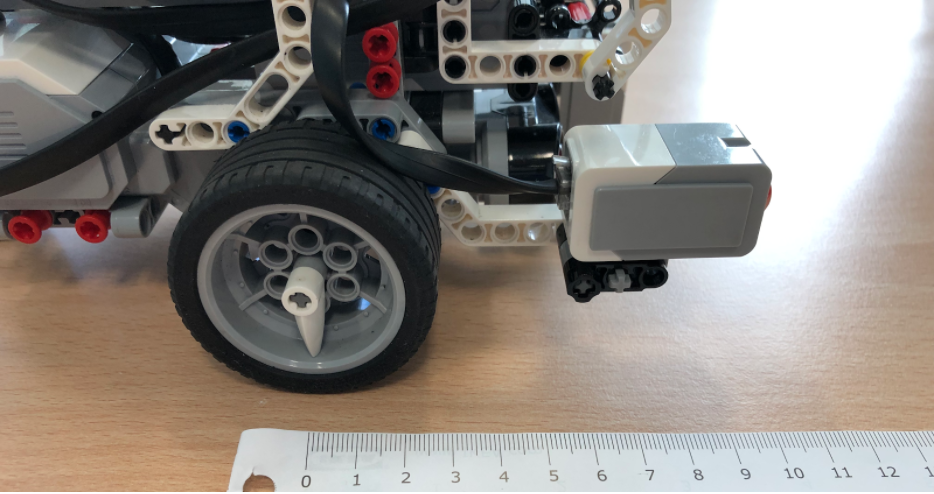
Using a measuring tape or metre stick, ask them to carefully place the centre of the robot’s tires at 0cm (use the wheel markers to help with this).
 .
.
Run the code in the block so that the robot moves forwards in a straight line for one rotation of the wheels. Ask the class to measure as accurately as possible; how many centimetres does it travel? Make sure they measure from the centre of the wheel when it stops. Do it a few times to make sure they are happy with their measurement.
Depending on the surface, it should move approx 17.4cm (the exact circumference of the wheel is 17.6, although friction between the floor and the wheel often reduces this slightly). This is really useful information!
Now we know exactly how far one rotation will take us, ask, so how far will two rotations move the robot? (34.8cm). What effect might the floor surface have on the accuracy of this?
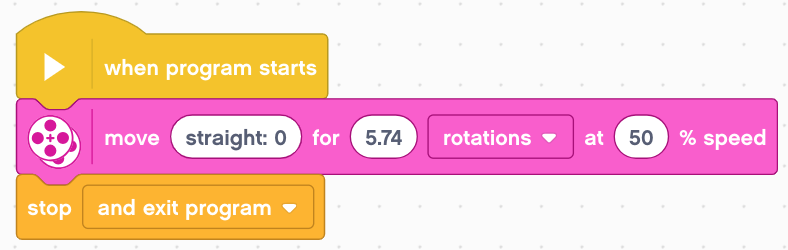
How many rotations would be needed to travel exactly one metre? How could we solve this problem? Establish that we need to divide 100cm by 17.4cm* to get the answer (*you may need to adjust 17.4 depending on the floor surface you are working on for perfection, but it somewhere in the range of 17.2 - 17.6 usually works well, and 17.4 usually gets good results).
You’ll need a calculators at this point! Make sure each group has their own calculator or app (Google also has one built in if your search 'calculator') The answer is 5.74 rotations of the wheel to travel 100cm. Ask them to test this out.
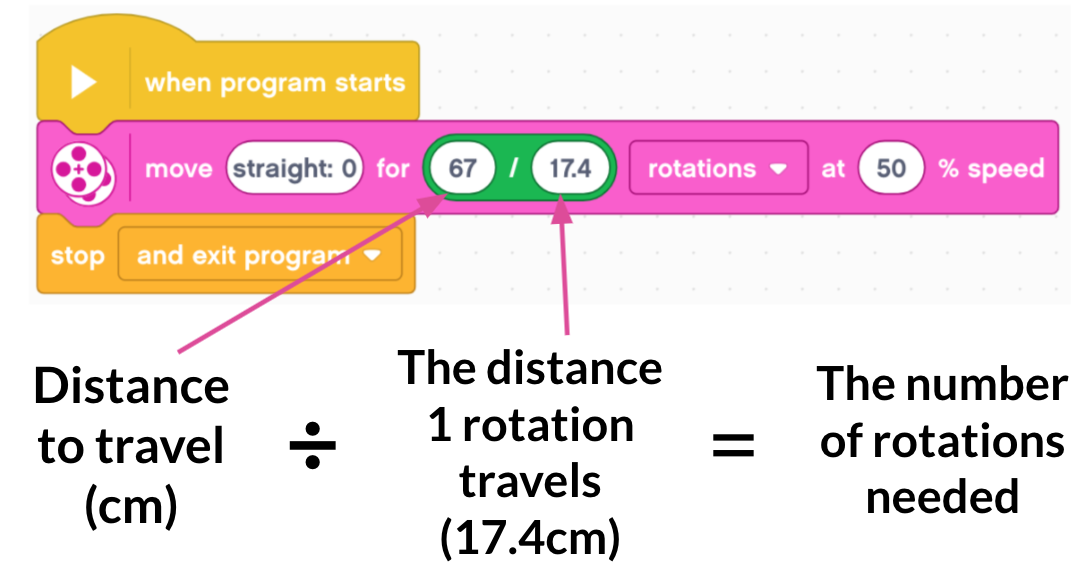
Put a random length of masking tape down on the floor. Ask the class, but what if I want my robot to travel this far? (the length of the tape). Establish that we need to measure the tape and then divide the distance by 17.4* (the distance one rotation travels). Ask them to do this for you and for one group to test it out on the tape you have put down.
We can speed up this process even further by including the calculation in our code so we never actually have to work it out.
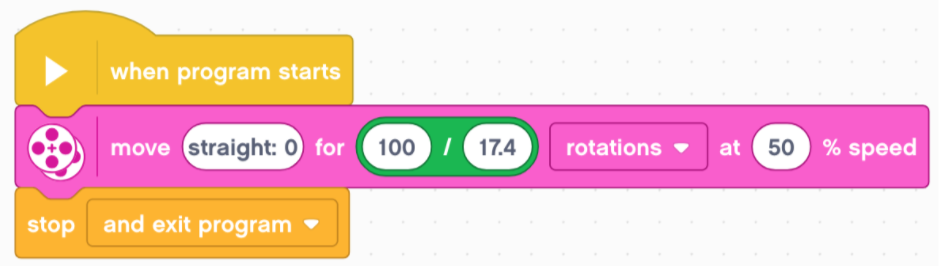
The green operator block divides 100 by 17.4 and the answer to that calculation is used for the number of rotations, even though it is not shown on the screen.
They should now be able to accurately travel any distance in a straight line. Put down a selection of strips of masking tape/paper down on the floor. Try and make them all different lengths (including some 1m+) but don’t worry about measuring them.
The students must program their robot to travel exactly the length of each piece of tape. Encourage them to use the operator block to make the process more efficient, but emphasise the process of what each number they are using means.
The process for them to follow is:
- Measure the line.
- Insert the length of the tape (in cm) into the first part of operator block
- Run the code!
Plenary
Finish the lesson by asking them to share what they have found out today. Did anyone experience their robot veering off to the side when it was programmed to move in a straight line? Why might this happen?
There are a number of factors that can stop your robot moving as straight as you might want it to. Here’s some examples of things that can cause it to move off course:
- Robot not straight at the start
- Wheels not aligned at the start - the wheels have independent motors that if not lined up can cause a jerk to one side when they start to move.
- Cables snagging wheels
- Unbalanced robot
- heavier attachments on one side
- EV3 brick not central
- LEGO pieces catching on the tires
- Tires not on wheel straight
- Bent axles
- Driving on an uneven surface
- Battery low
Explain that the next lesson will introduce turning, but they will still need to remember the process of calculating rotations for a distance, as they used today.