
More inputs and outputs
Getting started with the BBC micro:bit - Lesson 3
Objectives
- To understand inputs and outputs on a computer
- Design algorithms that use variables, and selection and arithmetic operators
- Use logical reasoning to predict the behaviour of programs. Detects and corrects simple semantic errors i.e. debugging, in programs.
Lesson Resources
- Lesson Slides
- micro:bits and USB cables (approximately 1 between 2 students)
- micro:bit battery packs
- Ice cubes or ice packs (optional)
- Small sealable containers, e.g. takeaway box size (optional)
Lesson 1 - Getting started and the LED Grid
Lesson 2 - Inputs and outputs
Lesson 3 - More inputs and outputs
Lesson 4 - ‘Beat the buzzer’ – Pin inputs and outputs
Lesson 5 - Using conditions and random numbers
Lesson 6 - Variables: Building a scorekeeper
Introduction
Recap the last lesson, what is an input? Can you give an example of input devices that are commonly used with computers? Keyboard, mouse, camera, touchscreen in some cases, microphone, scanners. What outputs does a normal computer have? Graphics via the screen, sound via speakers, printer.
What inputs might a games console have? Controller buttons and joysticks, motion sensors, keyboard. The outputs are very similar to a PC.
In our last lesson we looked at some of the micro:bit’s inputs and how these can be used to trigger outputs. Ask the class - Can you remember some of the micro:bit’s inputs that you found and tested?
Recap the button and motion based inputs that the micro:bit has:

Other inputs - Temperature
In this lesson we’re going to look at two other inputs that the micro:bit has that cleverly make use of different parts of the device.
The first is a temperature sensor, which actually uses the micro:bit’s processor rather than a dedicated component. Take a look at this video from Microsoft Makecode which explains some of the science behind how it works.
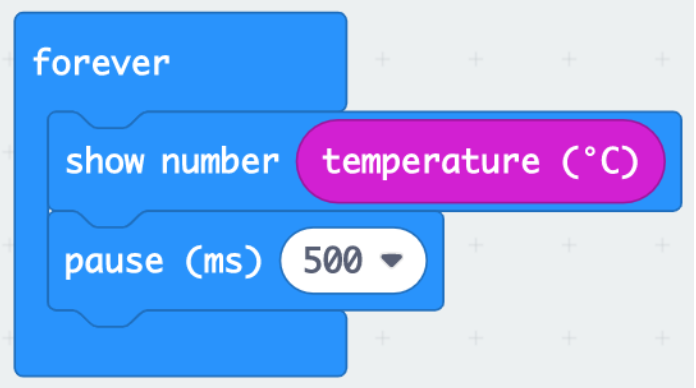
As the video suggests, start by writing this simple code that will report the temperature on the LED display.
What applications could this be useful for? Why might we want to know if things are getting warmer or colder? It could be a monitor/alarm to make sure a pet is not suffering in too much heat, that a plant has the right temperature for it to be healthy, or perhaps to ensure food is being kept fresh in a cool environment.
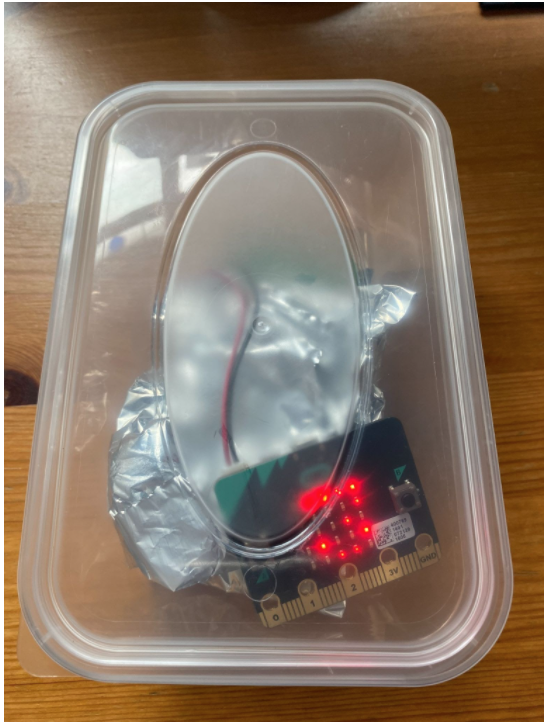
Get the children to download the code to their micro:bits and try it out by affecting the temperature of the processor. They can do this by holding their finger on it, breathing or blowing on it, holding it next to a source of heat or cool air. You can try a fan, some wrapped up ice or an ice pack (be careful not to get any liquid on the micro:bit though!) Or take the micro:bit outside using the battery packs to power them.
Here, we’ve wrapped some ice cubes in foil and put them and the micro:bit in a takeaway box to try and keep the cool air in and bring the temperature sensor reading down (it was reading 13℃ at this point).
Temperature challenge
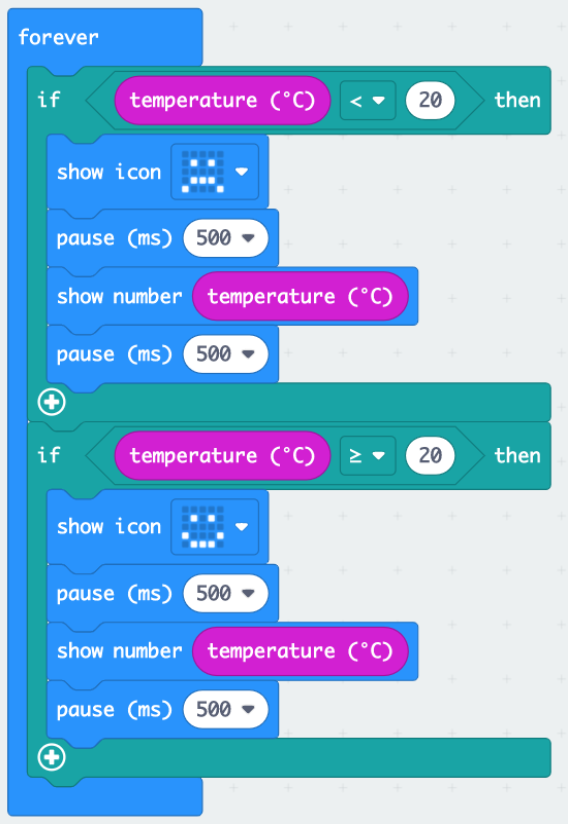
How could we design a program that displays a happy face when the temperature is at a comfortable temperature (usually around 20℃) but a sad face if the temperature drops below that?
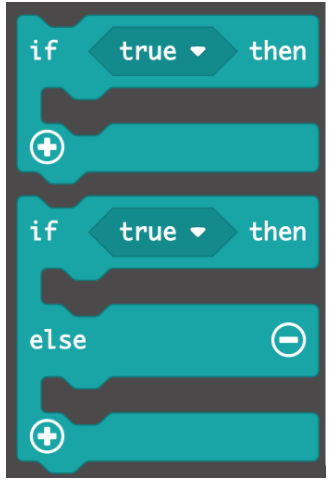
Some students might be able to have a go at this straight away, others might need some hints depending on their experience with coding, and in particular a common feature used in Scratch called conditions. Some of the later lessons in this unit explore this in more detail, but a condition is a rule for when something happens. It's likely that the students will have used ‘If, then’ or ‘If, then else’ blocks in Scratch projects to dictate when things happen in a project:

These same blocks are available in the Makecode editor, in the Logic section:
Ask the students to try and complete the challenge making use of these blocks.
Solutions could look like this, which uses two ‘If then’ blocks:
Or this more straightforward solution which makes use of an “if, then, else’ block to decide which image is shown and when.
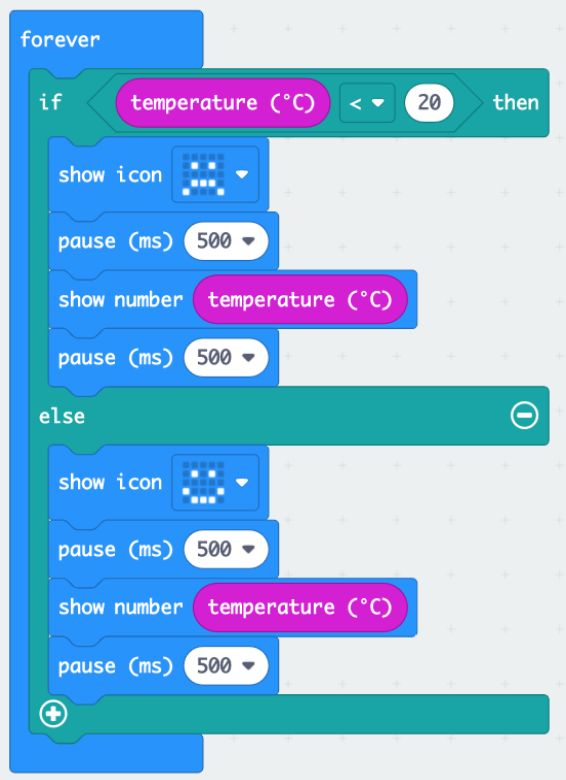
Both solutions also report the actual temperature for ease of use.
Other inputs - Light
The micro:bit is also capable of sensing light through its LEDs. A bit like the processor being used as a temperature sensor, this is not a standard and dedicated light sensor, but it's a clever solution that works well. Take a look at this video from Microsoft Makecode to find out more about the science behind it and how light sensors work.
As the video suggests, build the code that plots a bar graph based on light levels and download this to your micro:bit to test it out.
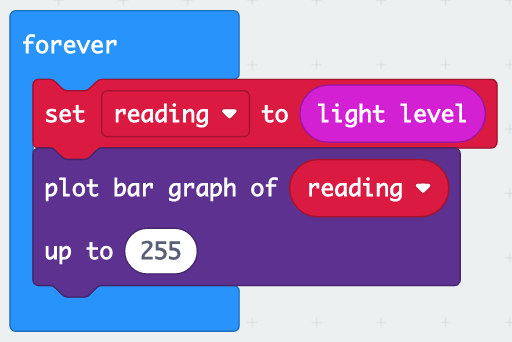
Tip - Keep the micro:bit really still when trying to take a light reading so it has chance to register to light levels
You can obviously adjust the light levels by covering the LEDs with your hand or holding the LEDs up to a light. You will need a bright source of light such as close proximity to a lamp or torch to hit the highest light level readings.
Ask the students, where and when might it be useful to measure levels of light?
Photographers do this to decide where to take the best pictures, automatic lights such as the night light described in the video, or security lights on buildings also use light sensors, and horticulturists could also use them to decide where best to place plants that require different levels of light.
Light level challenge
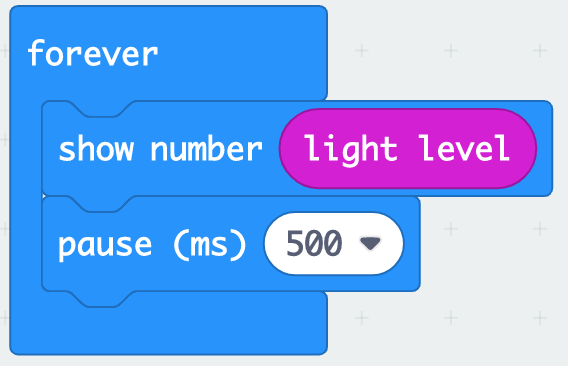
Can the students adjust their code so that the light level is displayed as a number value instead of a barchart?
Here’s a solution to that:
Ask them to find out - What are the darkest and lightest parts of the room when not covering the micro:bit’s LEDs? (you’ll need to use the battery packs to move your micro:bits around the room) What is the light reading (as a number) in those locations?
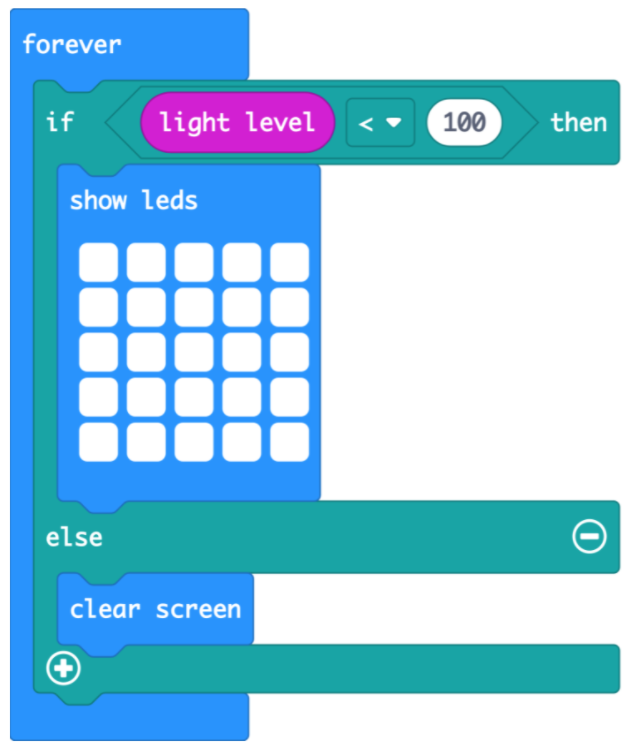
Next can they make a simple night light where all the LEDs light up when it gets dark?
This code will achieve that:
Finally, you can us the light sensor capabilities to adjust the brightness of the LEDs, so they get brighter as it gets darker and dim as it gets lighter (you’ll need a good strong source of light on the LEDs to see them really dimming.) Try this code out:
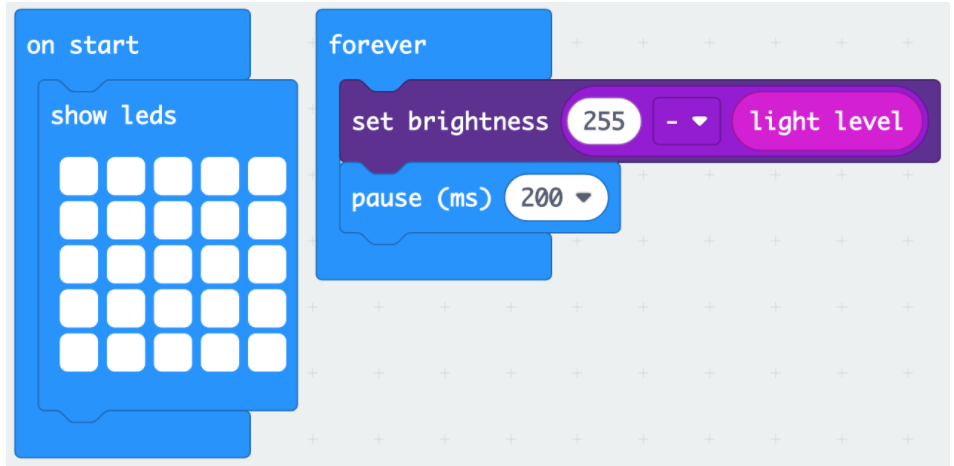
You can find the ‘Set brightness’ block in the ‘more’ section of the Led category, and the purple subtract block in ‘Math’. Can they explain how this works? If 255 is the brightest the LEDs can be, their brightness is set to that, minus the current light level, so the higher the current light level the more is subtracted from the brightness.
Can you think where you’ve seen anything like this before? Some phones, tablets and computers automatically adjust their brightness settings in relation to the light levels in the room. They tend to work in the opposite way though; making the screen brighter when its bright so you can still see it and dimmer when it's dark to prevent eye strain.
Plenary
Review the lesson by asking the class - What new types of input have we experimented with today? Which parts of the micro:bit are used to make these input sensors work? If we had the ability to make a sound (v2 micro:bits have a built-in speaker and you can also attach external speakers to v1 micro:bits) how could we build those into the programs we’ve written today?
Finish off by revisiting the lesson objectives and asking the students to assess their own success, and where they might like to further develop their learning.