
Building Houses
3D Design - Lessons 3 and 4
Objectives
- Create a detailed 3D building model
- Create and use components in a Sketchup model
- Apply realistic colour and materials to a 3D model
Lesson Resources
- Lesson Slides
- Sketchup Fundamentals learning centre - tutorial videos - Log in to access the free learning content.
Lesson 1 - Getting Started With Sketchup
Lesson 2 - Building Furniture
Lessons 3 & 4 - Building Houses
Lessons 5 & 6 - Topic linked design
Introduction
This two lesson project is written as one as it’s difficult to say exactly where you might be up to at the end of the first lesson. So just ensure the students save their work wherever they get up in the first part and then continue on in the second lesson, recapping as necessary what was achieved in the first part.
Recap the last couple of lessons and what we have covered with Sketchup so far. What did we learn when creating the chair last week? We established that you sometimes need to give more thought about where to start drawing and in what order to draw things on a model.
This week we will be designing and creating a full house and its grounds. We’ll find out about some useful new tools in Sketchup that can save us time and help us to add even more detail to our models.
If you still need some more help with your own Sketchup skills, don’t forget there is a great series of tutorial videos on the Sketchup website which can be really useful in developing your 3D drawing skills.
Start by asking, what does a house look like? Take a few suggestions but quickly try and establish that people’s homes can look very different. They often vary between towns, cities and the countryside, and also different parts of the world build houses in different styles. It’s highly unlikely that everyone in the room lives in houses that look the same.
So if I said draw me a house, it might look a bit like this
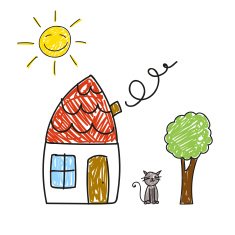
But actually not many homes look like this.
Take a look at some examples from a local estate agents’ website, or show the students these four photographs of different houses. Ask them to talk to a partner about these four houses, what similarities and differences can you see?
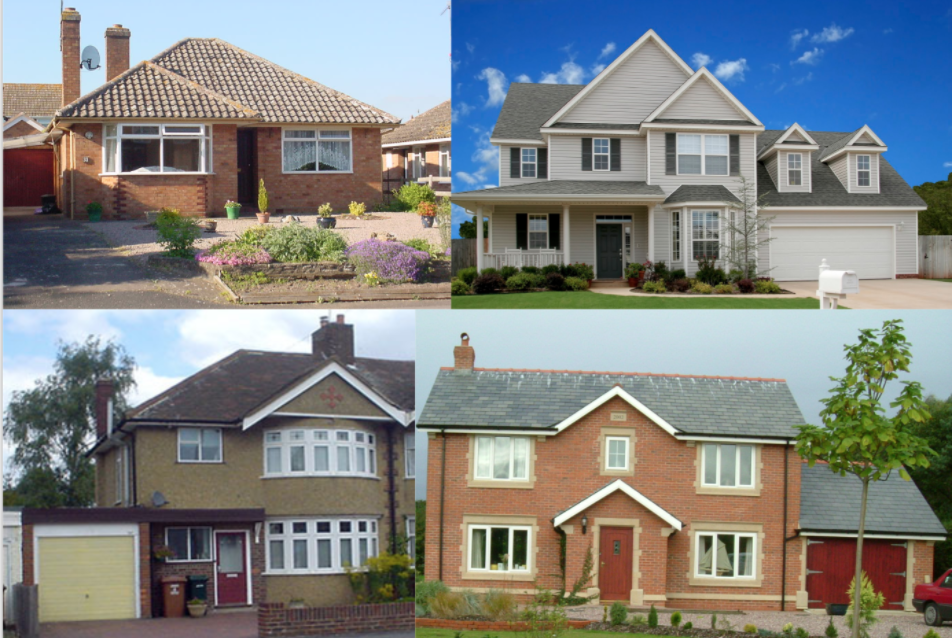
Hopefully the students will spot lots of things that are similar:
- They all have a front door
- They all have windows
- They all have a garage (although they are different)
- They all have some kind of driveway
- They all have some kind of plants or trees around them
- They all have rectangles and triangles visible in their design
And also some differences:
- Window are different shapes and sizes
- Doors are in different positions
- They are different sizes
- One is a bungalow (no upstairs)
- They are finished with different materials (brick, boarding, render, pebbledash)
- One has roof windows
- Some have porches
... to name a few
The point is, many houses are very different and we don’t want all our Sketchup houses to look the same. However, there are some house basics that we can all stick to to help us design an interesting building and its surroundings with a good level of detail. Explain that this is likely to take a couple of lessons. We will go step by step at first and you will give them examples of how to draw different features, but there is plenty of scope for them to be creative and design and add elements that they would like.
Drawing a house guide
Here’s a general guide to drawing a house with Sketchup:
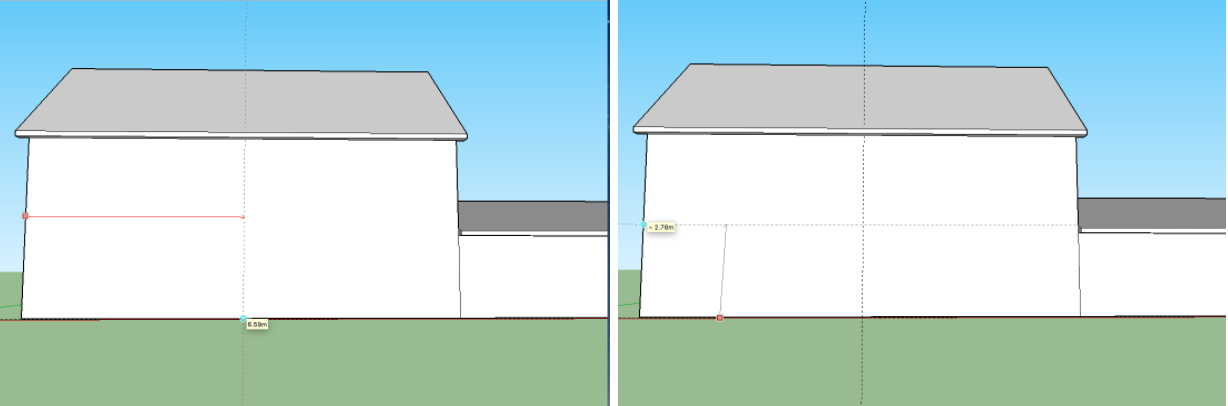
Start by zooming out quite a bit and keep the figure in place. Use the figure to give you a sense of scale as you draw your house. A building that is too big or small will look strange later when you try and paint your model with materials such as roof tiles or bricks as the size of the tile or brick are fixed when applied to any model so the bricks could look huge (if your model is too small) or so small you can’t even see them (if your model is too big).
Scale too small
Scale too big
The building’s shape
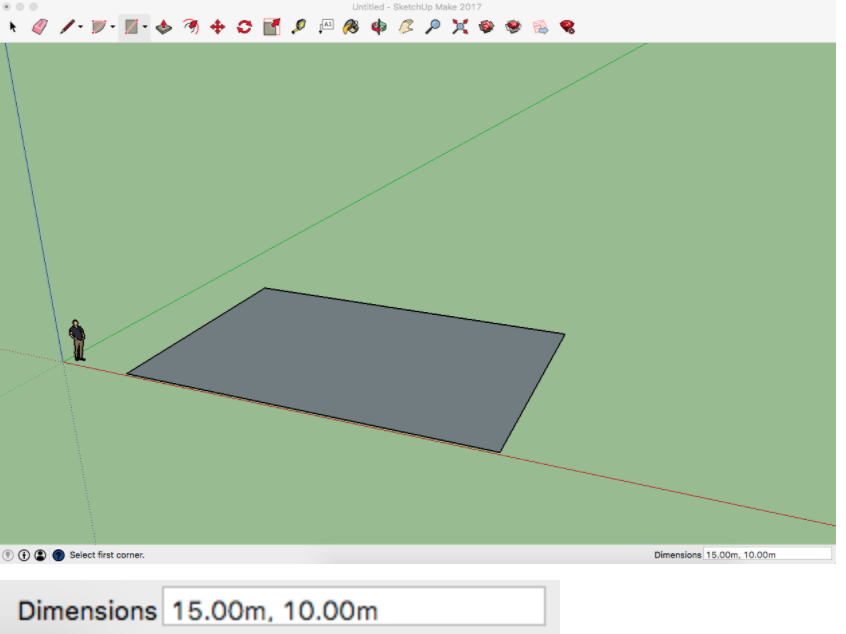
We’re going for a nice big house in this example, so start with the Rectangle tool and stretch out a large rectangle on the floor. Try and image roughly how many rooms this might include and how big they would be relative to the figure. Once you let go of the rectangle you can be very specific with its size by clicking in the dimensions box (in the bottom right) and editing the two measurements, press Enter and your rectangle will adjust to the size you type. We’ve gone for 15.00m x 10.00m.
Pull up the rectangle until it is approximately three times the height of the figure. Again you can manually adjust this to a specific height in the dimensions box. We’ve set ours to 5.50m.
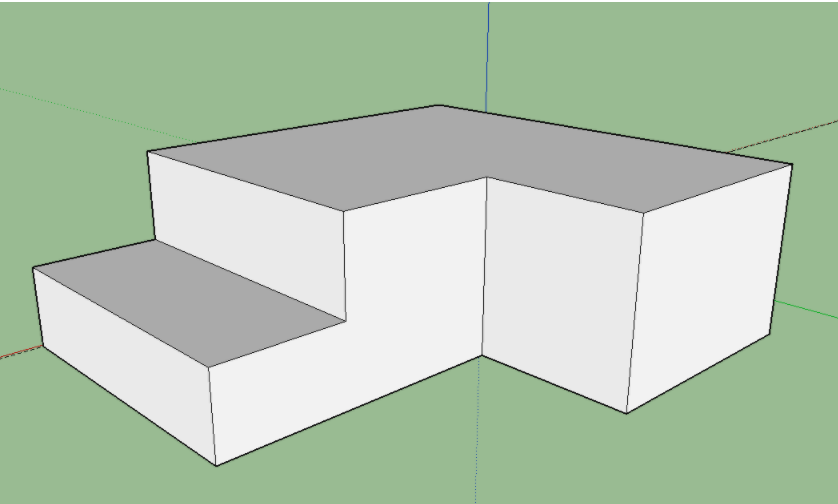
Next, use rectangles to draw on the sidewalls the shape of any extensions you might wish to add. These could include garages, porches, sunrooms or simple one or two story extensions.
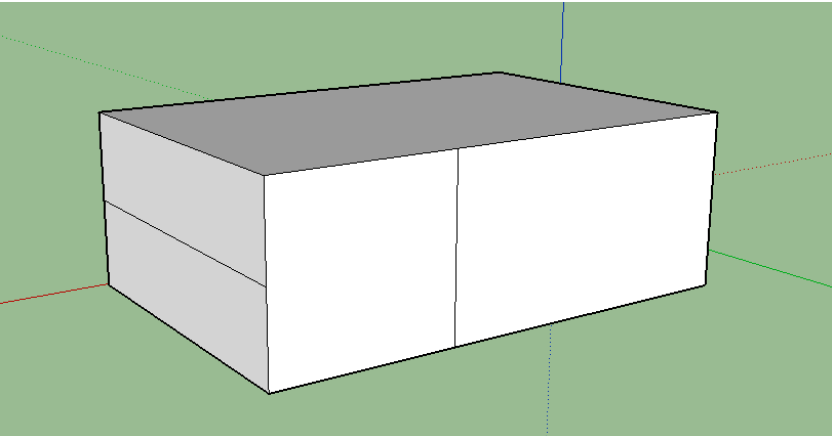
Pull these out to the different sections of your building.
The roof
Turn to the front of your house. Move your cursor along the flat roofline of one of the side walls until you find the midpoint (shown by a bright blue dot). Using the Line tool (pencil). Click once to begin a line from that point and slowly move upwards, drawing a vertical line. Make sure the line goes blue as you draw it (which shows you are parallel to the vertical axis). Click again at a suitable height for the ridge of your roof.
From the top of that line, draw another line back down to the corners of the roof surface to create a triangle.
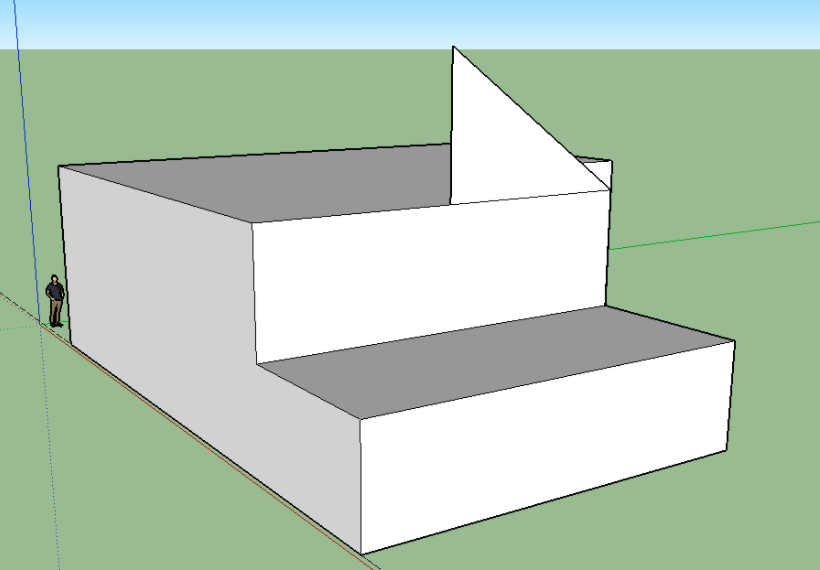
Repeat this again from the top of the vertical line to the other corner of the roof, then use the eraser (or right click) to rub out the central line, leaving you with one large triangle which is the profile of your main roof.
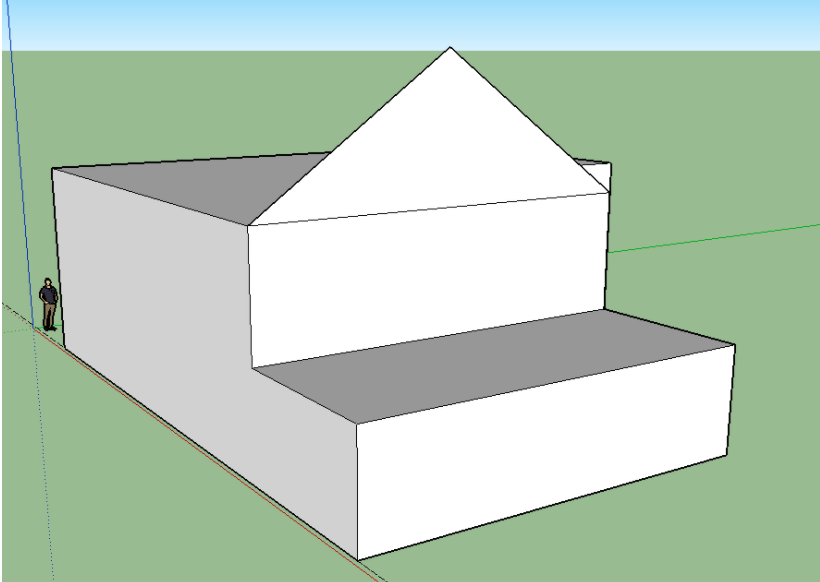
Orbit around your model and pull the triangle across to create a roof. Use the edge of the building as a reference when pulling the roof across to ensure the roof is flush to the edge of the building.
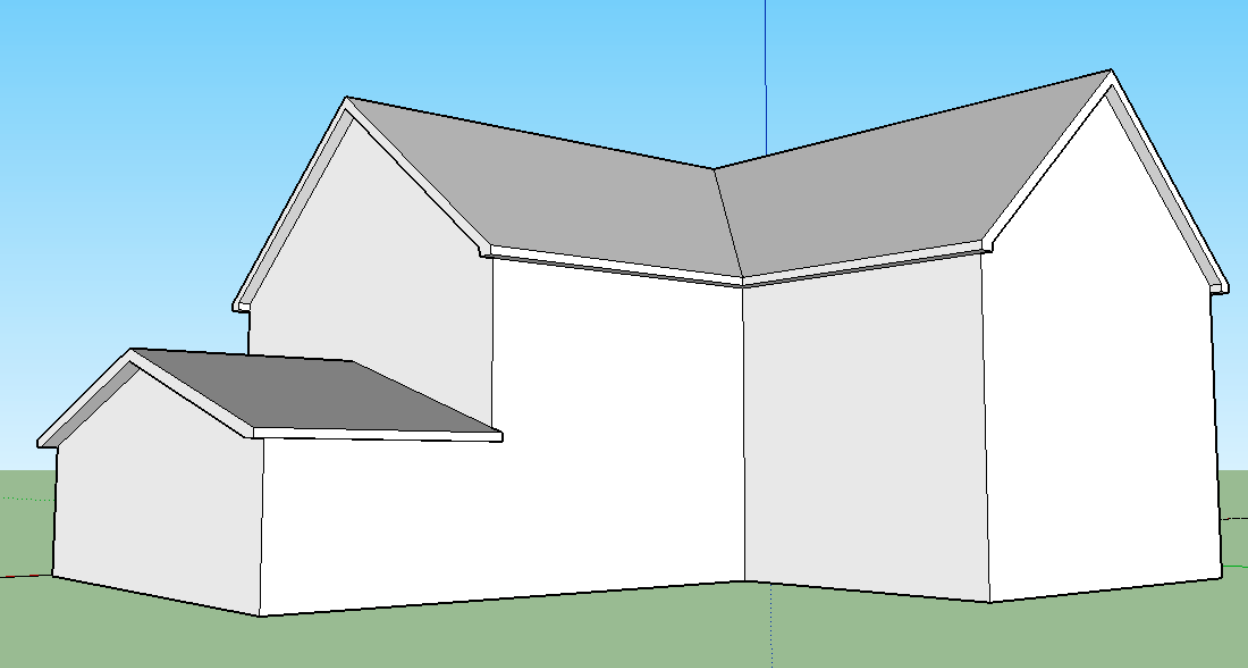
Repeat this process on the garage, and any single story extensions that you have.
Find the midpoint, draw a vertical line up. Connect the tip of the line to the two corners, rub out the middle line, pull the roof across.
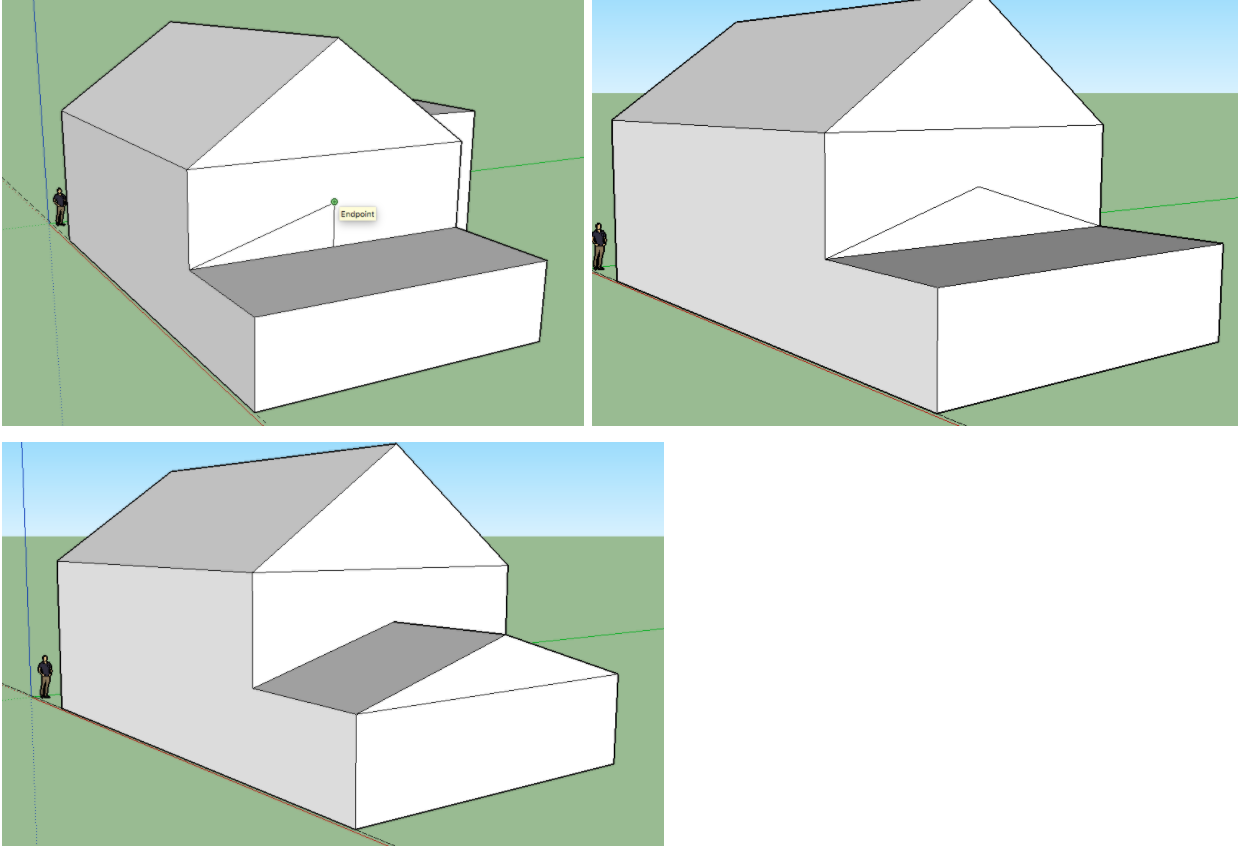
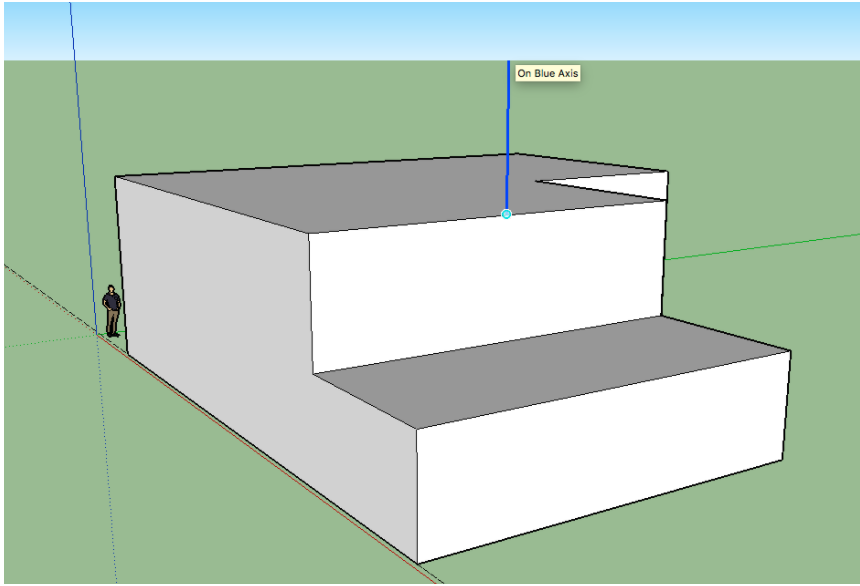
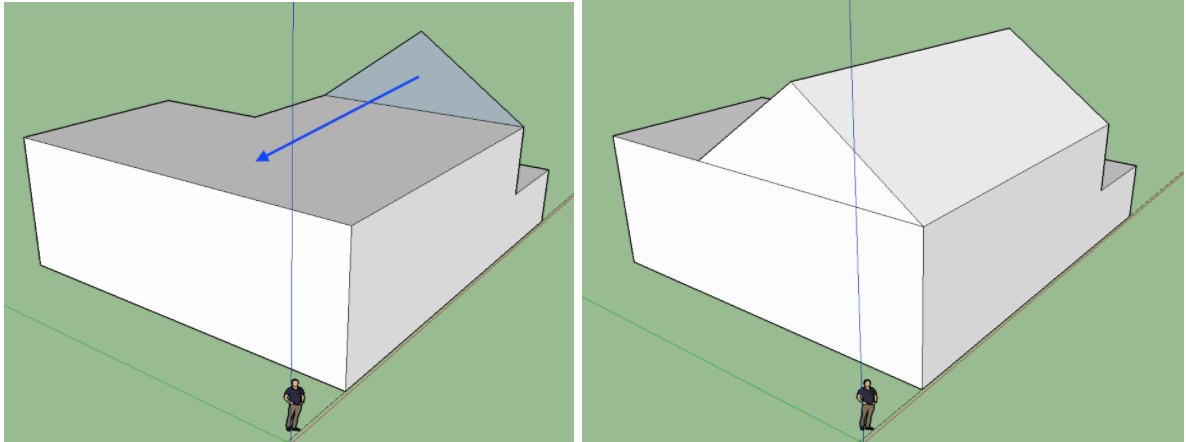
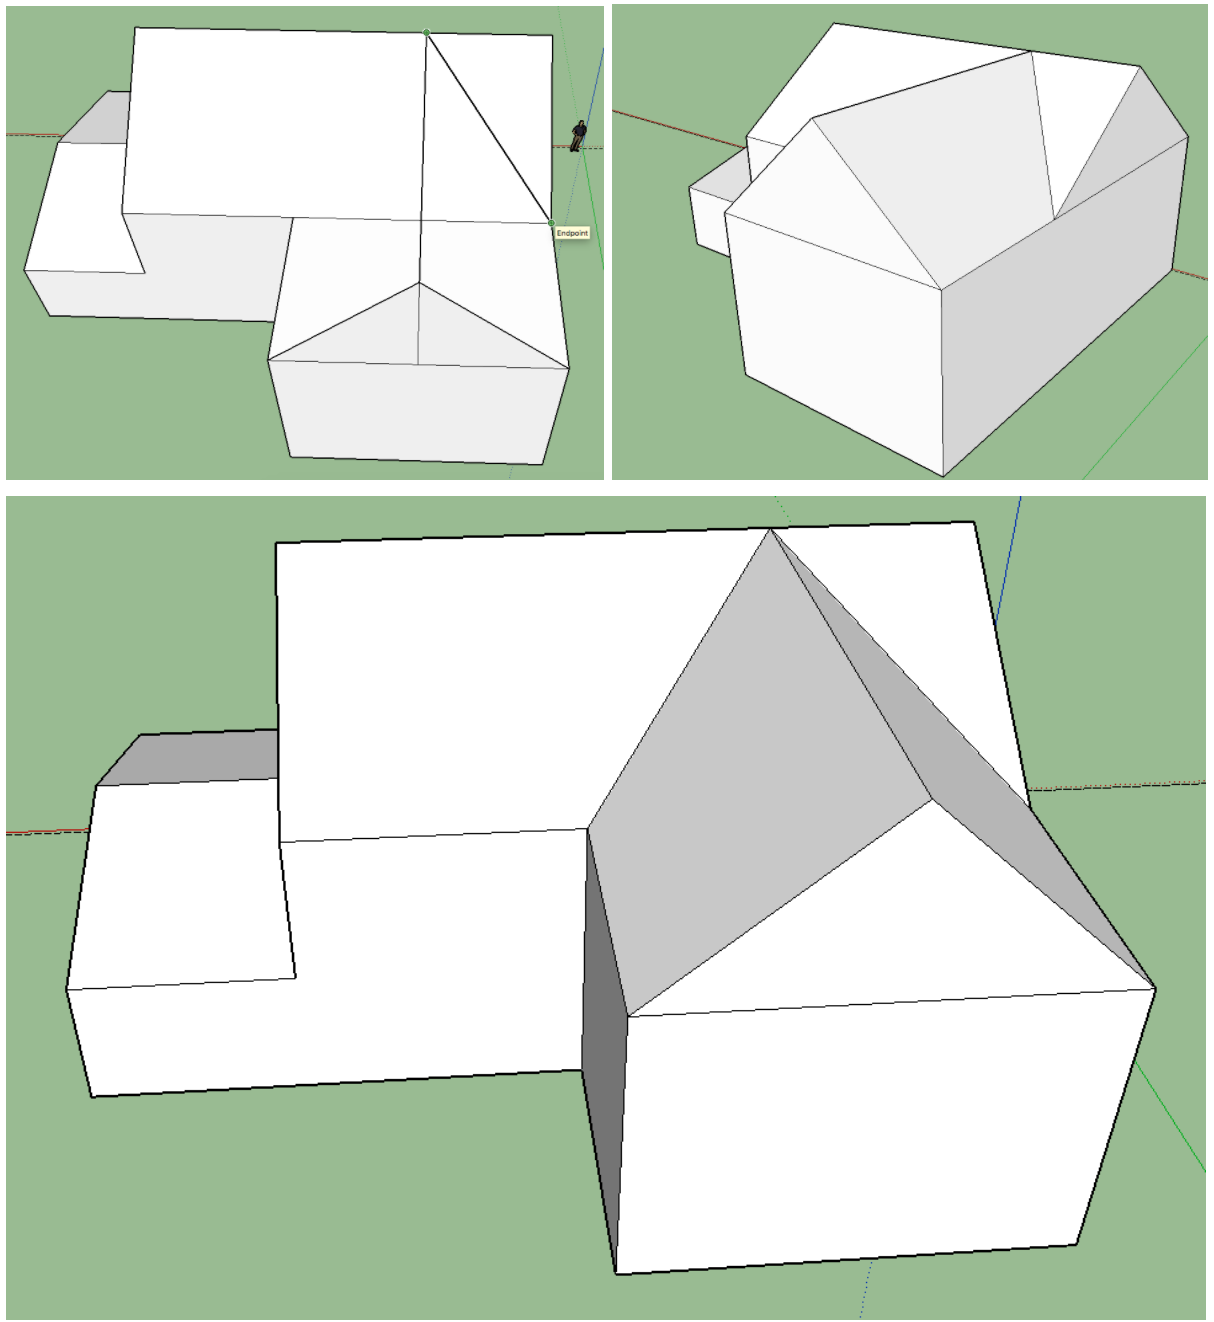
If you have any two story extensions, then adding the final part to the roof to join it in with the rest is slightly different. Find the horizontal midpoint of the extension as before, use referencing (go to the other roof’s corner) to make the height of this line the exact same height as the main roof and complete drawing the vertical line.
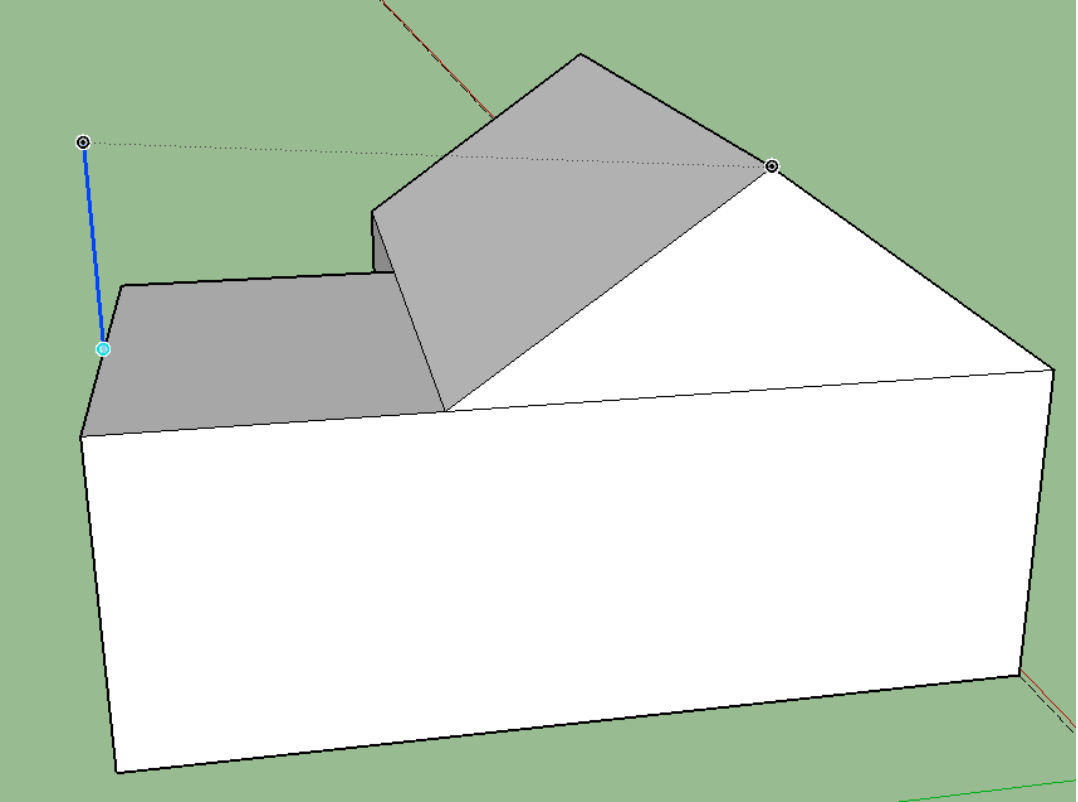
Add two more lines from the point to the corners to create the triangles like the other roof.
But instead of using push/pull at this point, just use the pencil line tool to draw a horizontal line on the green axis from the tip of the triangle across to the ridge of the main roof (make sure it’s green!)
Then from the point it connects, add another diagonal line down the slope of the roof as shown. This will create a surface on that part of the extension’s roof. Do the same on the other side to complete it.
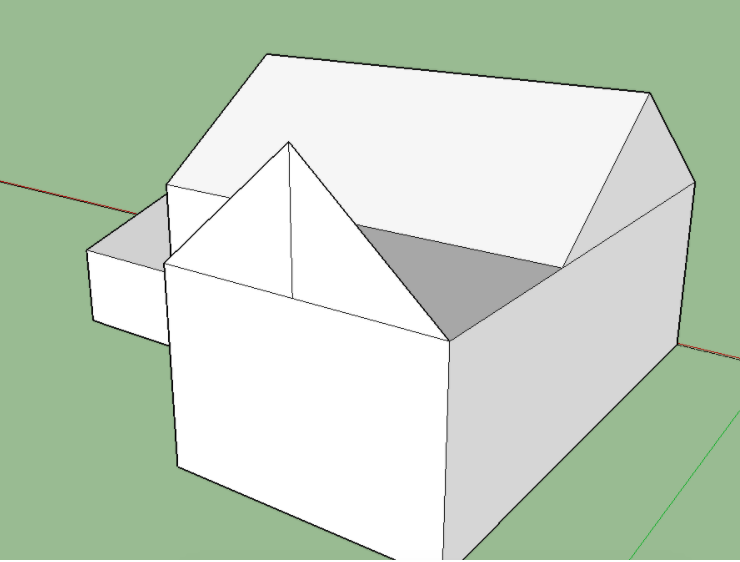
Creating an overhang
For a more realistic looking roof that overhangs the building (most roofs do), orbit so you are looking at the bottom of the model. Select the offsetting tool and click on the outer edge of your model’s footprint. Draw a slightly smaller version of the footprint inside the original.
Push the outer version of the footprint upwards. If you don’t have any single story extensions of any kind you’ll be able to push it right up to roof level, however, it’ll get stuck at the point of the single story extension if you have one.
To solve this, a couple of extra little lines need adding at the front and back of the single story extension to separate the parts of the building, see below.
You can then push up the rest of the overhang to the top of the roof.
To tidy things up, add one more line to join these points and delete the lines shown with the arrows.
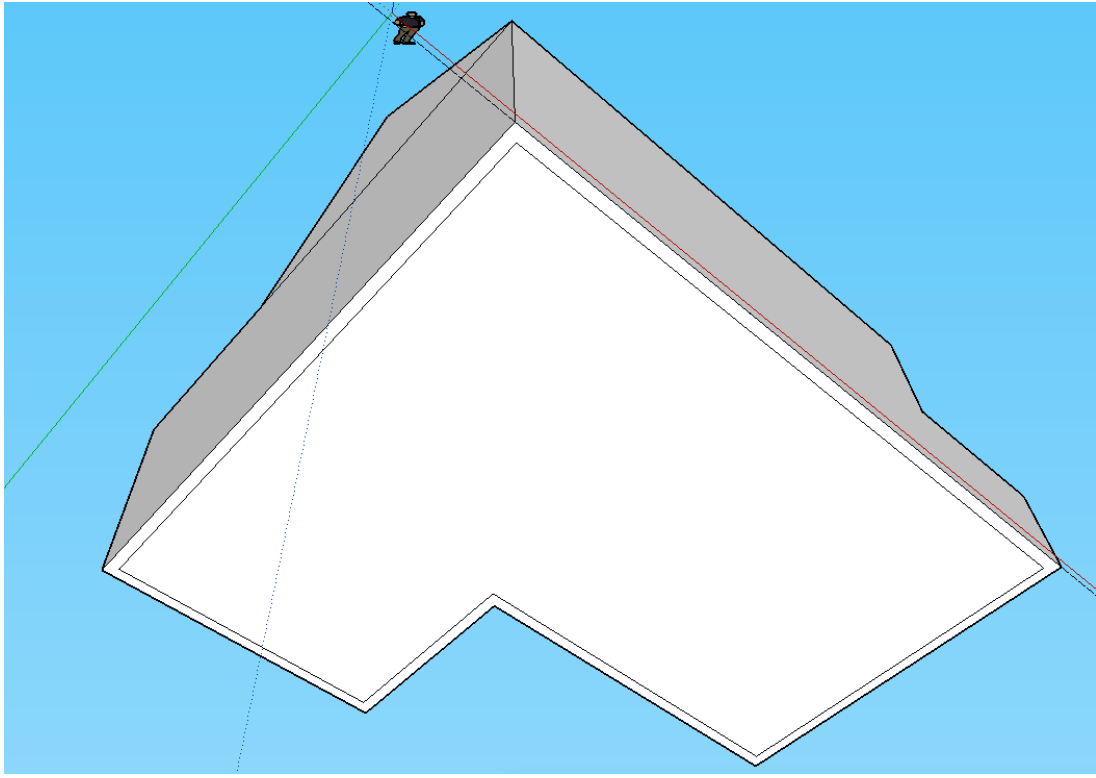
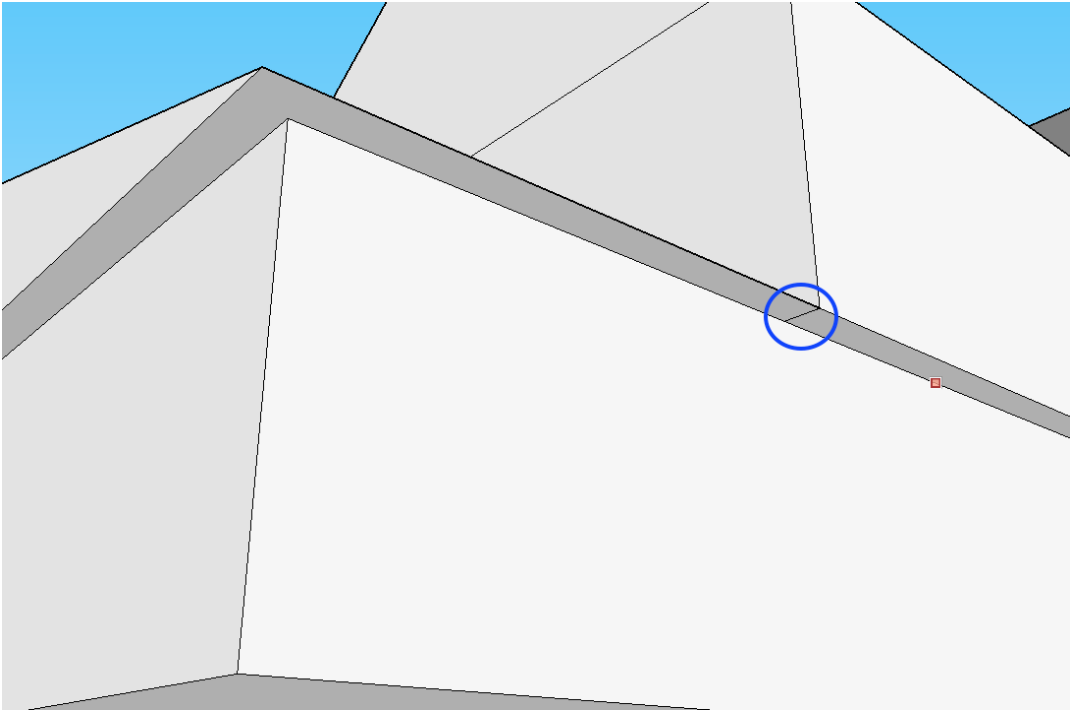
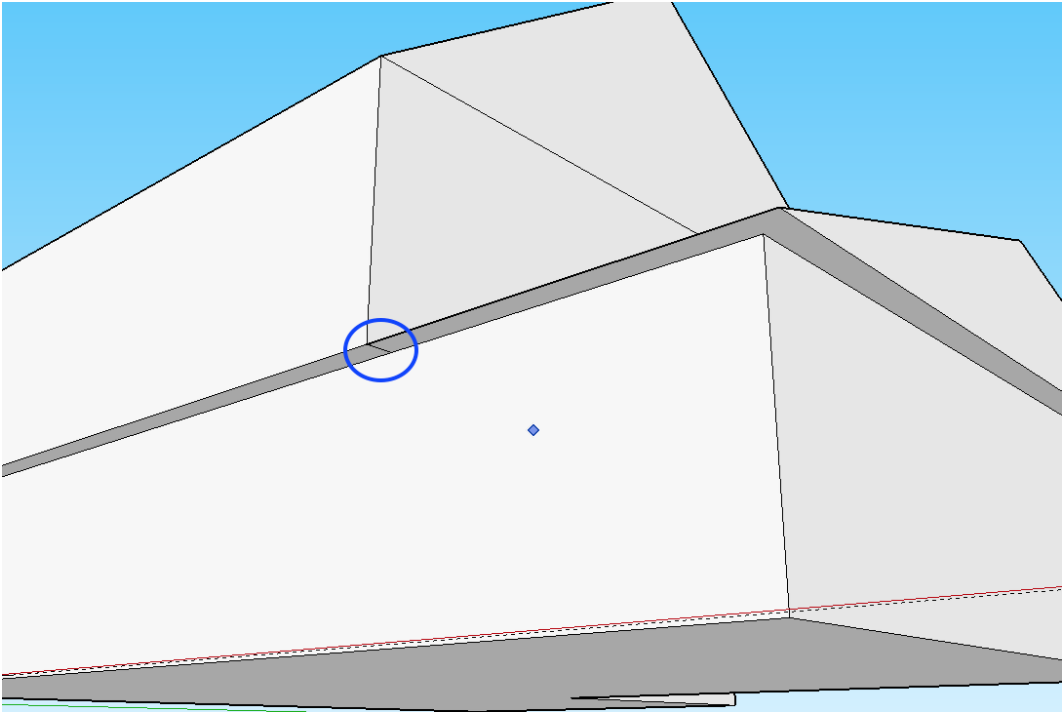
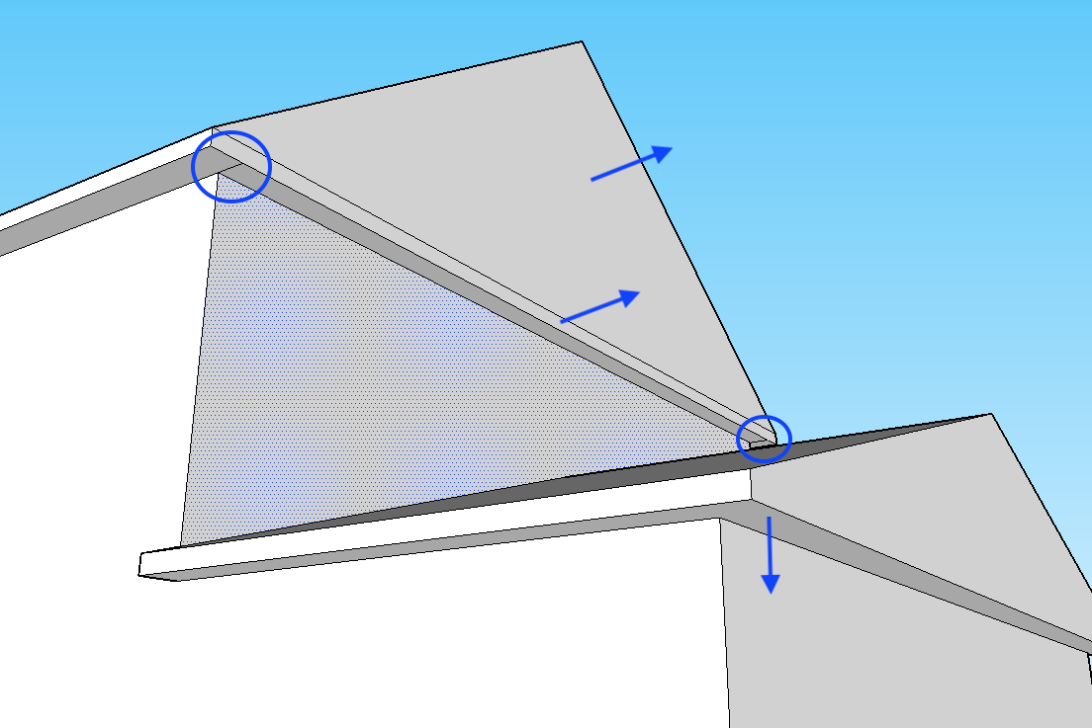
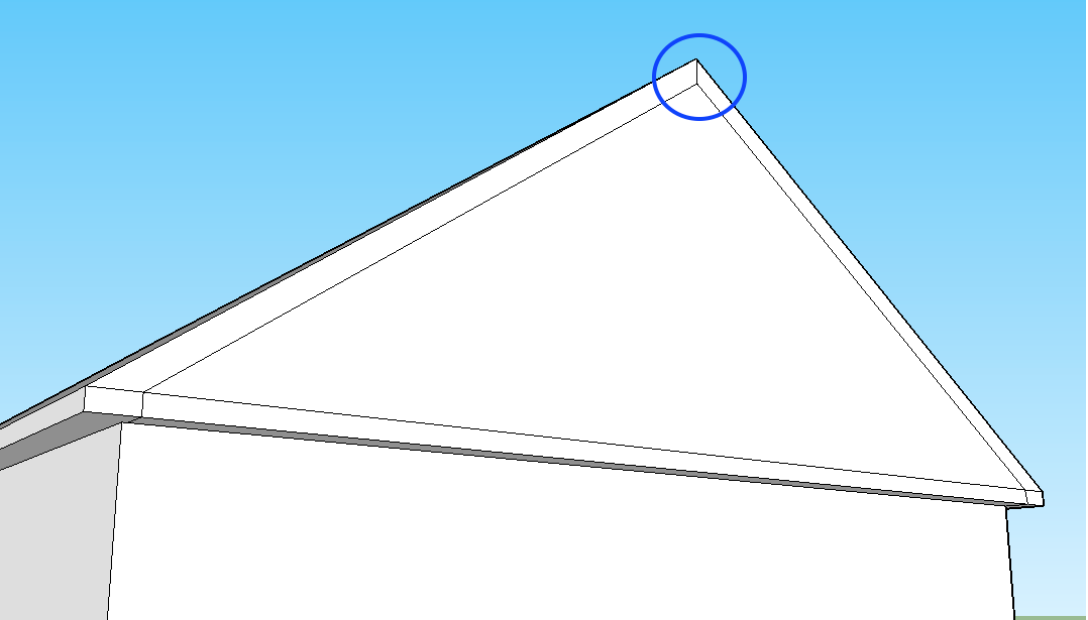
Finally, pull out the gable end of the house a little to create an overhang at this end too, delete the lines shown in the circles and pull down the underside of the garage roof a bit for a more solid edge to its overhang.
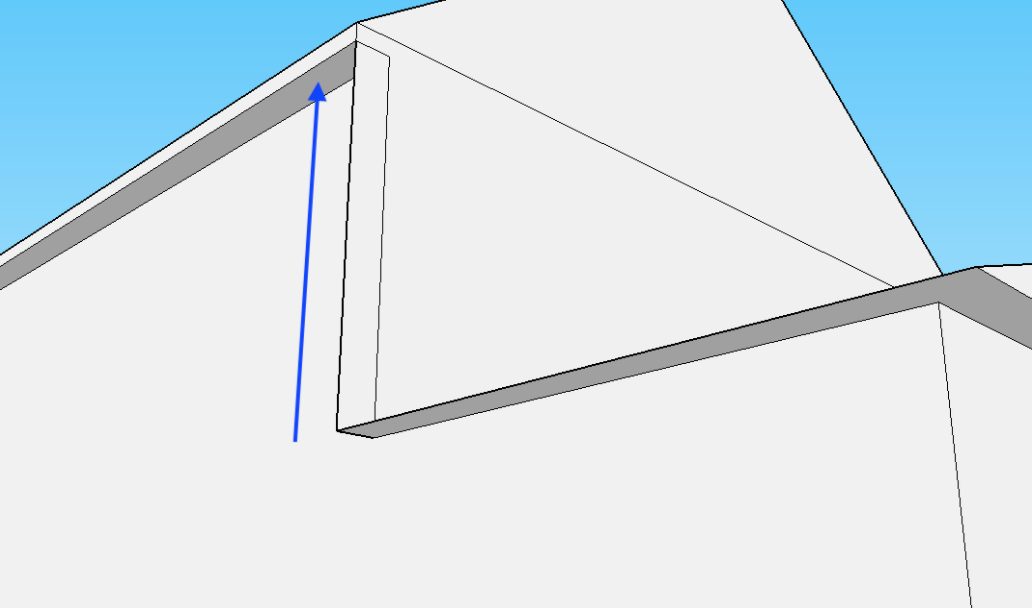
The look of an overhanging roof can be improved even further still by drawing diagonal lines parallel to the roof line. Start with a short vertical line, downwards at the peak of the roof as highlighted below and connect the bottom of this to the bottom of the triangle.
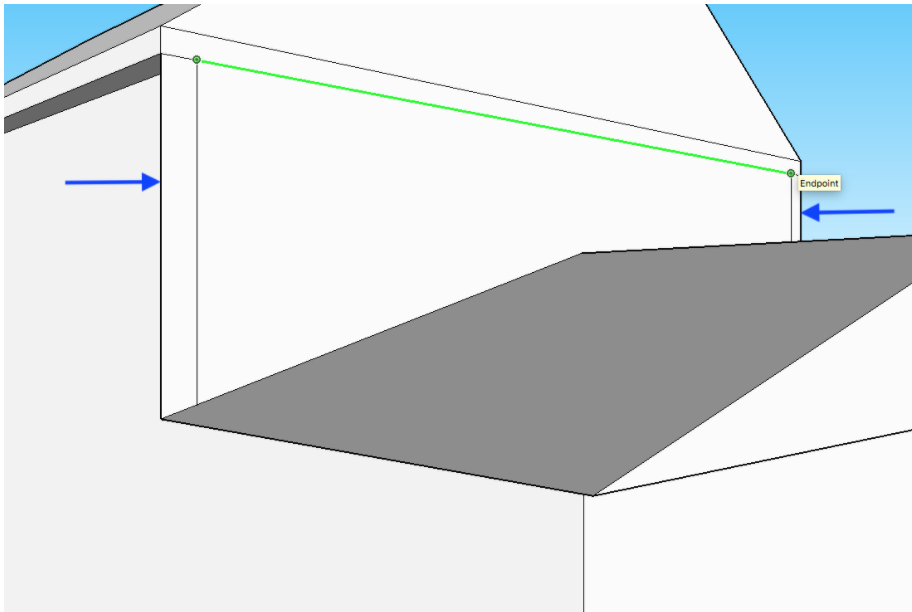
Then push the middle sections back in flush with the rest of the wall and rub away unwanted lines, like this.
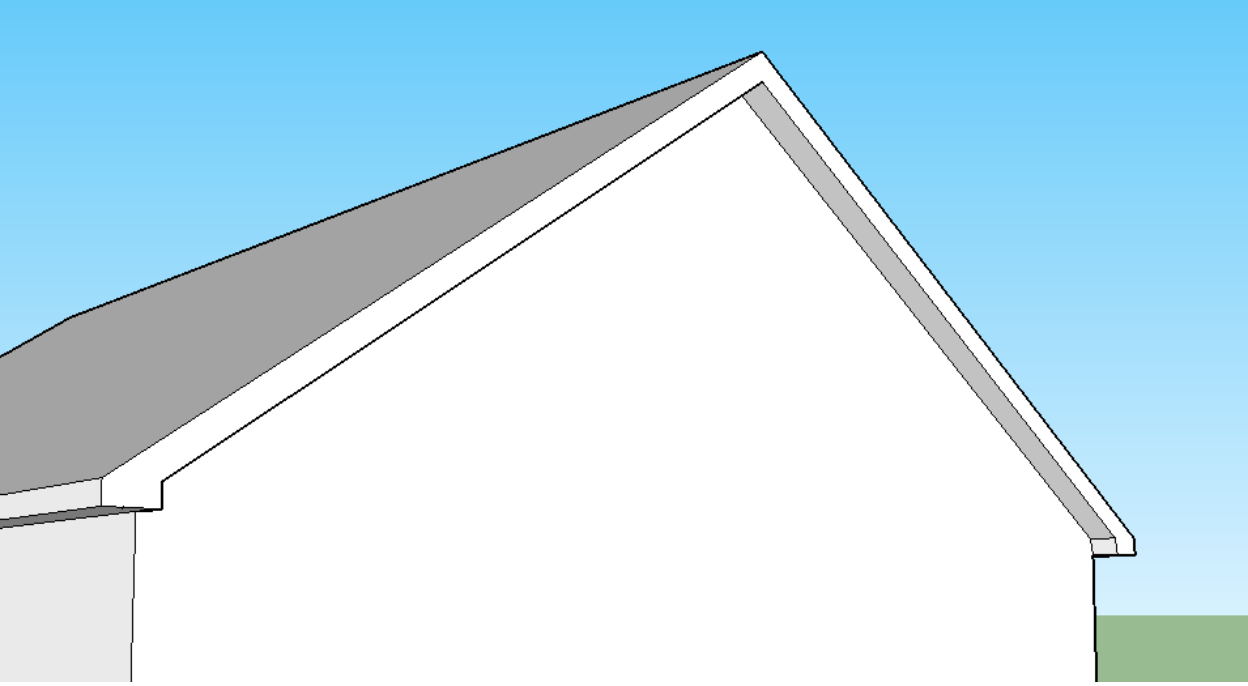
Repeat on any other gable ends of your building.
Remember to save your work as you go! Now is a good time to save what you have done so far.
Using Guidelines
Before thinking about doors and windows it’s useful to add some guidelines to the front of your house to help you get the size and spacing of things right here.
Orbit the camera to the front of the house. To add guidelines, use the tape measure tool and click and drag from the left hand edge of the building across to the centre.

You can use the bottom line to find the exact midpoint. You’ll see a dotted guideline appear where you stop. This is not part of your model and can be removed easily later. You can then do the same from the bottom of the wall to draw a horizontal midpoint line.
Doors
There are many different styles and sizes of front doors available, from traditional to the more modern. Here’s just a few examples courtesy of www.solidor.co.uk
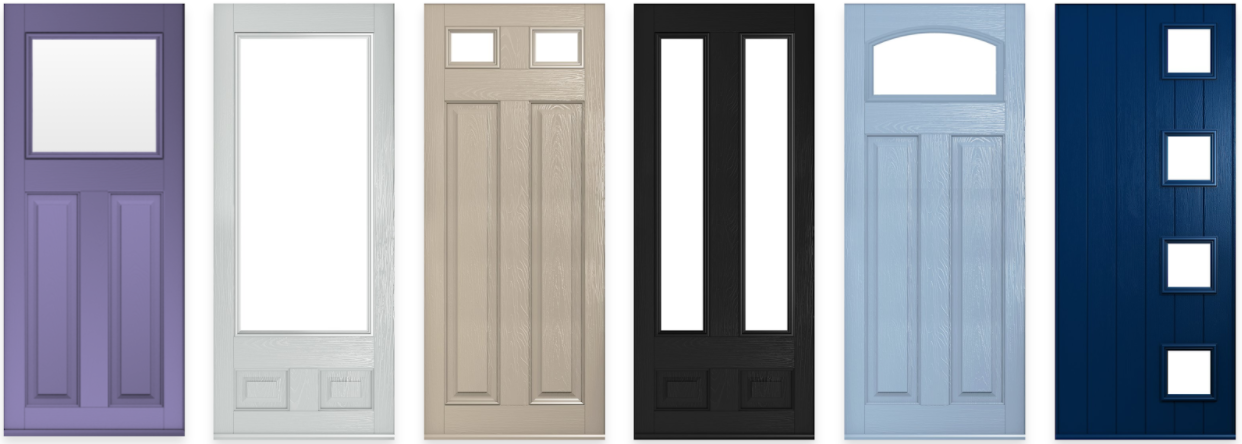
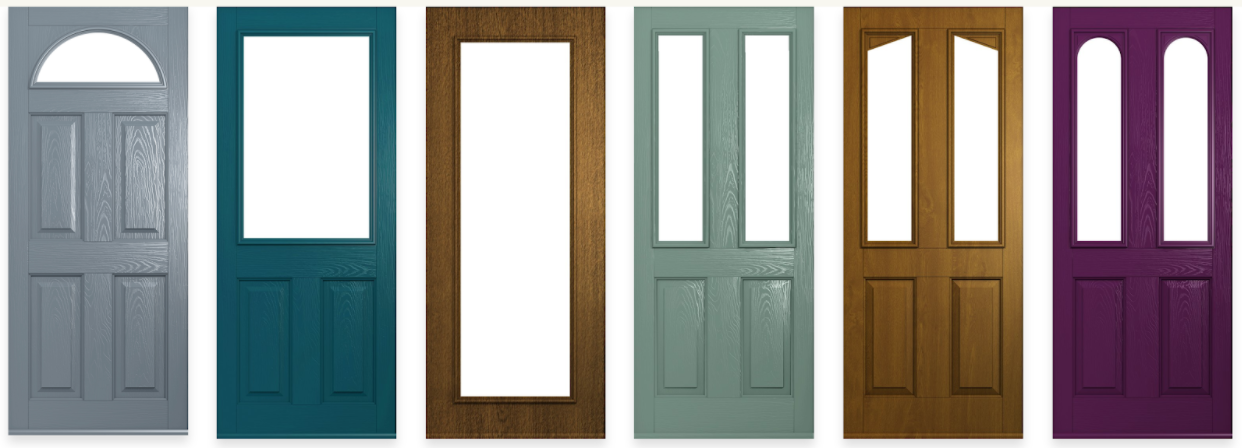
Any of these designs (or others) can be achieved with Sketchup.
The positioning of the door is completely up to the students, but in this example, the guidelines are helpful for getting it central on the main front wall of the house. Here, we’ve started with a large rectangle for the door frame, added three other thin rectangles as windows and two other horizontal rectangles at the bottom which will become doorsteps.
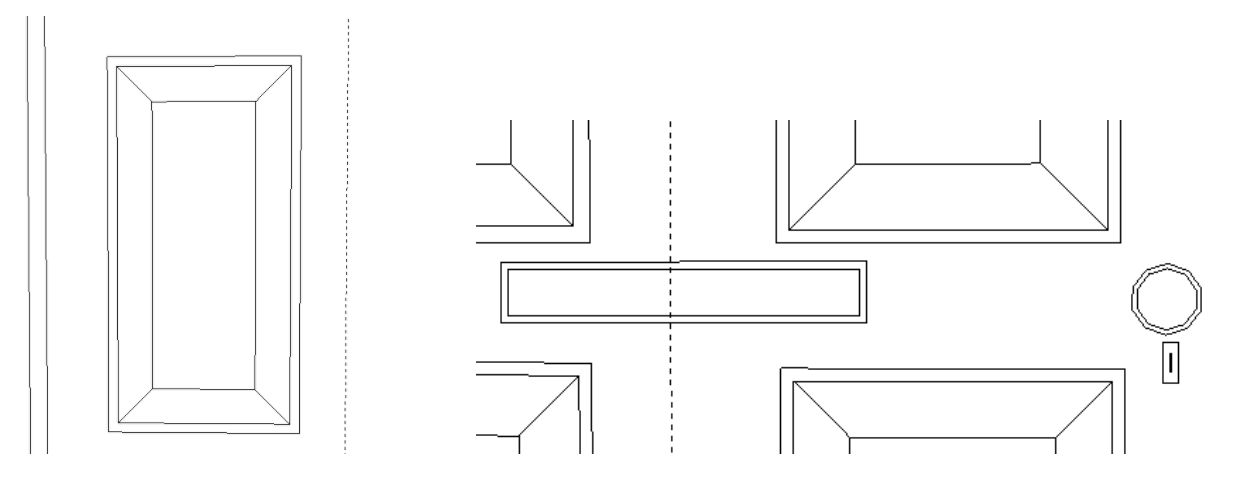
Then zoom in much closer to create the actual door and to add some detail. We used the offset tool to add smaller rectangles inside the door and windows we’ve just drawn to create frames, plus four rectangular panels to the door (draw one, then select it, copy (Ctrl+C) and paste (Ctrl+V) it for consistency) and a 2 point arc using the arc tool.
![]()
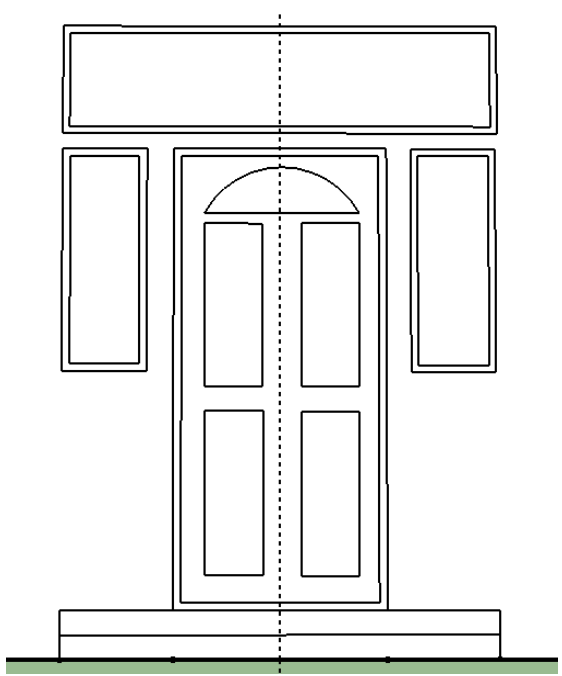
Some extra diagonal lines joining the panel corners creates the effect seen in many front doors. This was simply done with the pencil line tool. A letter box was also added and a decagon (which will become the door handle) and a small rectangle for the lock (all offset with smaller versions inside them).
Then it’s time for some pushing and pulling to give the door some depth.
Windows
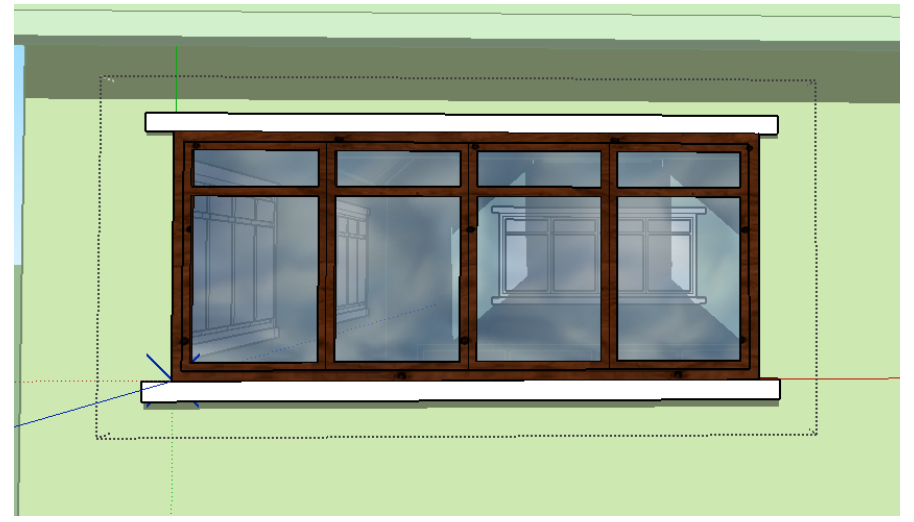
For creating the windows of the house we’ll start with one of the large downstairs windows. Not all the windows will be the same in most houses, but the majority will probably be the same or similar. For this we can make use of an incredibly useful feature in Sketchup called Components.
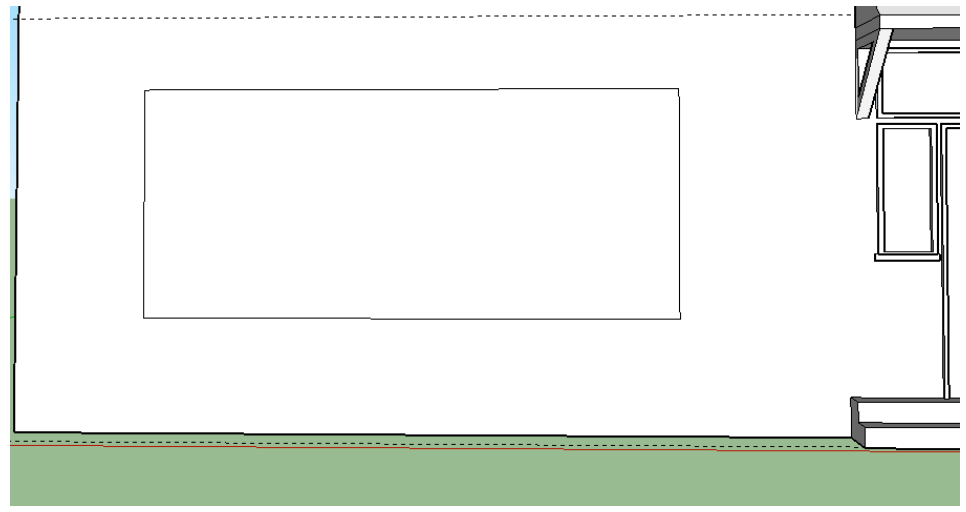
First, draw a rectangle to be the size of the whole window frame.
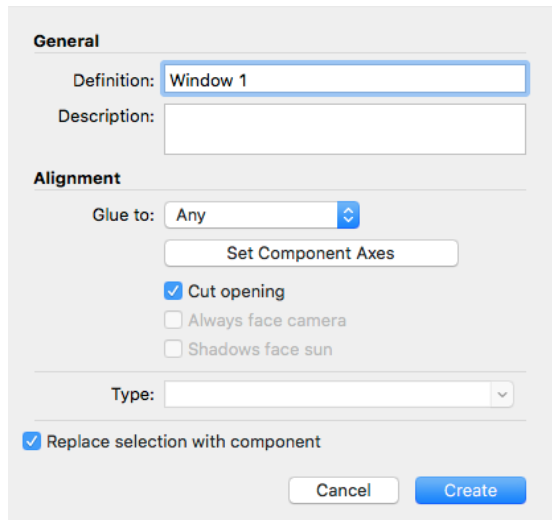
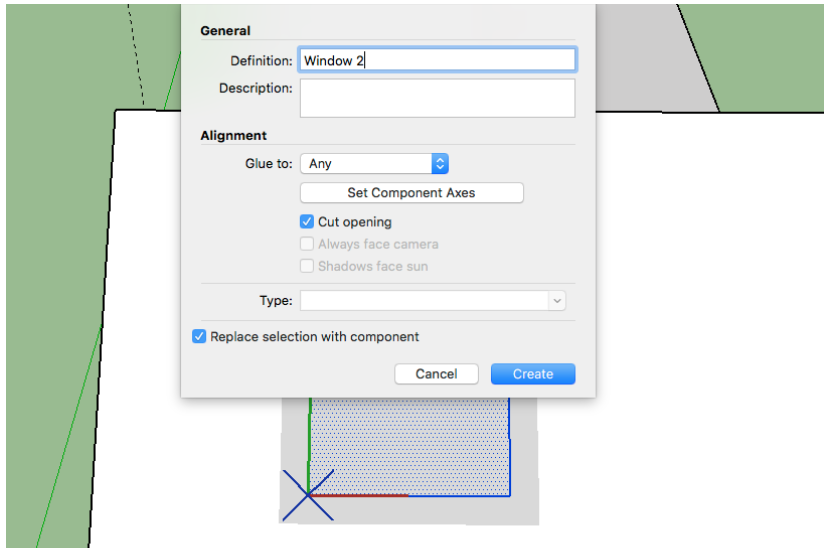
Then use the select tool to select the rectangle and its edges by double clicking it, so the whole thing is blue. Do not select it by dragging a box around it as it will also select the wall behind the window which will cause big problems later. Once selected, right click the selection and choose Make a Component.
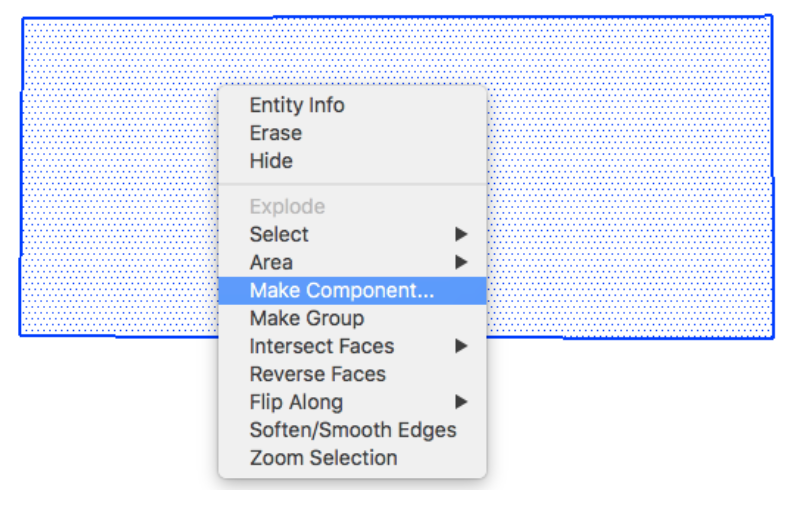
When the components box appears name it ‘window 1’ in the definition box and click Create. Creating components makes elements of your model that can be reused again, which saves a lot of time and effort!
You can then click on the rectangle you drew and copy (Ctrl+C) and paste (Ctrl+V) it to make other identical windows around the house. As you paste it, move your mouse and you’ll see a copy appear that you can move and place where you want. It will even go round corners and rotate the rectangle for you so it can be placed on any flat wall on the other sides of your house.
Once you have placed all the windows needed (of this size), go back to the original rectangle you drew and (with the select tool) double click it. This will put a green filter over the rest of the building to show you that you are now only editing the component you created.
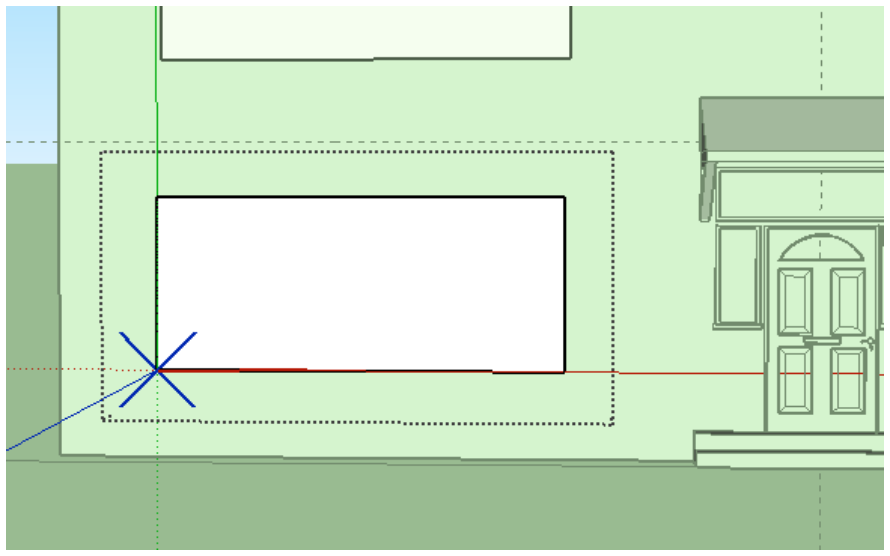
Add some extra detail to the window by creating panes, frames and sills using rectangles and the offset tool for symmetry and neatness. Zoom out and, as if by magic, you’ll see that the changes you make to the component will be replicated on all the copies you made! Wow! Just think of the time saved and how much better the house will look creating windows this way.
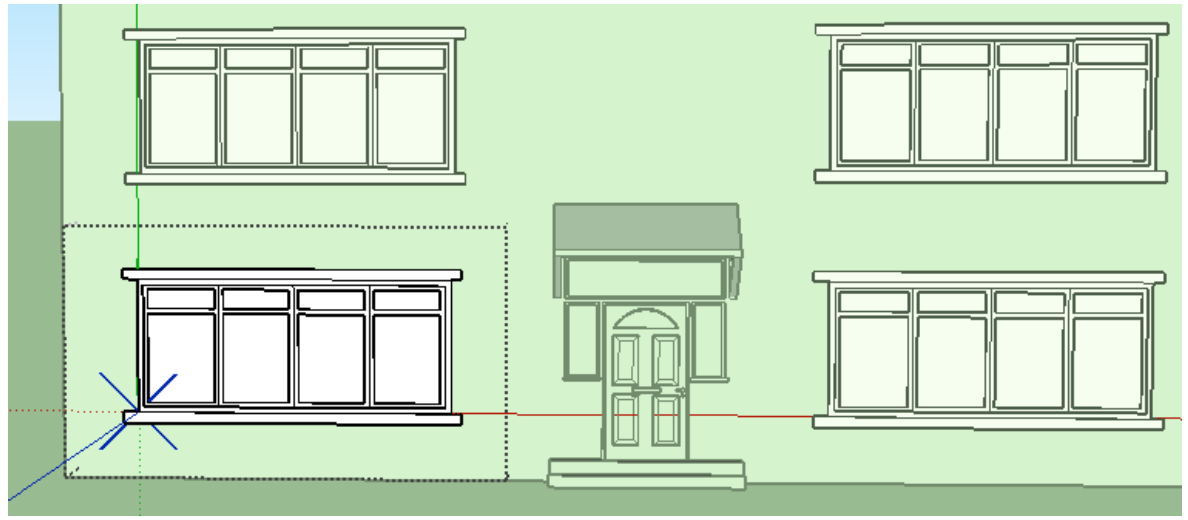
Click to the side, away from the component area to seal the changes and leave component editing.
If you want other windows that are different to the original window, draw these separately. If you plan to have more than one of any you can repeat the process above and make a new component named ‘window 2’ etc. Edit each one in the same way, and any changes you make to any components you create will be reflected in all the copies (or future copies) you make.
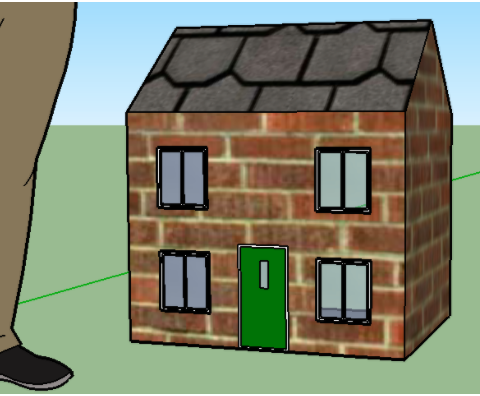
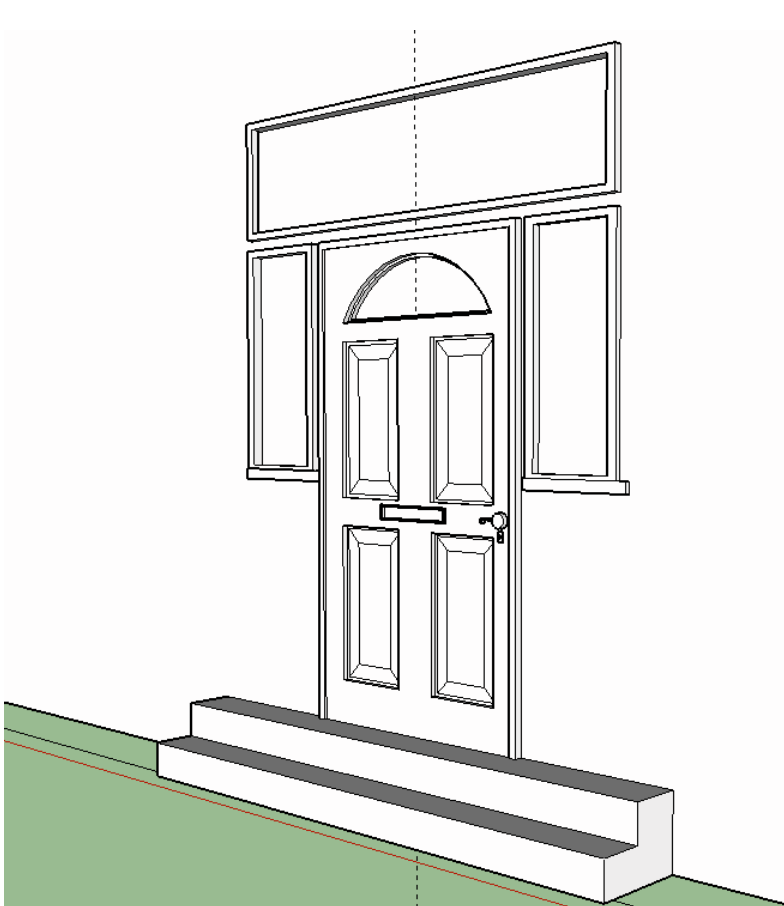
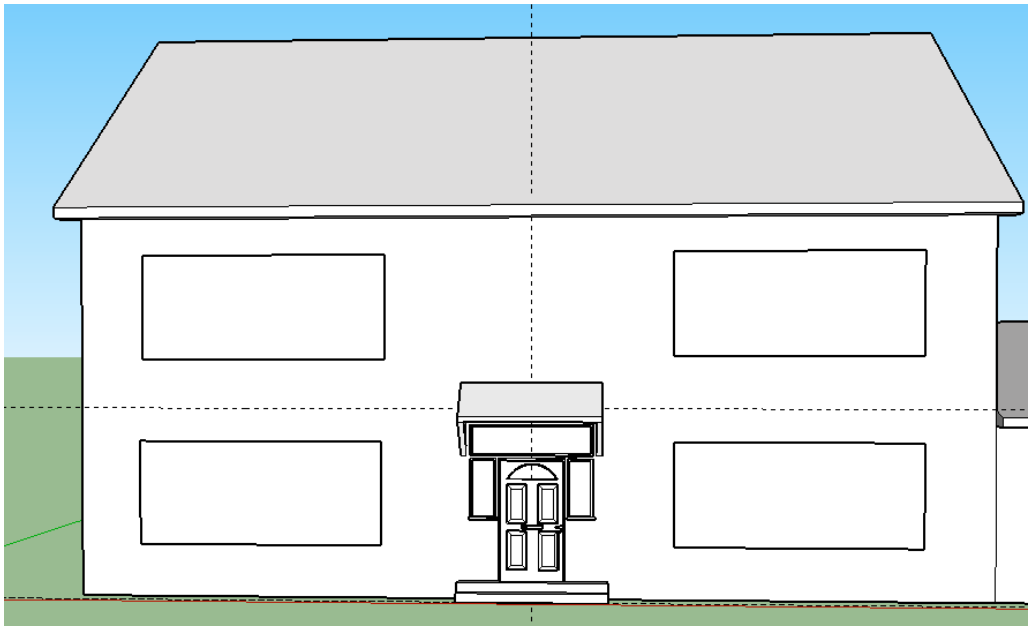
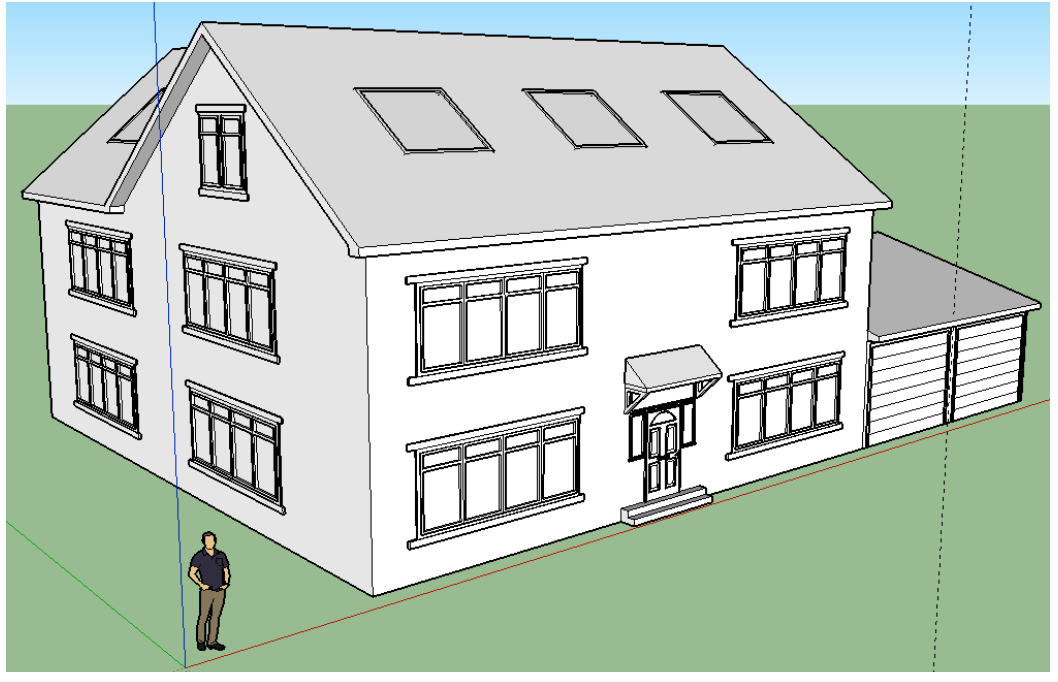
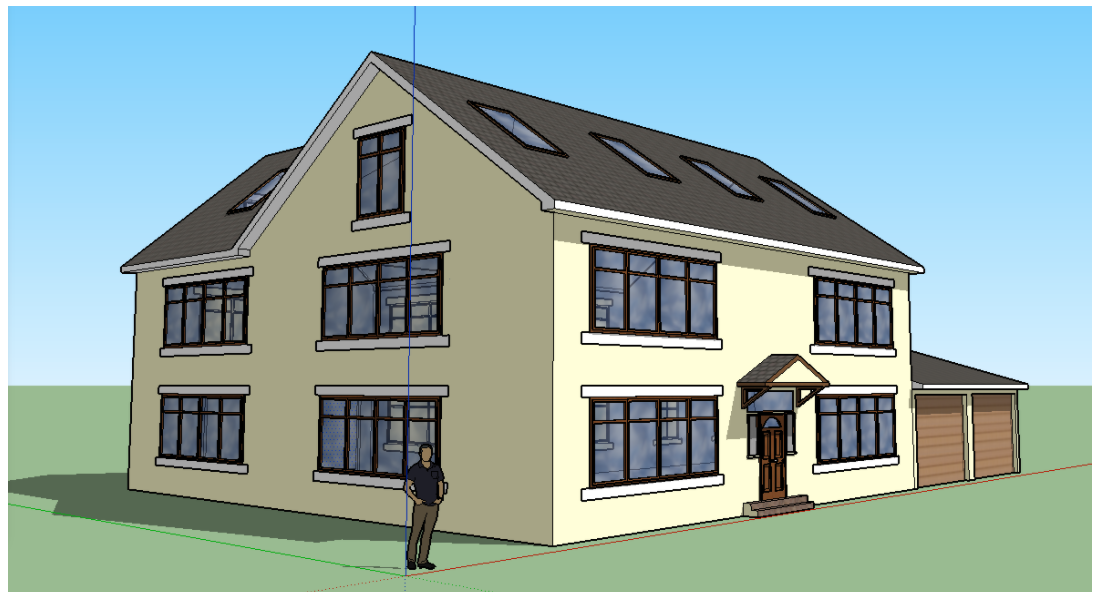
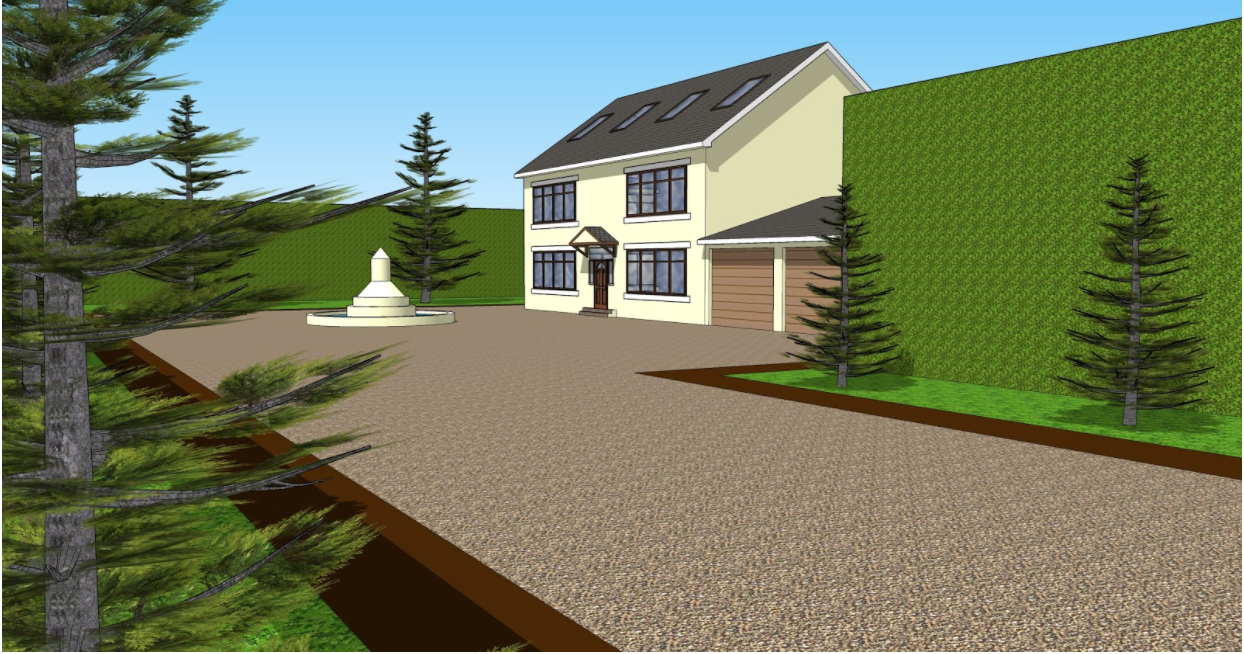
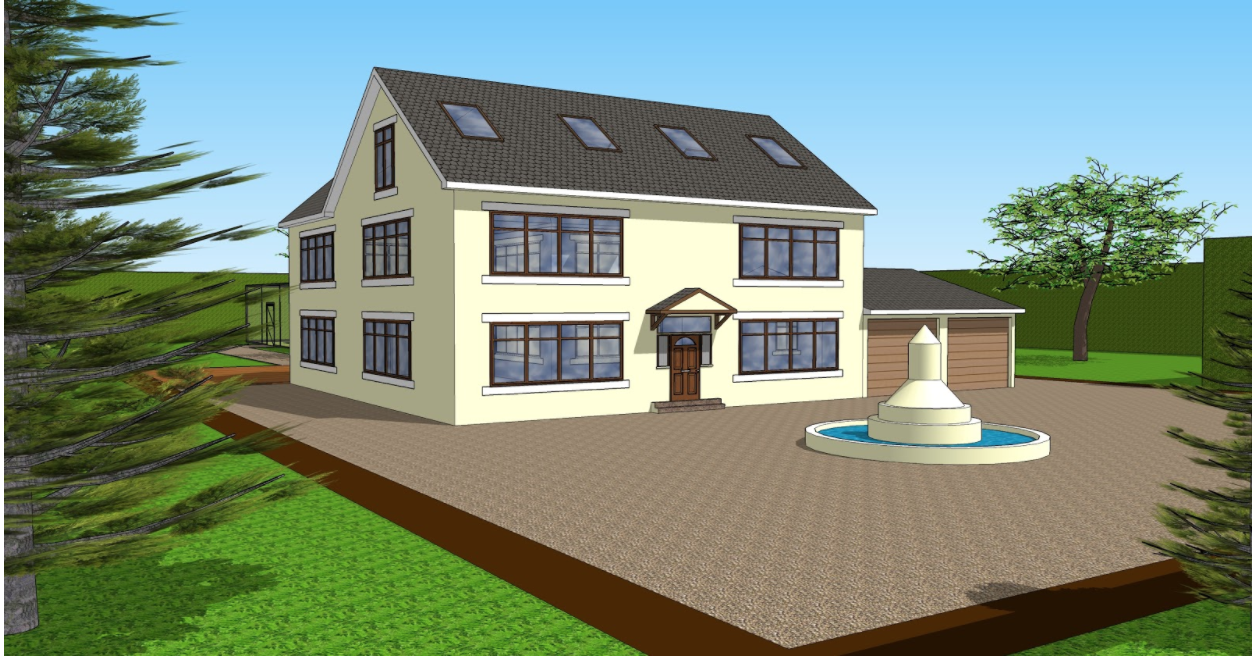
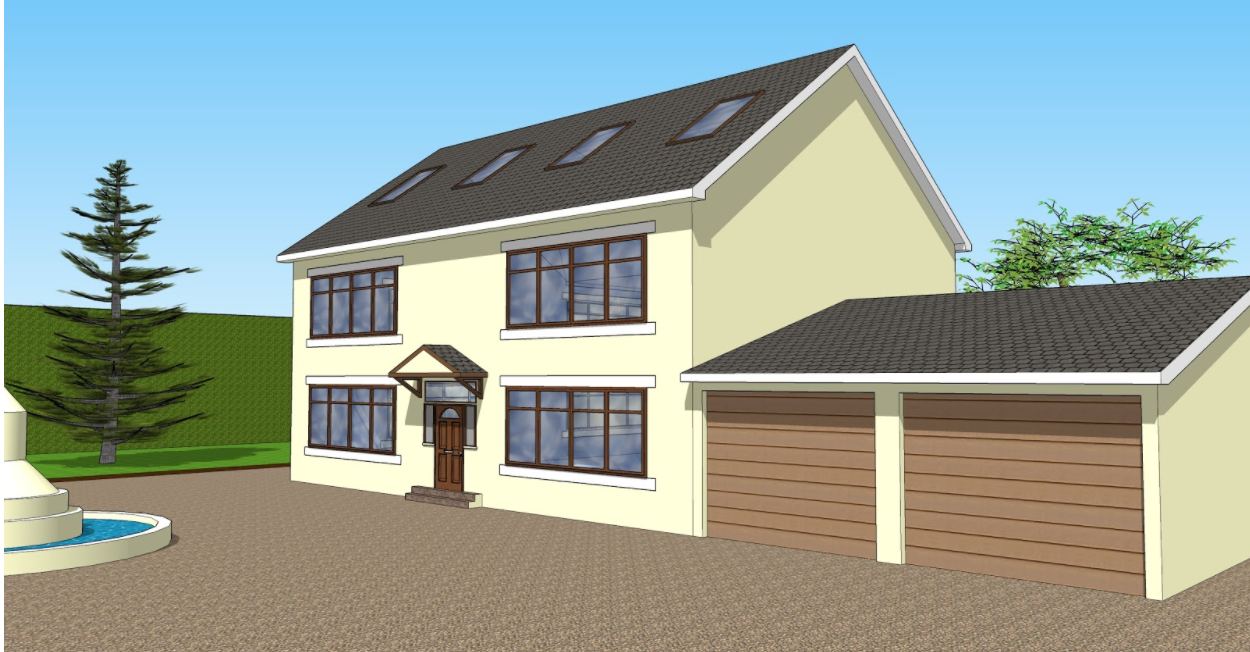
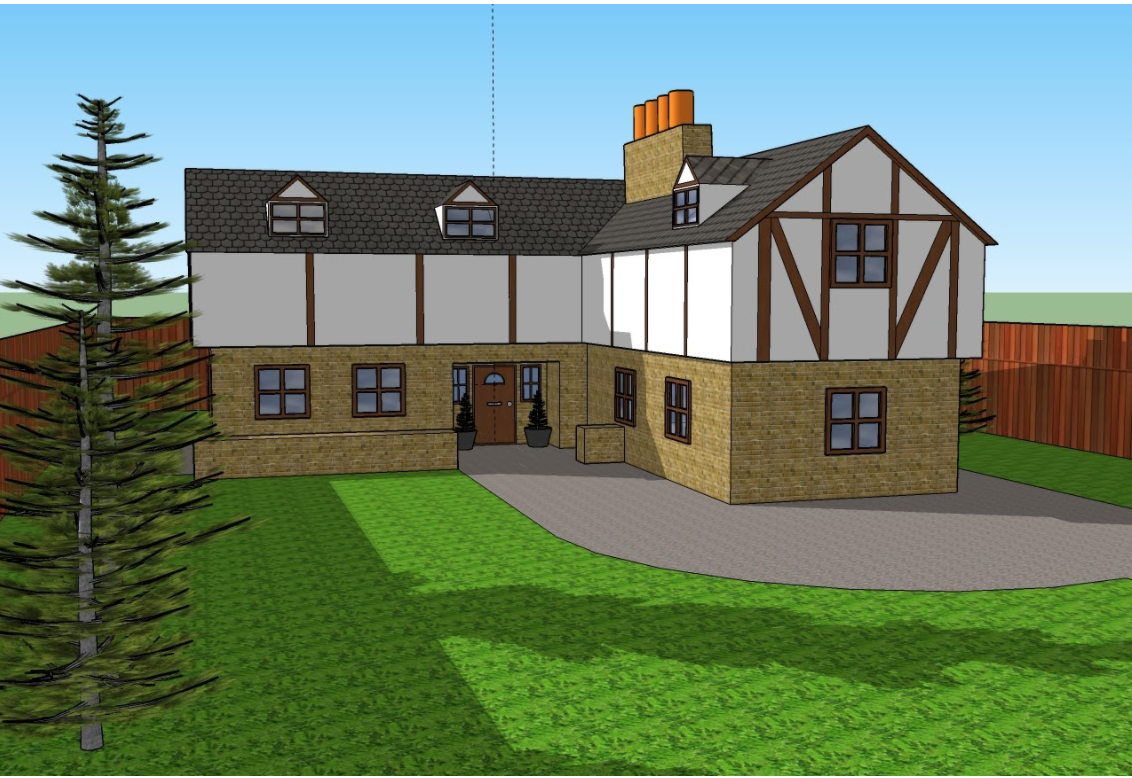
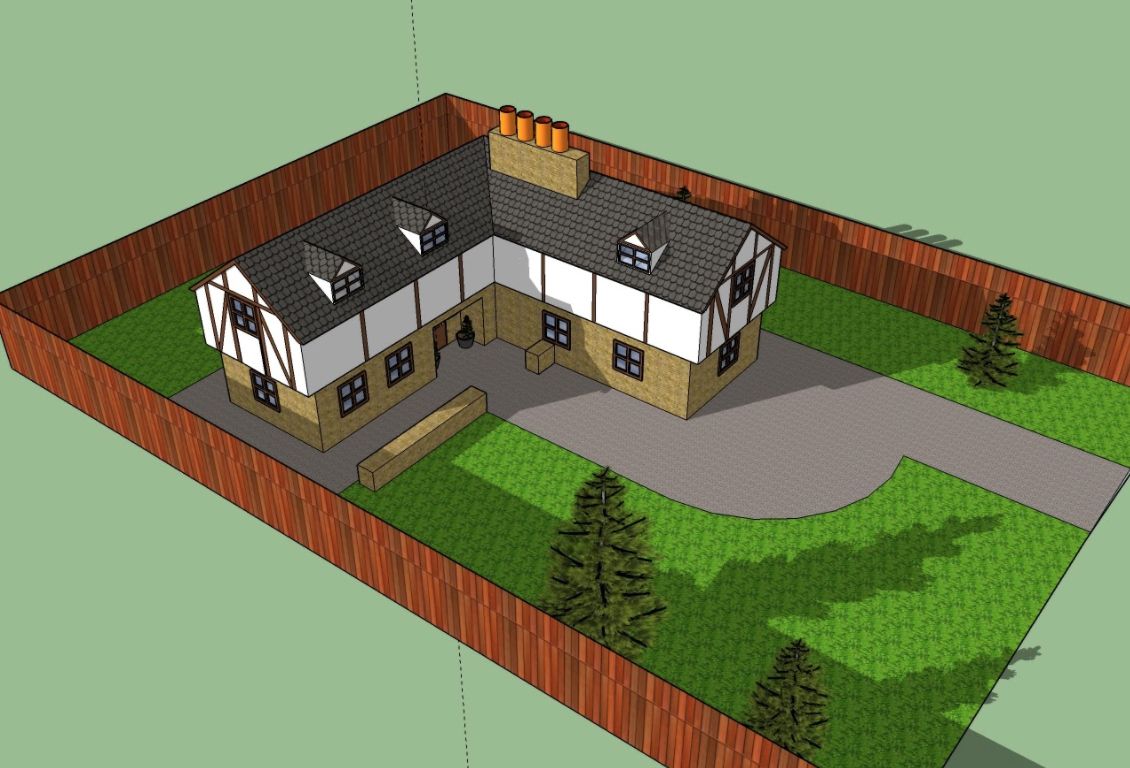
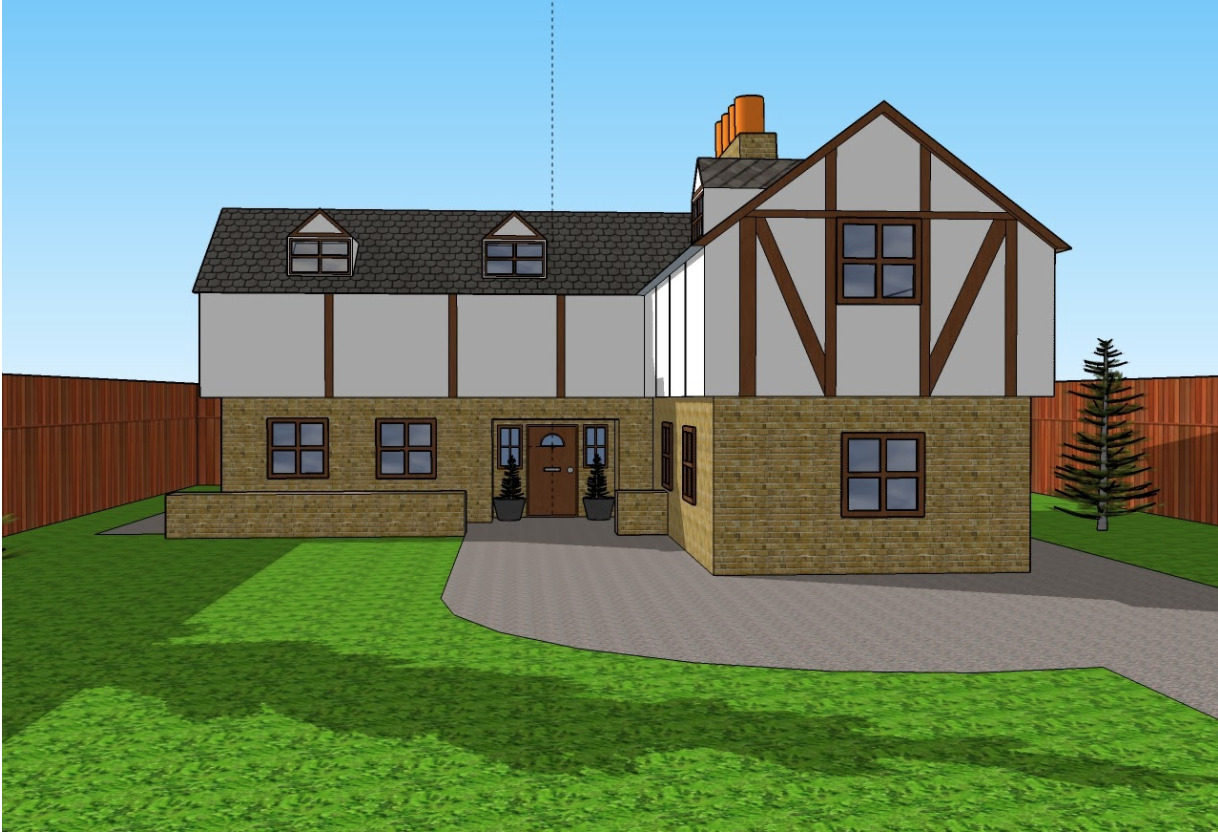
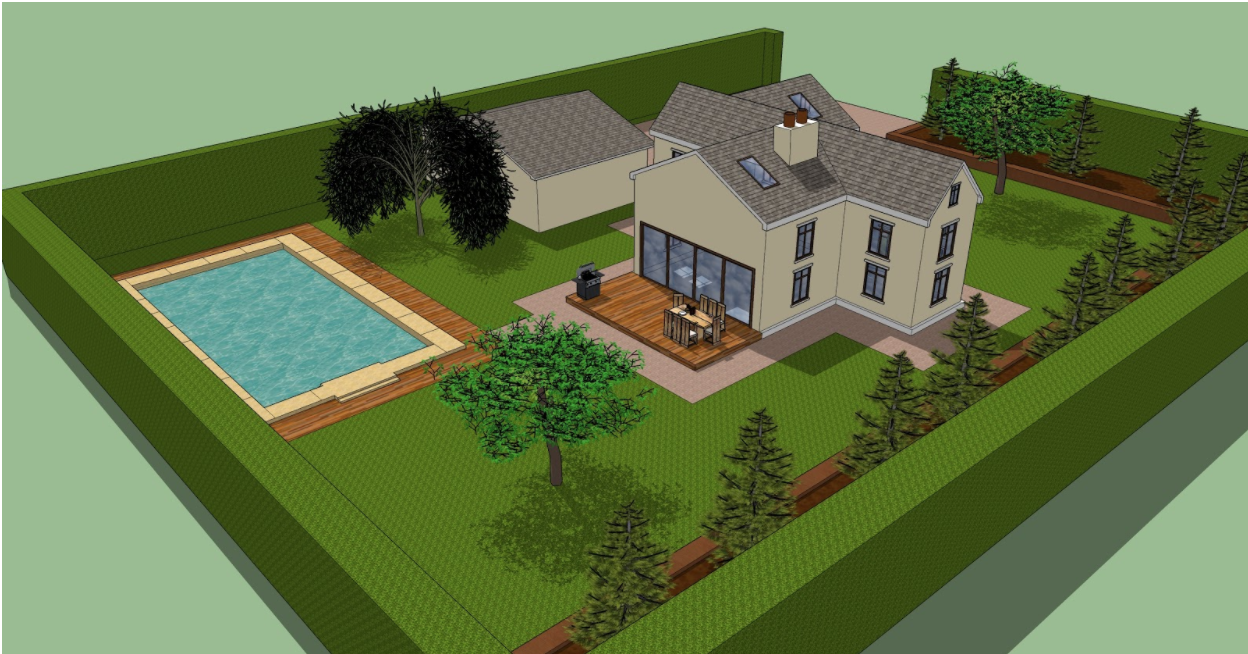
Your house with doors and windows completed might look a bit like this when this stage is completed. We also added garage doors and bifold doors at the back to our model .
Colour and materials
At this point you might want to add some colour and materials to the building. This might take a while when done properly as there are lots of surfaces to cover and quite a few different materials or colours to consider, but again, using components will speed things up as paining one paints them all.
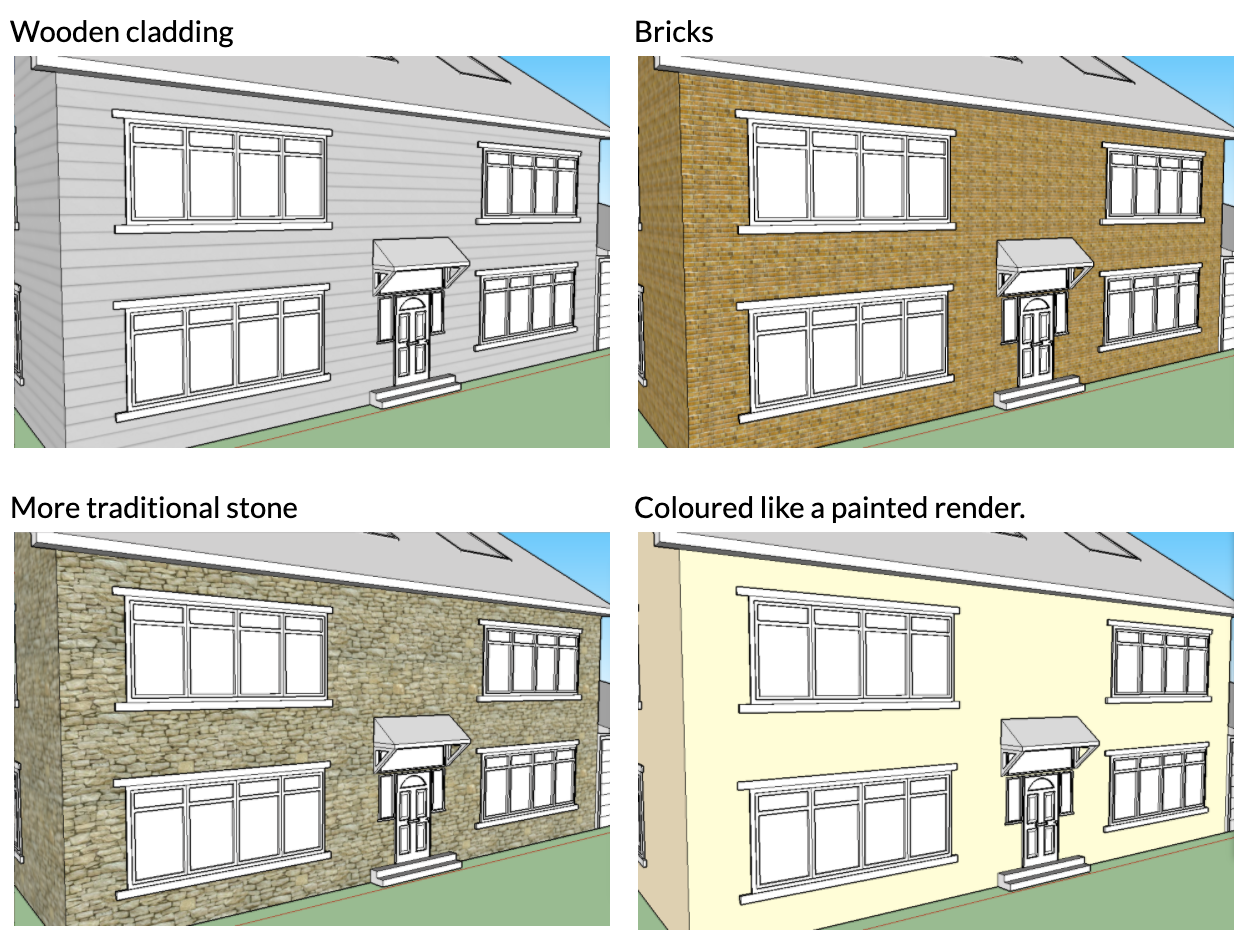
Depending on the version of Sketchup you are using you’ll find material categories for bricks, roofing, wood, metal, translucent (or window coverings depending on your version) and colours, which might all be useful depending on the design of your house.
You may wish to return to look at some example photos of houses with the students here and consider things like different colours of window frames, roof tiles and wall colours or coverings. There are obviously different colours of bricks or stone and many houses are rendered with different materials. So the choice is theirs, and there’s lots to choose from, especially in the newer versions of Sketchup where material lists have been updated.
Here are just a few examples of wall colours and materials:
Components such as the windows need to be double-clicked before you are able to paint them.
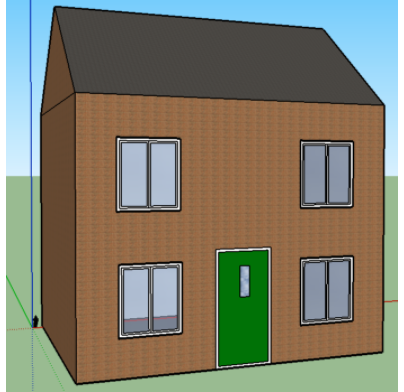
When your house is all painted, it might look a bit like this example
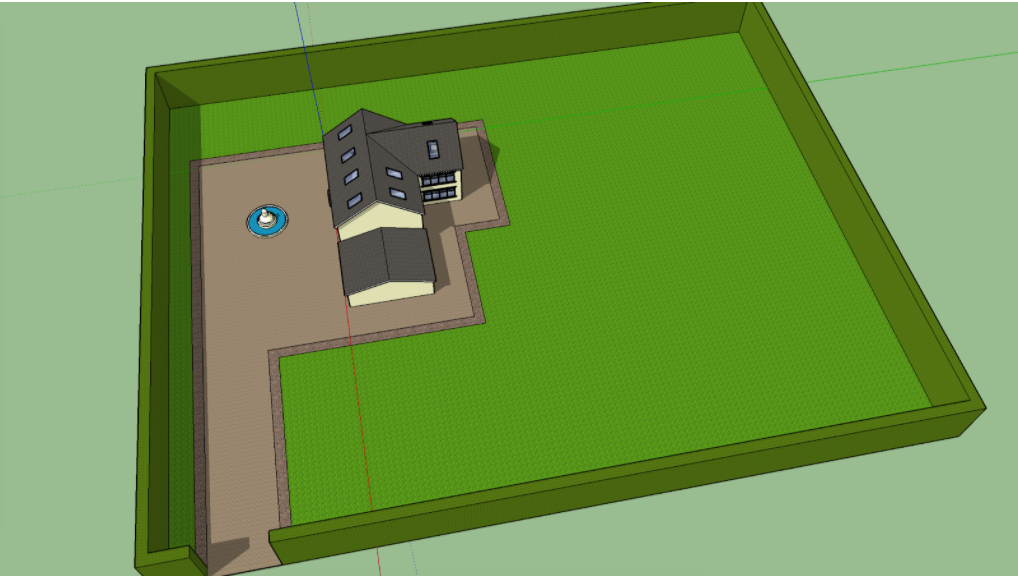
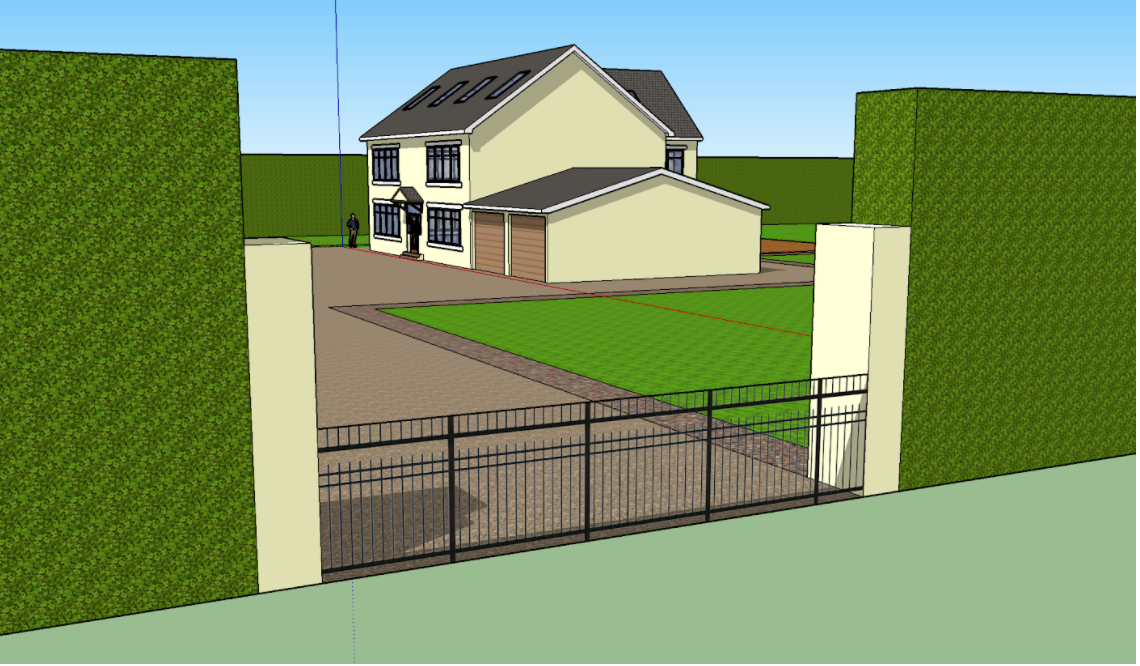
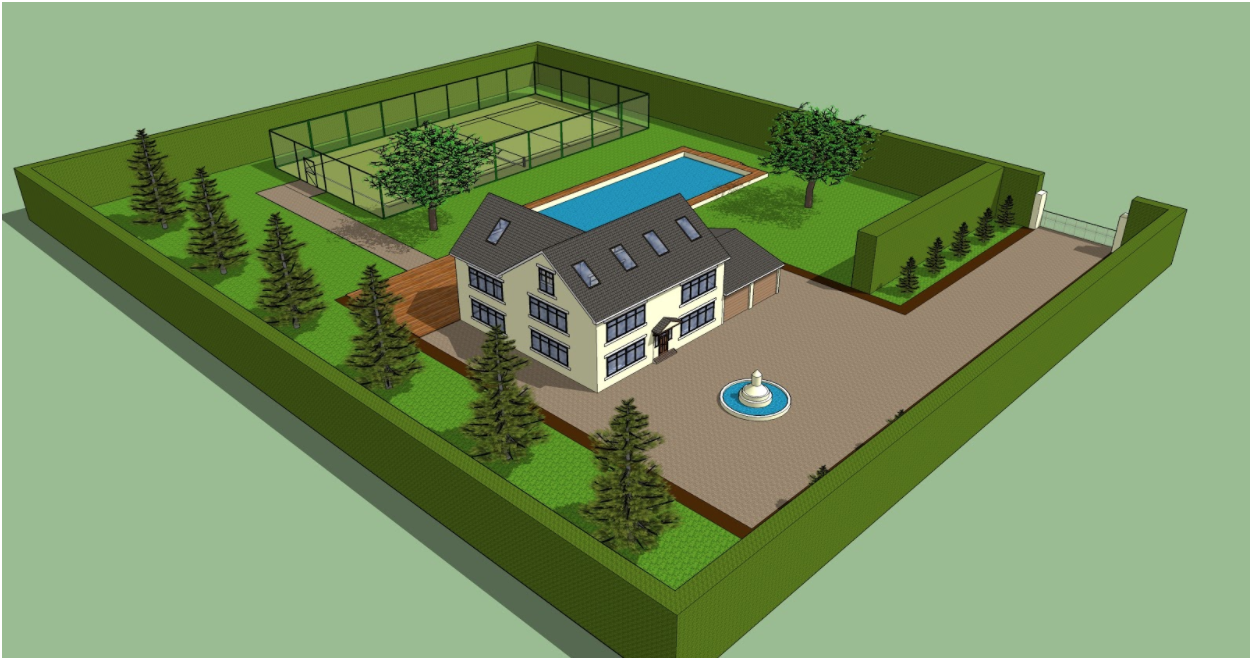
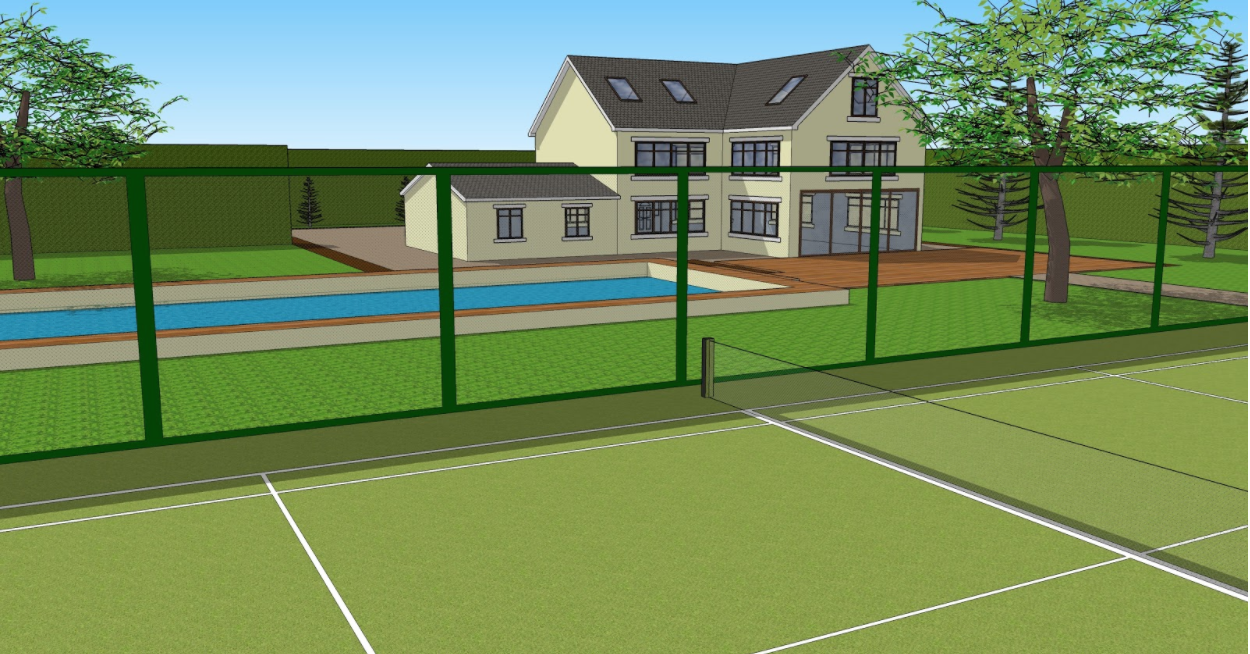
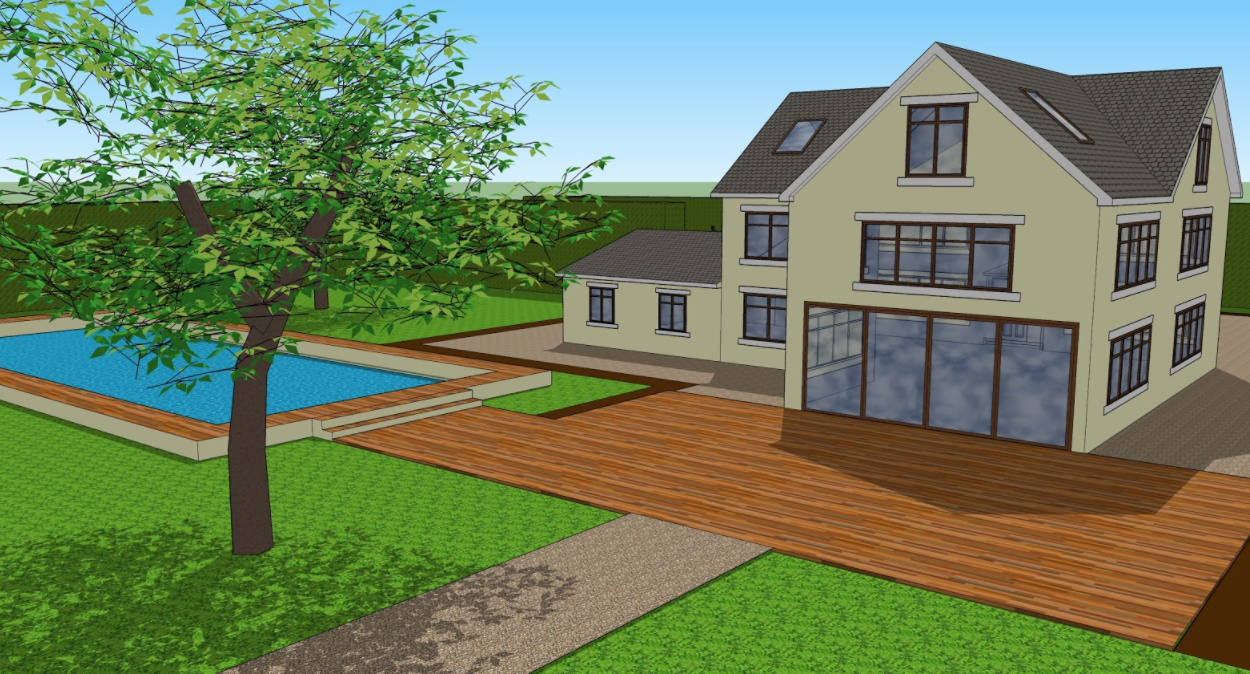
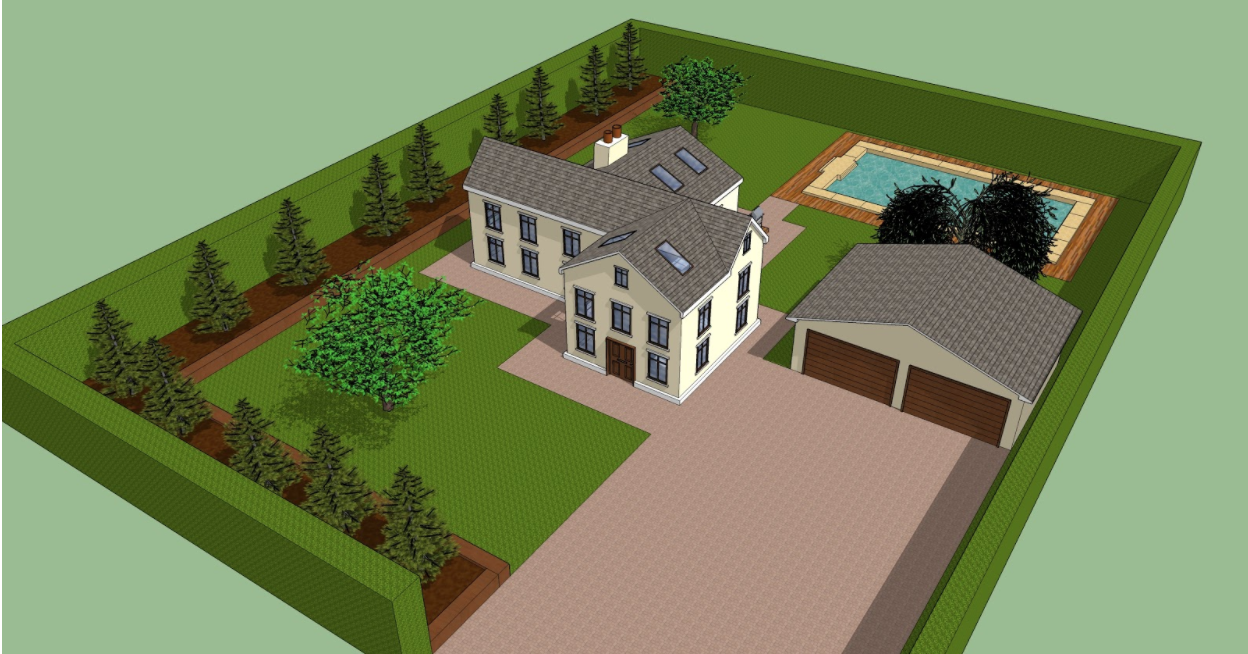
Gardens and surroundings
Once you have completed the house, you may want to leave it there, but if there’s time for your students to extend things further, they can also design the gardens and surroundings for the house.
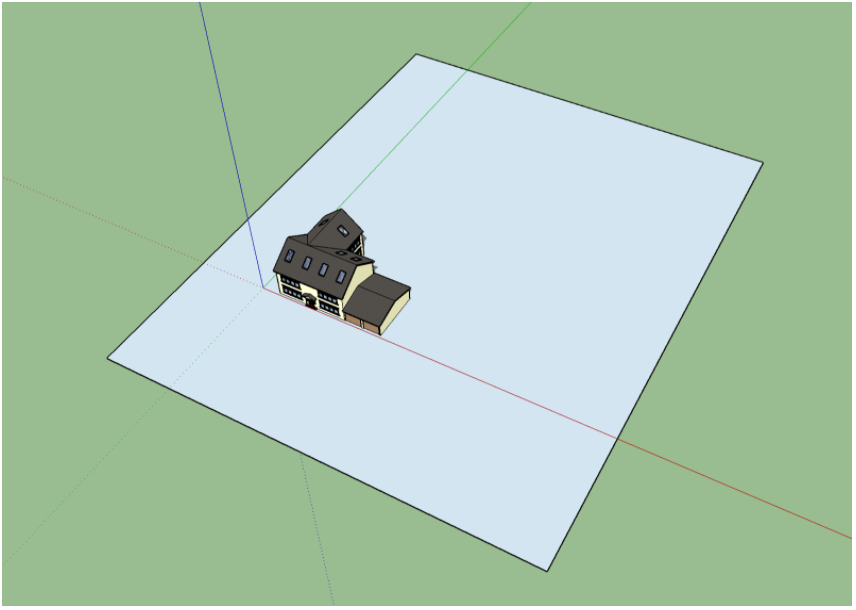
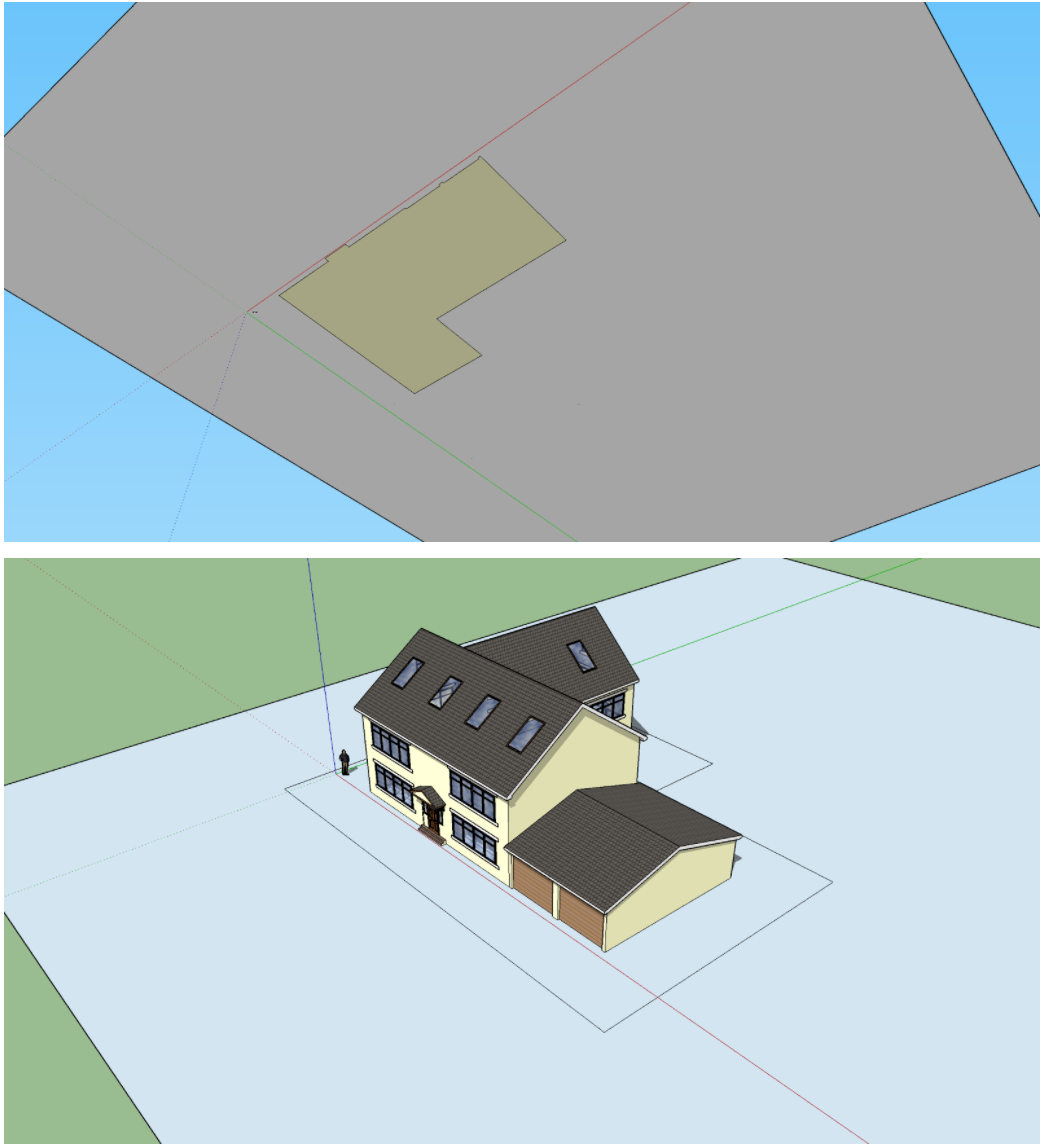
The easiest way to start this is to zoom out from the house and turn the camera to look down from above. Draw a large rectangle around the house that will be the boundary of the garden.
There is no single correct way to design a garden, but like the house guidance, below is an example of features you can add.
Orbit below the ground surface and use the offset tool to create an easy path around your house. Click on the outside edge of its footprint and drag it outwards as wide as you want it.
It’s then easy to add other areas, driveways, patios etc by just adding more rectangles.
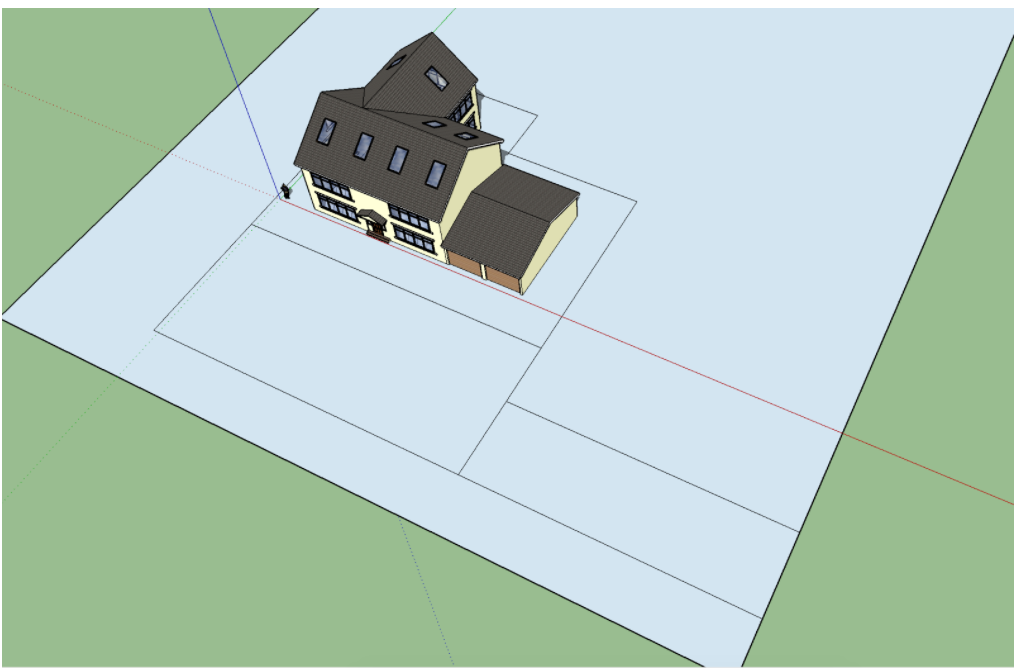
When you are happy with the overall shape, rub out any joining lines.
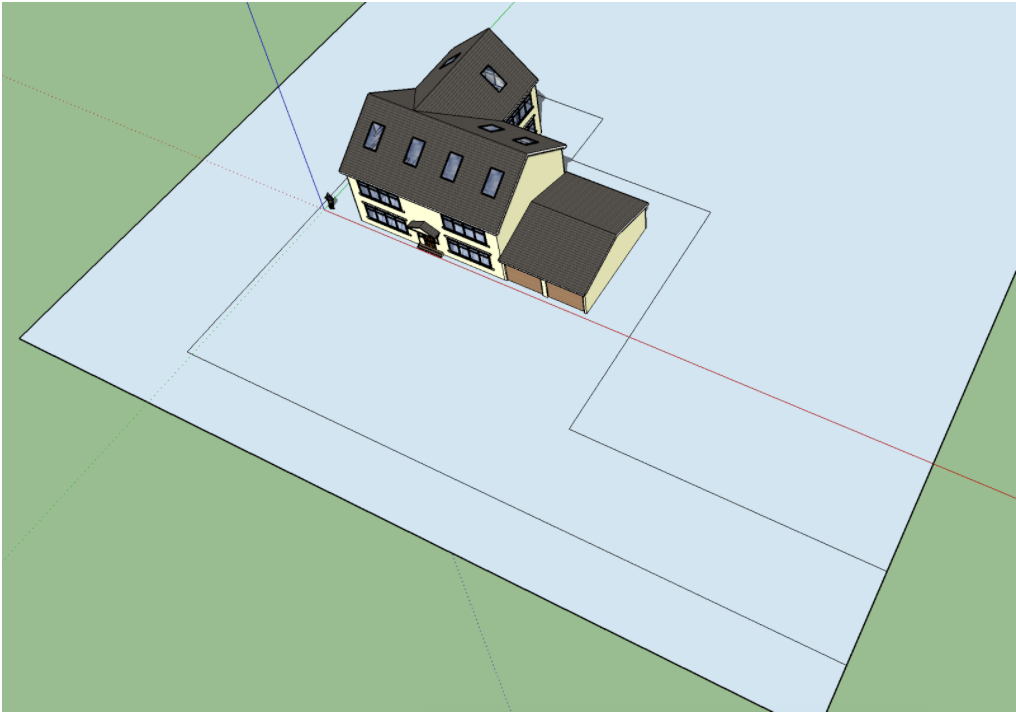
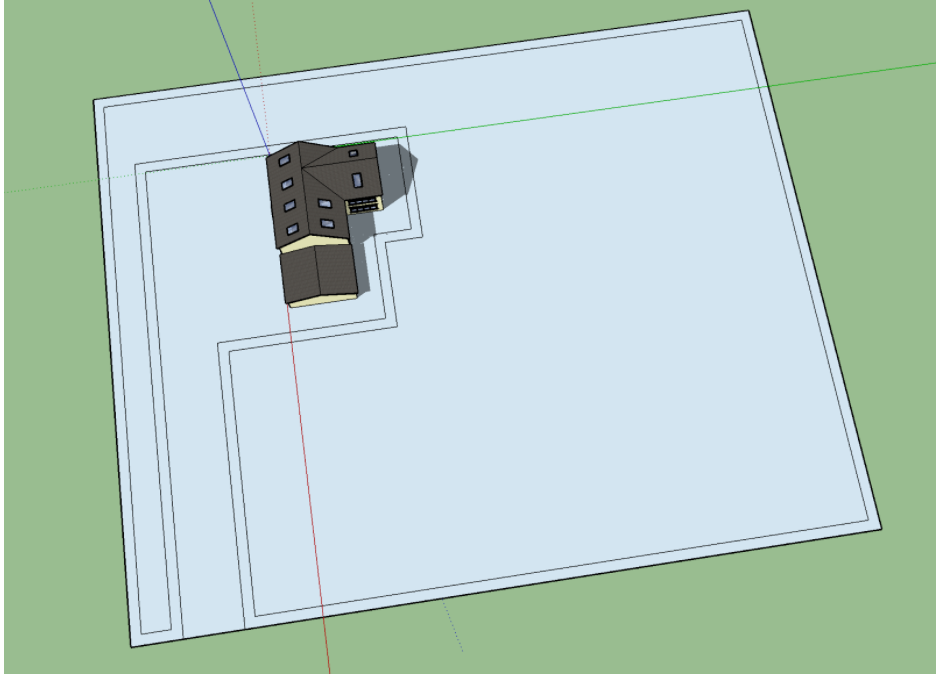
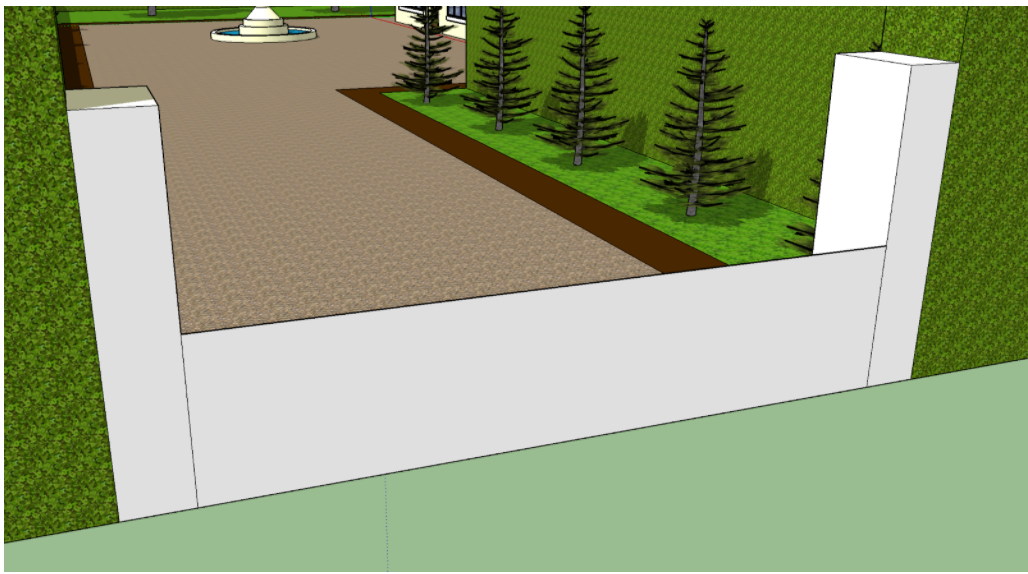
You can use the offset tool again to create easy borders or even hedges around the property. Click on any of the boundary lines and carefully move it inwards.
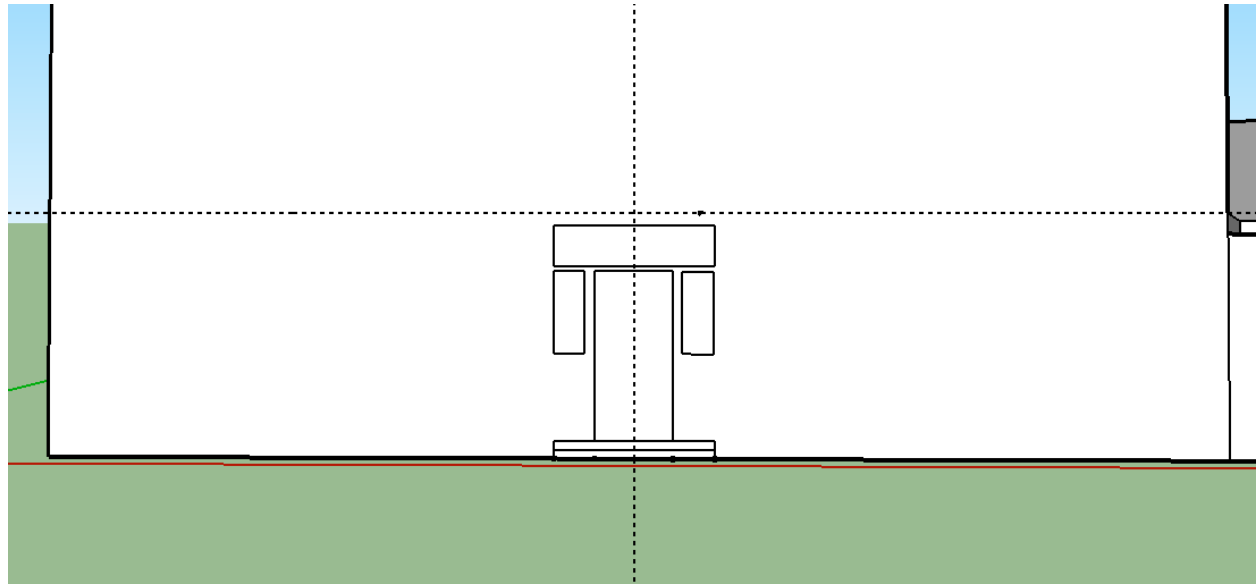
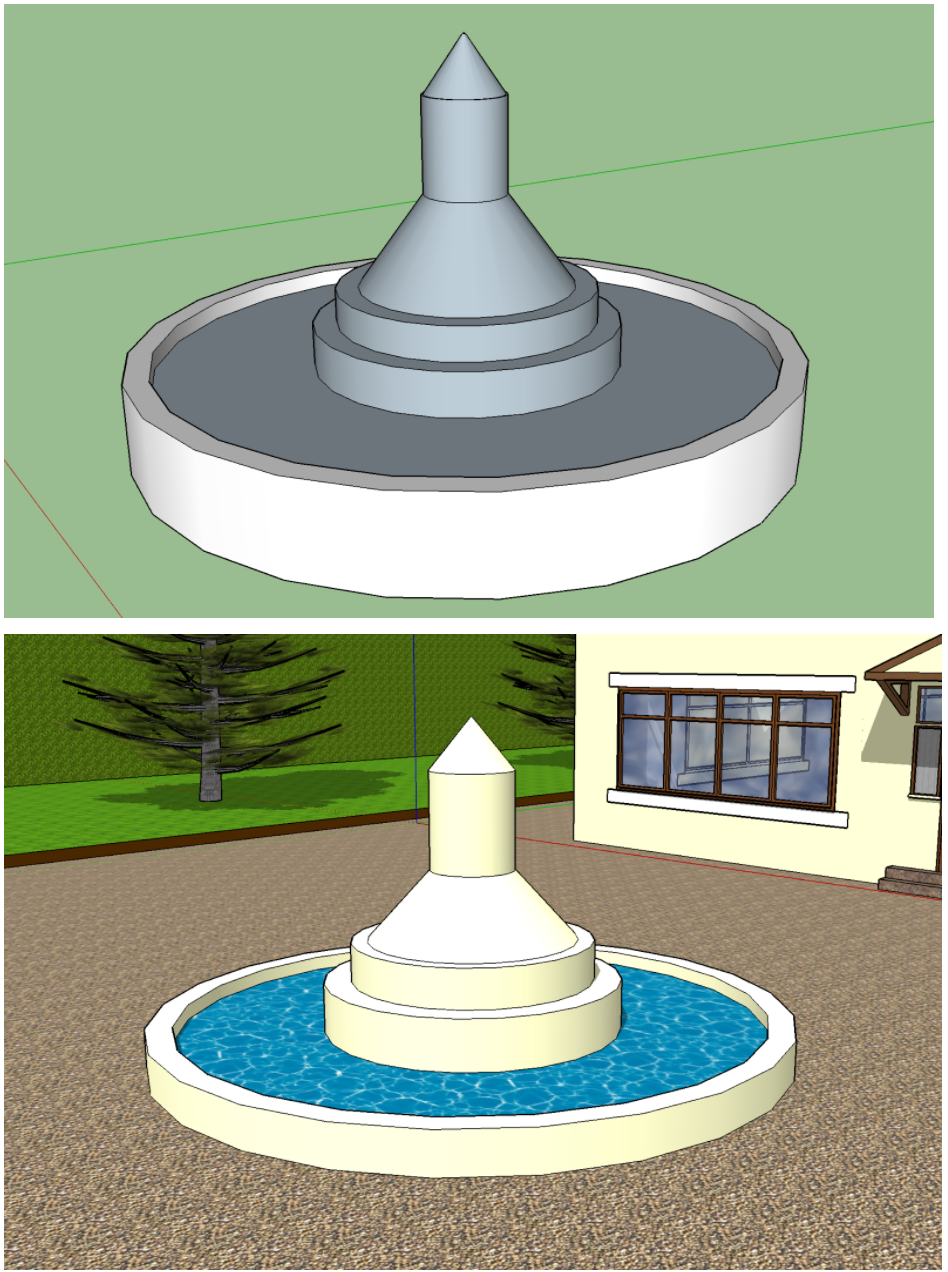
Our house is getting full on luxury surroundings! So we’re adding a fountain to the front driveway. Start with the circle tool and then use the offset tool to create a number of inner circles. Pull these up with push/pull.
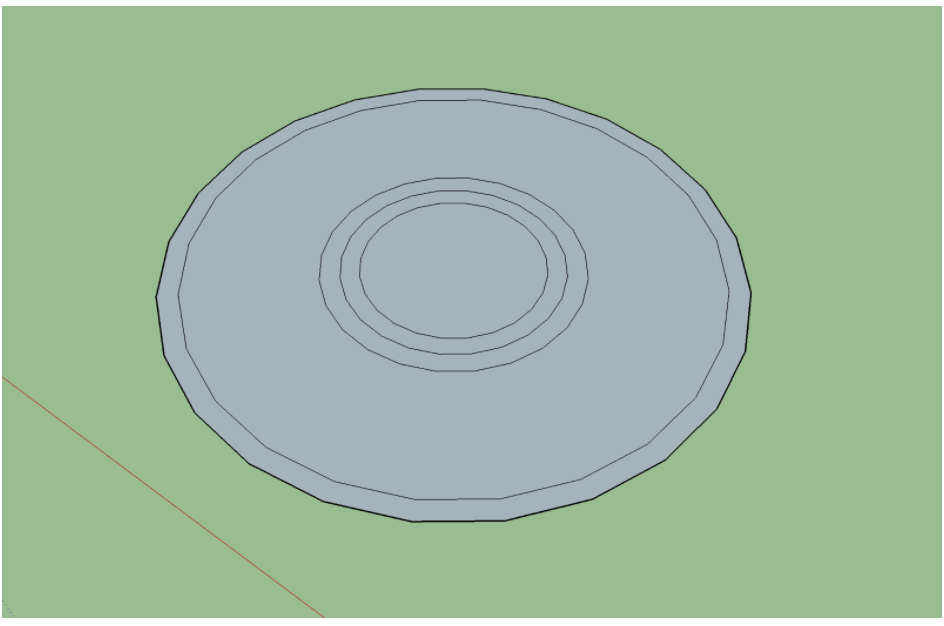
This can create the edges of the fountain’s pool, the water surface and inner fountain layers.
To create cones and slopes as part of the fountain you can use the scale tool. Select it and click on the top surface of a cylinder you created, you will see resizing handles appear. Hold down the Ctrl key and resize from a corner only. Move it inwards to shrink the surface and create a cone that slopes up and in.
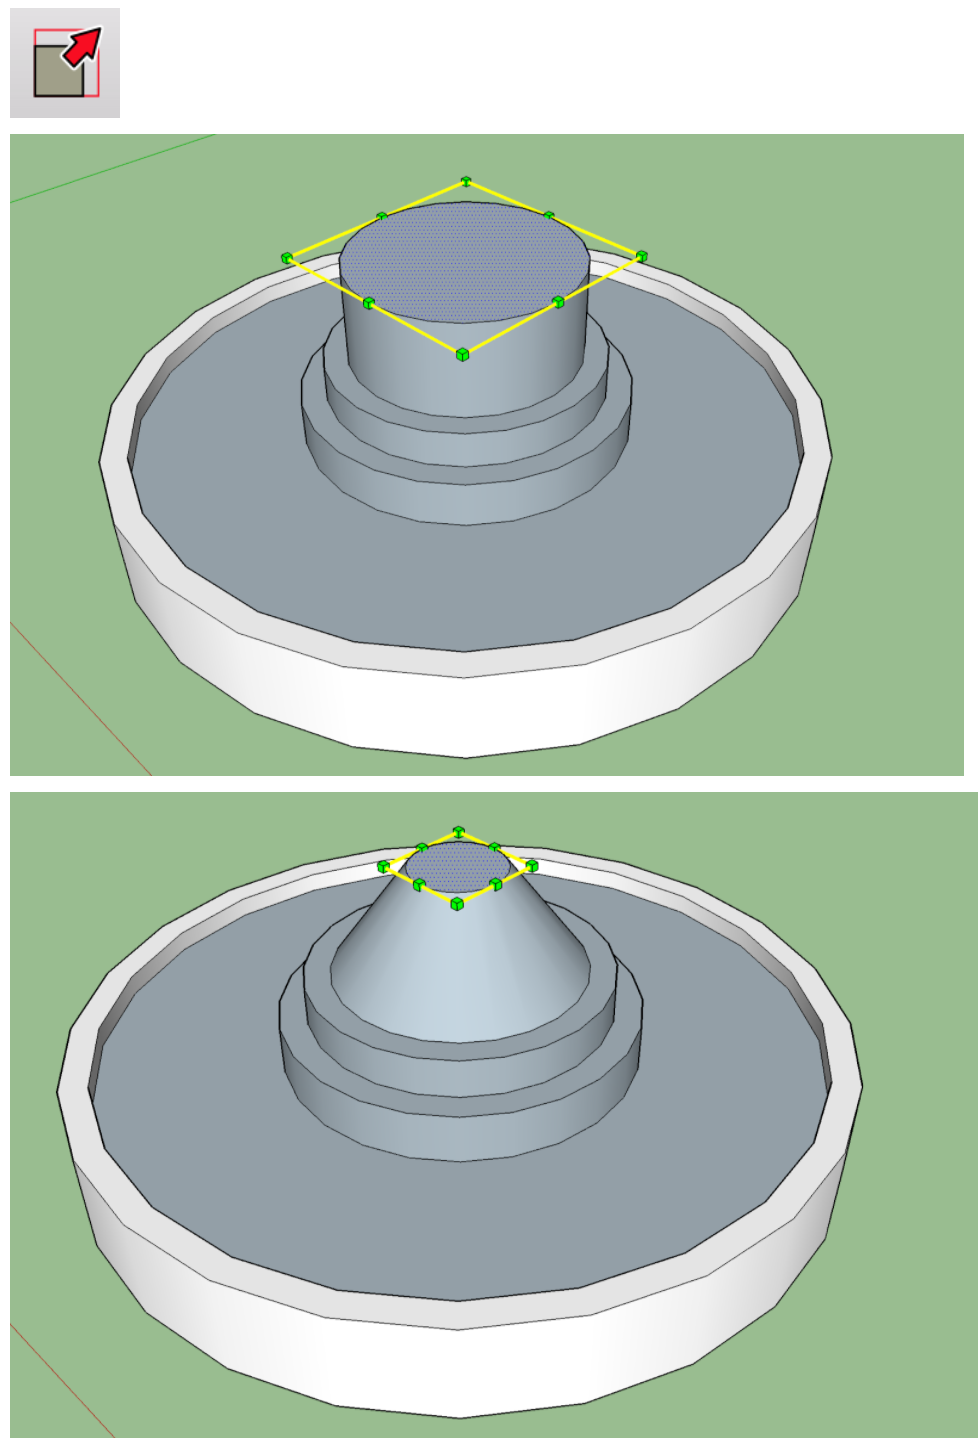
You can add extra sections as you wish and then add some materials to colour it. There’s even a water category in the materials list!
Borders can be easily pulled upwards to create hedges. Colour them, as well your lawns with materials in the vegetation category.
Fences and gates can be easily added with rectangles pulled up into posts and a single vertical rectangle to join them and then painting it with materials from the fencing category (‘Landscapes, fencing and vegetation’ in more recent versions of Sketchup).
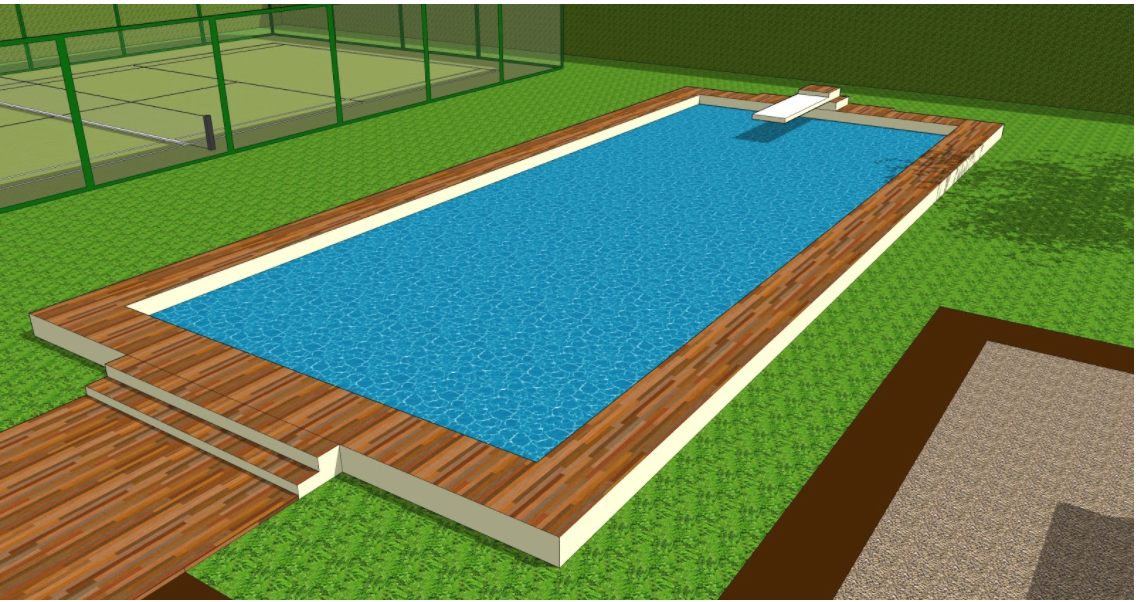
For even more luxury, swimming pools are easy to add with a few rectangles pulled up and pushed down. Add some steps and a diving board with just a few more rectangles pulled outwards.
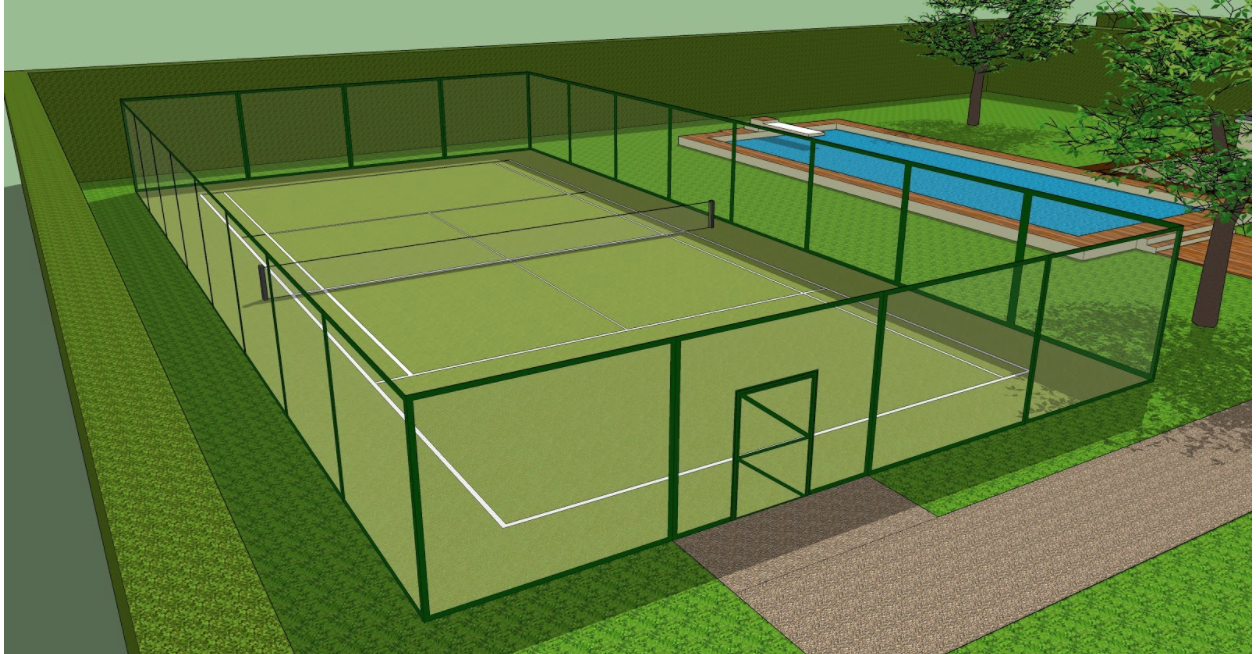
This tennis court is again just lots more rectangles, painted with the mesh fencing option, pale grass materials and simple colours.
Trees are pretty hard to construct, so you can cheat a bit for this part! The 3D Warehouse is an online place where Sketchup users can share their models. There are some amazing models in there!.
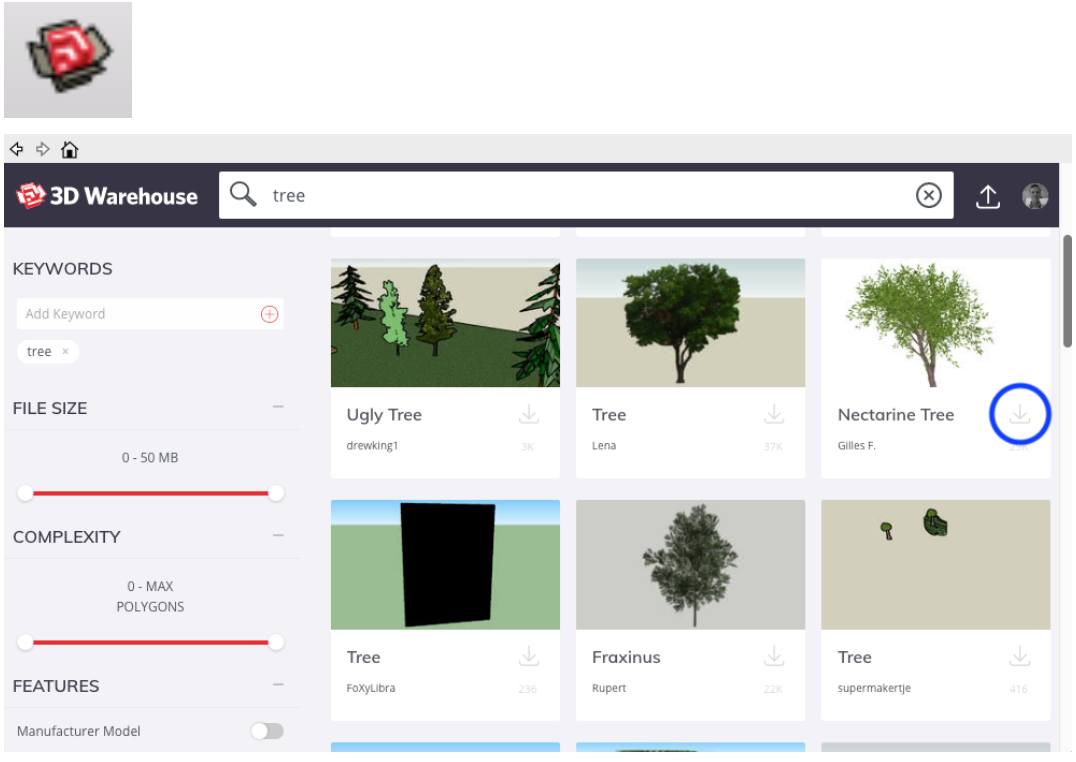
Open the 3D warehouse and do a search for trees, find a few you like and download them. Save them to a folder on your shared area so the students can access them. This is usually better than letting them search for their own extra models as it can also seriously slow down your internet connection if they are all trying to search for and download models.
To add the downloaded trees to your house model go to File > Import and browse for the model. Select it and click to place in your garden. You can use the scale tool to resize it if needed.

Remember, at any point you can save your work as a Sketchup model (.skp file) which will let you come back to your model to work on it (File > Save as). When it’s complete though you can export it as an image. Position the camera (screen view) so it’s showing the view of your model that you want to capture, turning on the shadows effect is a nice extra touch as well:
To turn them on click - View > Shadows To adjust the shadows position, go to the Shadow changing window - Window > Shadows (this lets you change the shadow angles in relation to the time of day and month)
Click File > Export > 2D Graphic. Name your file and choose which format of image you want to save it in (JPG or PNG are normal), then click Export.
So here’s our finished example and a range of images showing it from different angles. Further down the page are some other images of example houses we made with Sketchup.
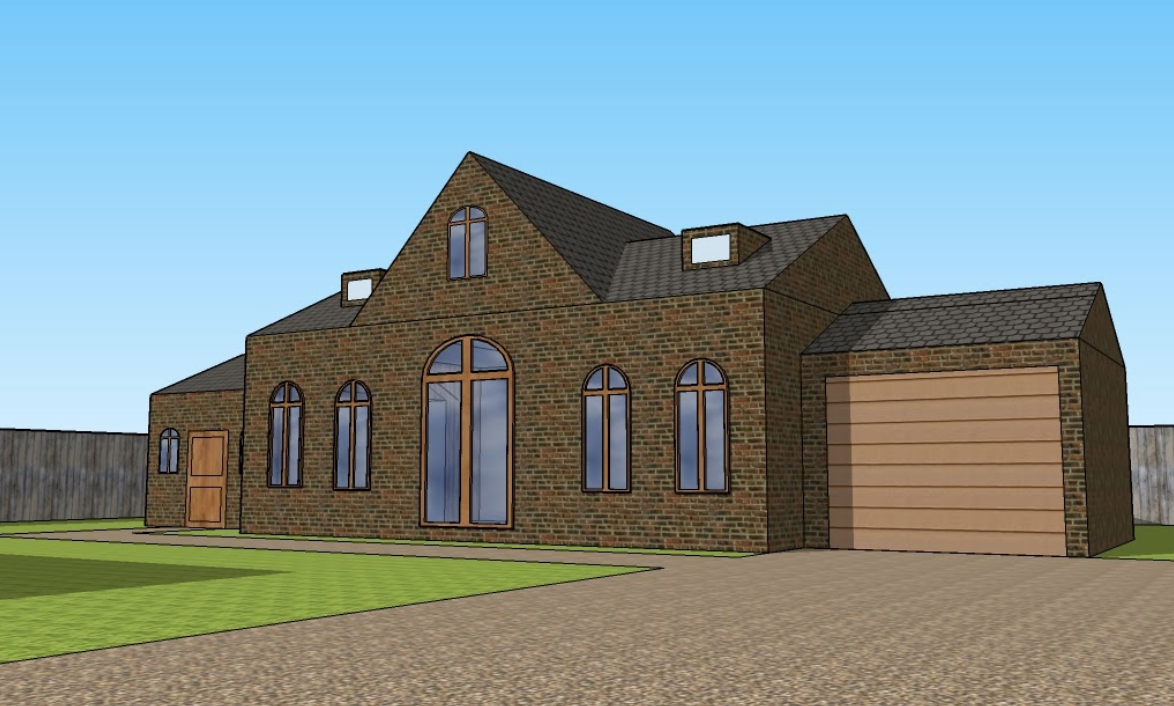
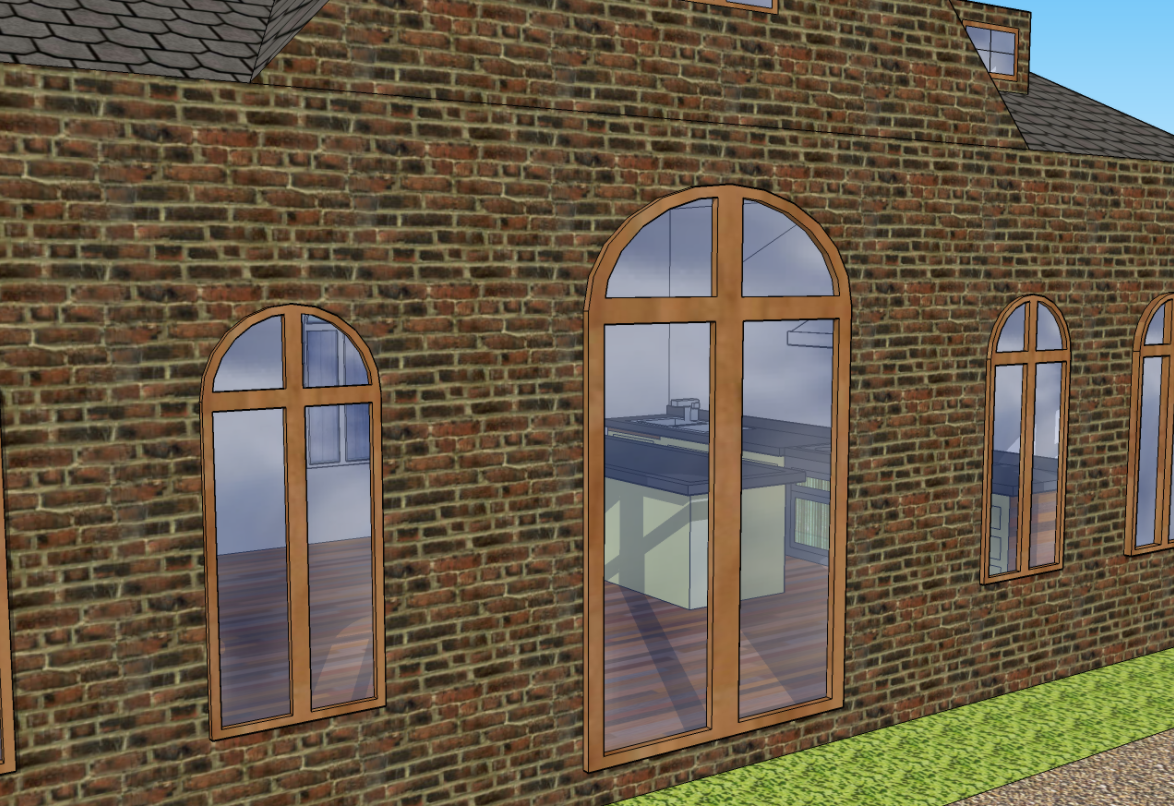
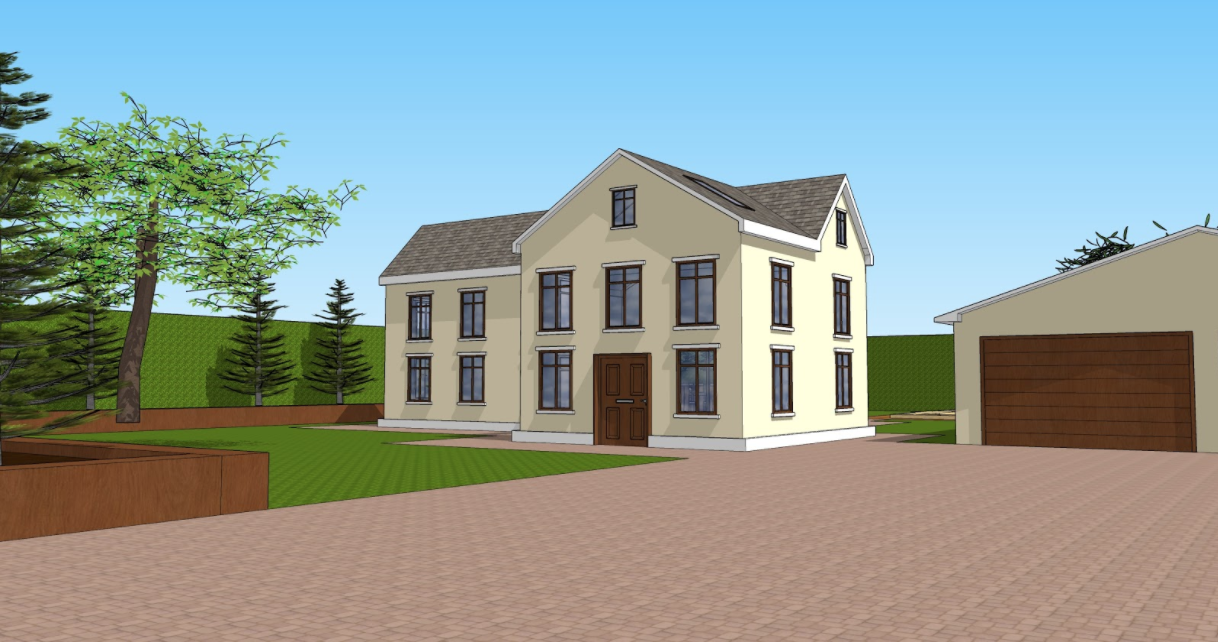
Example houses
Here are some other house examples in different styles.
Plenary
Finish off by giving them a chance to take a look at each other’s work and discussing what they’ve done.
- What did they find easy or difficult?
- Did anyone add any more unusual features to their building or find out anything new for themselves?
Then with regard to their own work, ask them to consider:
- What things are you still finding difficult with Sketchup?
- What do you feel you got better at this week?