Project 1 – Pong part 1
Building Retro Games: Pick a project
Objectives
- Analyse an existing video game and explain how it works
- Understand and use sequence, selection, and repetition in programs
- Use X and Y coordinates effectively to control a sprite’s movement
Lesson Resources
Project 1 - Pong part 1
Project 1 - Pong part 2
Project 2 - Snake part 1
Project 2 - Snake part 2
Project 3 - Space Invaders part 1
Project 3 - Space Invaders part 2
Introduction
This unit contains guidance for using Scratch 3.0 which was released in January 2019. Scratch can be used online at scratch.mit.edu. An offline version can also be downloaded for free HERE if you would like it installed on your network.
Everything included is also possible with previous versions of Scratch although you may find there are some layout and feature differences with older versions.
You can set up a Scratch Teacher Account which provides educators with additional features to manage student participation on Scratch, including the ability to create student accounts, organise student projects into studios, and monitor student comments.
Scratch is a project of the Scratch Foundation, in collaboration with the Lifelong Kindergarten Group at the MIT Media Lab.
Versions of Scratch
Scratch 1.4 - Released July 2009
Offline only. The version most schools began using as they adopted teaching and learning with Scratch.
Other previous versions were available.
Newer Scratch projects are not backwards compatible with this version, but files from v1.4 will open with newer versions of Scratch.
Scratch 2.0 - Released May 2013
Online editor was released for the first time. Offline editor was also made available later.
Lots of new features made available. Online community and sharing of projects became much easier.
Older Scratch projects can be opened in Scratch 2.0
Scratch 3.0 - Released Jan 2019
New Online editor that has been completely rewritten in HTML5 to make it compatible with all modern web browsers on most devices.
Scratch 2.0 projects will be compatible with Scratch 3.0
Offline editors available for some platforms on launch. iOS and Android versions to follow.
Getting Started - The Retro Game
Introduce the game of Pong to the students. Ask them to watch this video of the game being played and talk to a partner and try to answer these questions:
- What do you know about the game?
- How does it work?
- What is the aim of the game?
- How do the different sprites work?
- What rules do they follow?
Discuss the answers to each question and then explain a little about the game and its history.
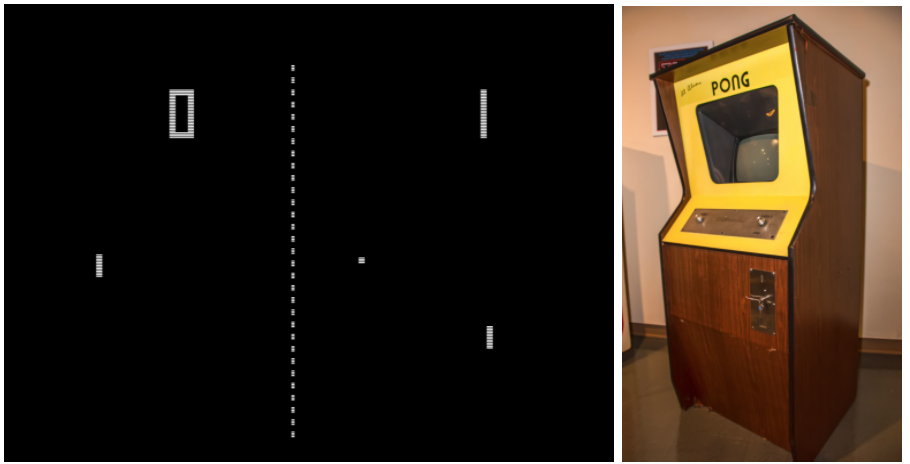
https://commons.wikimedia.org/wiki/File:Pong.png
Pong is one of the earliest arcade video games. It is a table tennis sports game featuring simple two-dimensional graphics. The game was originally manufactured by Atari, which released it in 1972. Allan Alcorn created Pong as a training exercise assigned to him by Atari co-founder Nolan Bushnell. Bushnell based the idea on an electronic ping-pong game included in the Magnavox Odyssey; Magnavox later sued Atari for patent infringement. Bushnell and Atari co-founder Ted Dabney were surprised by the quality of Alcorn's work and decided to manufacture the game.
Pong was the first commercially successful video game, which helped to establish the video game industry along with the first home console, the Magnavox Odyssey.
(Source: https://en.wikipedia.org/wiki/Pong)
Now let’s get on with making our own version!
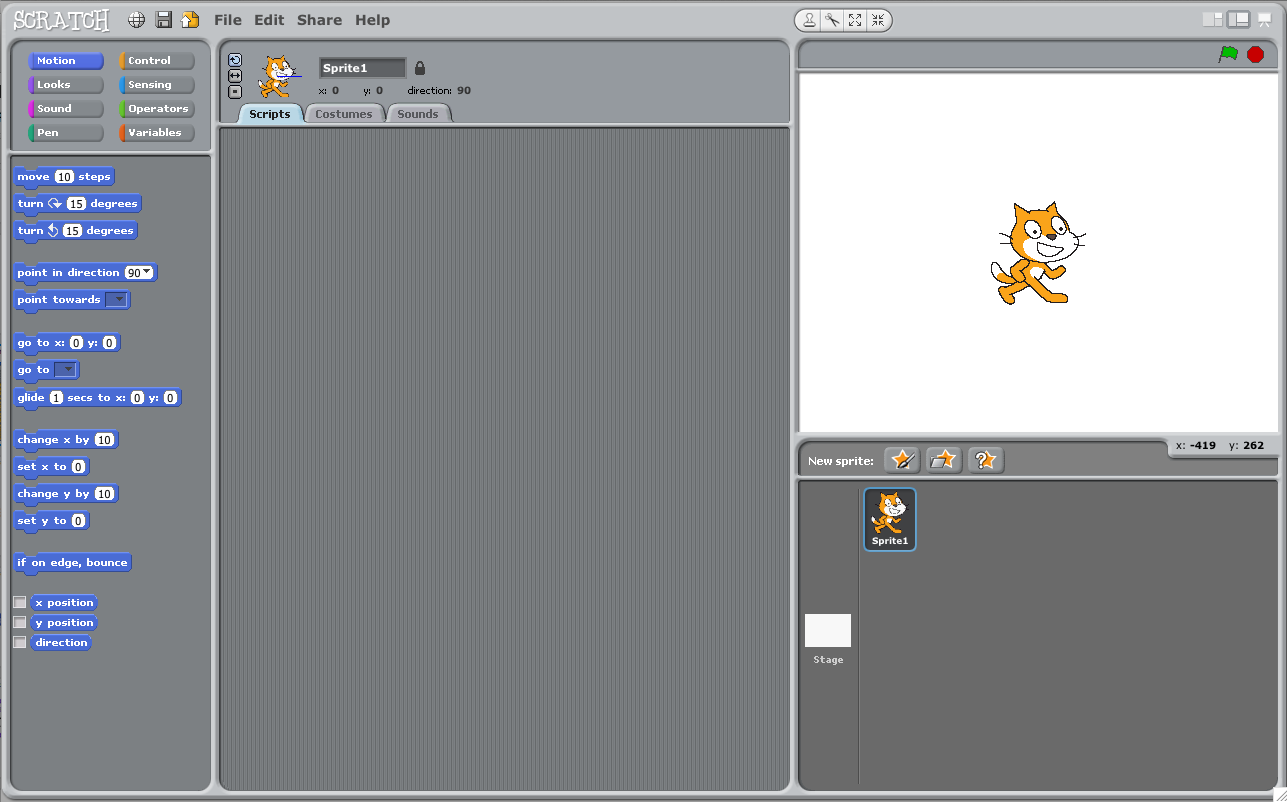
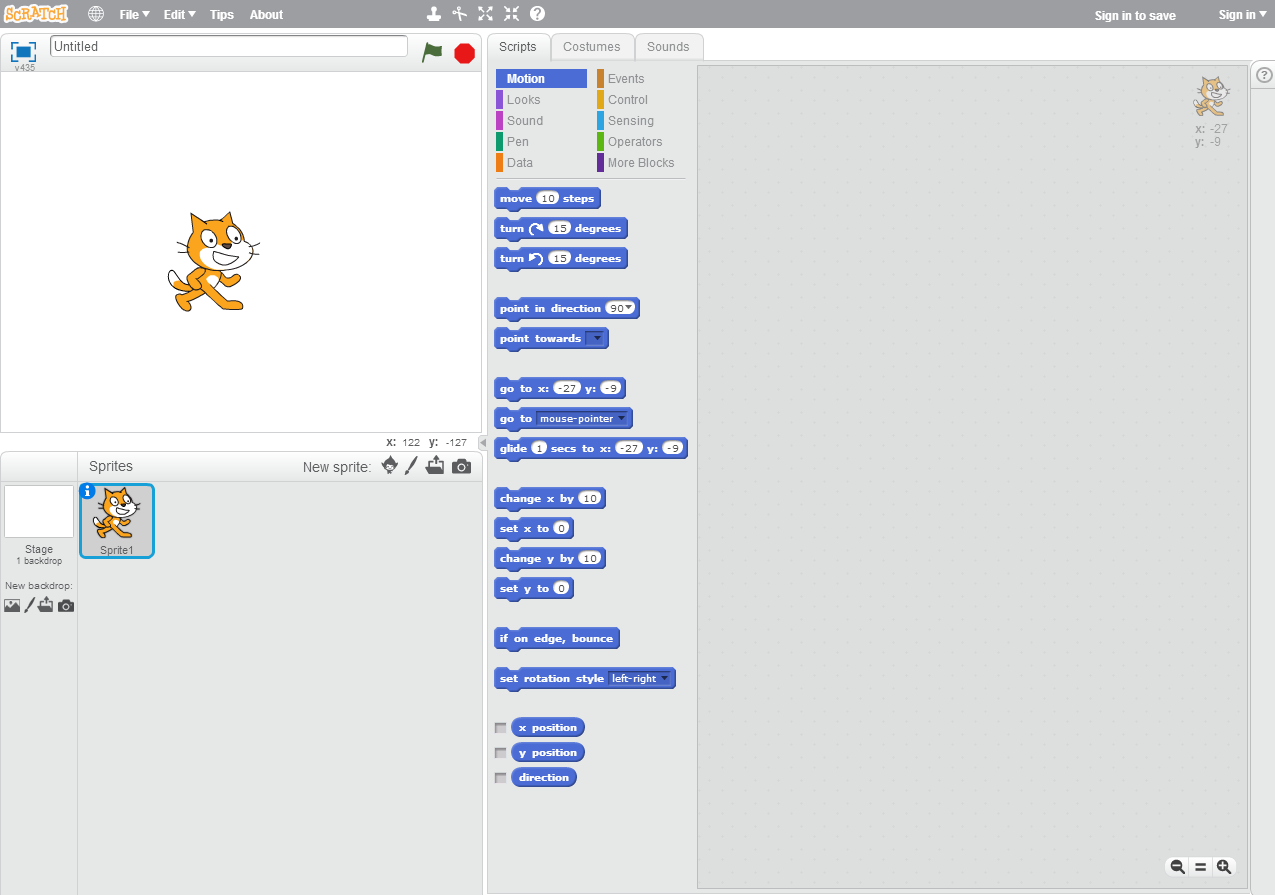
The Background and Sprites
To get started, click on the Stage section in the bottom right of the screen, then select the Backdrops tab in the top left of the screen. Here you will find the paint editor for backgrounds in your projects.

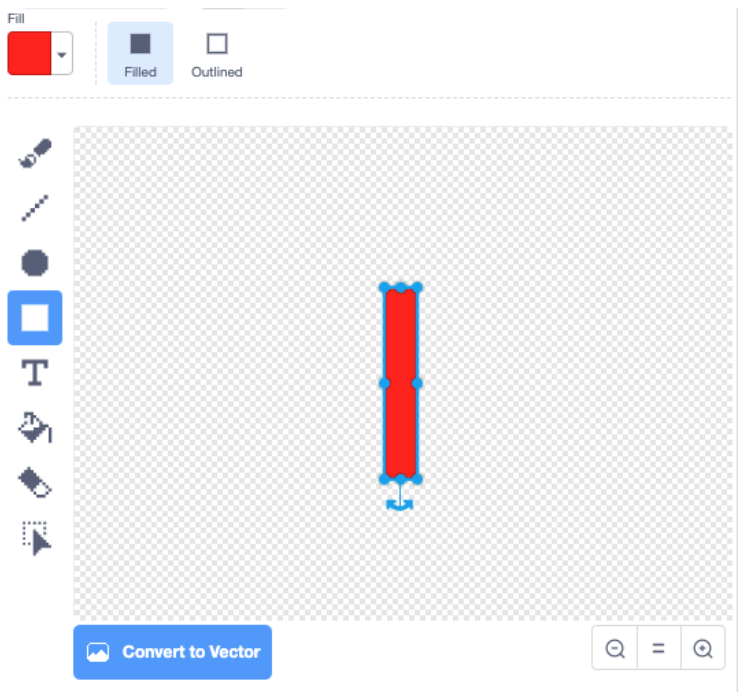
Click the blue Convert to Bitmap button at the bottom of the screen.
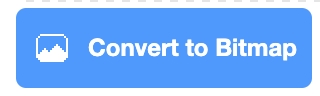
Choose the Fill tool from the drawing tools and pick a colour from the colour mixing tool.
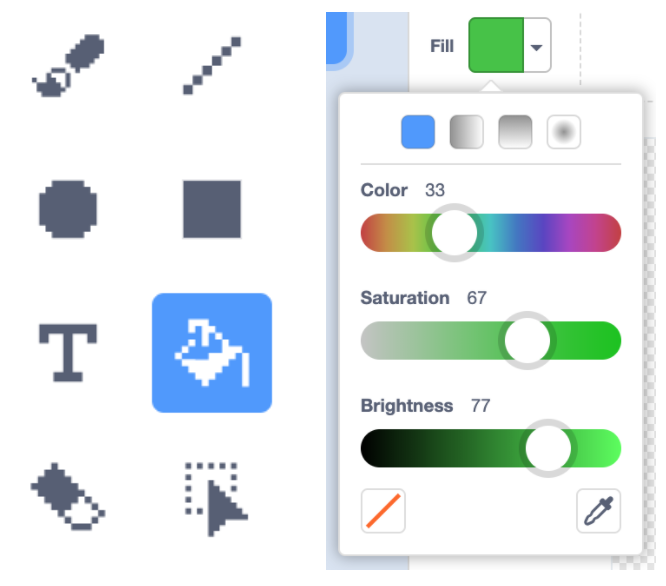
Then use the straight line tool (thickness 10) to add a line vertically down the centre of the screen:
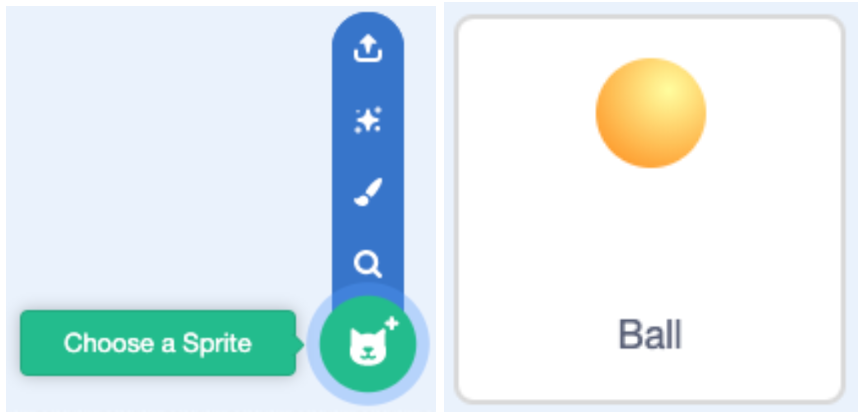
Now let’s add some sprites for the game. Choose the ball from the provided sprites in the library.
Now let’s make the two bats. Paint your own sprite. Convert the image to a Bitmap and use the rectangle tool to draw a thin rectangle in the centre of the screen. Once placed, use the handles to adjust its size if necessary.
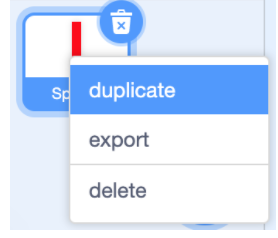
Set the sprites size to approx 50 and then right-click the sprite in the bottom right of the screen to duplicate it.
Use the fill tool to change the colour of the second bat and arrange all three sprites on the screen like this:
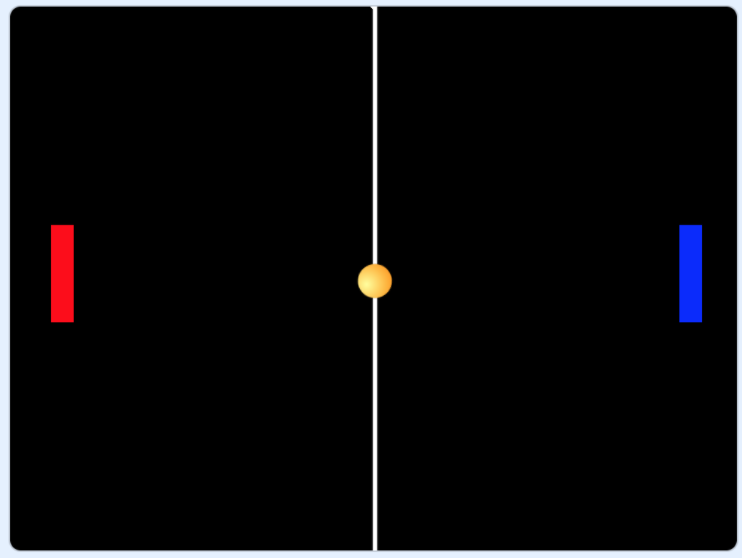
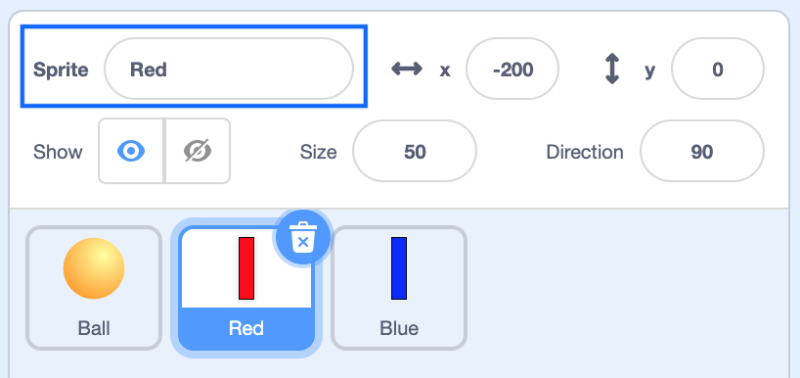
Finally, rename the two bat sprites with their colour name to make things clearer later. This can be done in the Sprite box under the Stage.
Controlling the bats
Now time to program the bats so they can be controlled by two different players.
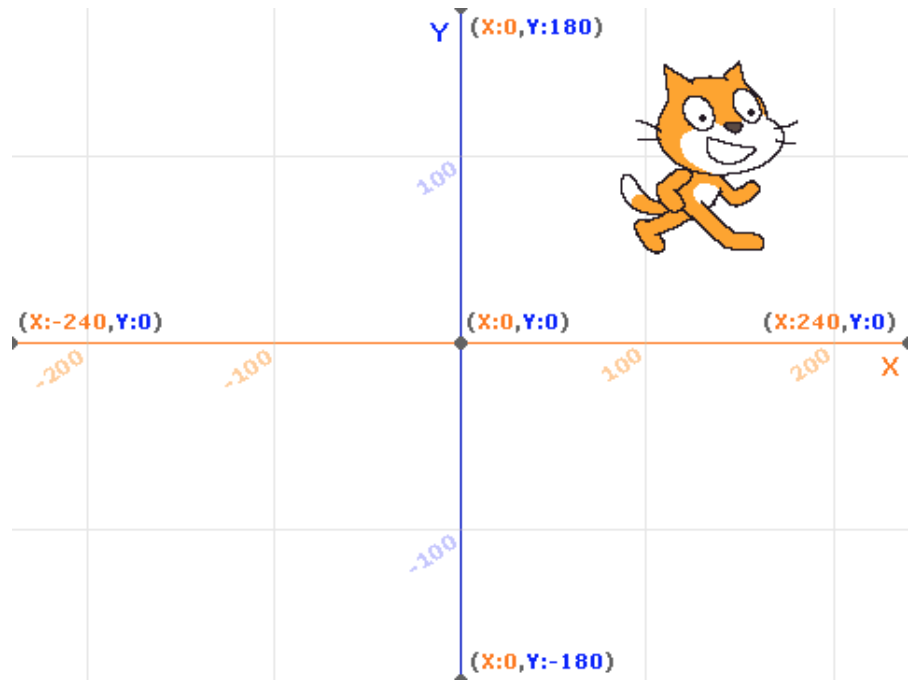
First, let’s set the start position of the bats. What is a coordinate? Explore your students’ knowledge of coordinates based upon what they have studied in maths and previous work with Scratch. They may have experienced using them in other contexts as well, most likely maps or perhaps the game of battleships.
They describe the position of something on a grid, and are commonly used in video games to code where a sprite should be in the game.
In a 2D game (and in the Scratch environment) this is done with a four quadrant coordinate grid like the one below, (0,0) being the centre of the screen:
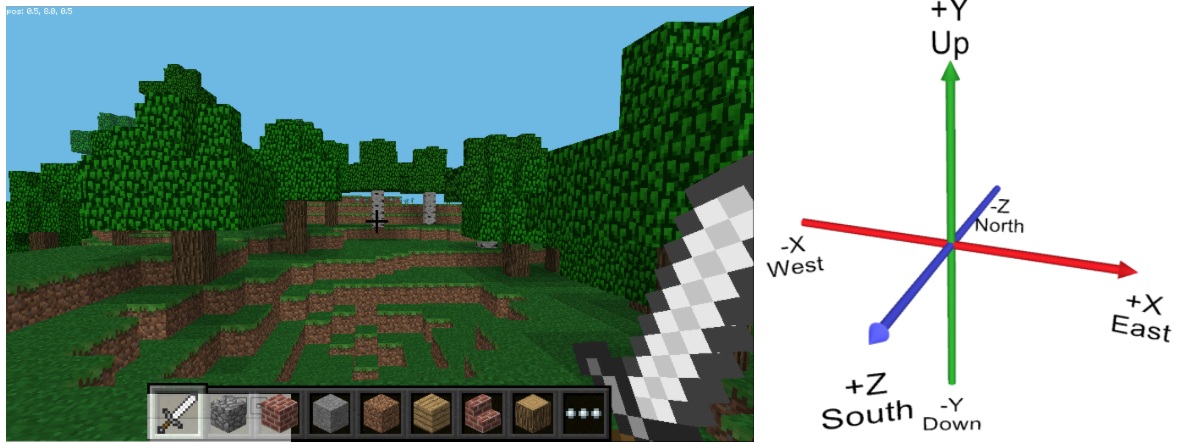
3D video games, like Minecraft or Kodu games also use coordinates but add a third (Z) axis to describe the depth position on the screen, in addition to the horizontal and vertical positions, so a coordinate might look like this (124, 87, -89).
There are several blocks in Scratch that relate to coordinates and they can all be found in the motion category. If X is the horizontal position and Y is the vertical position, what do you think these blocks will do to a sprite?
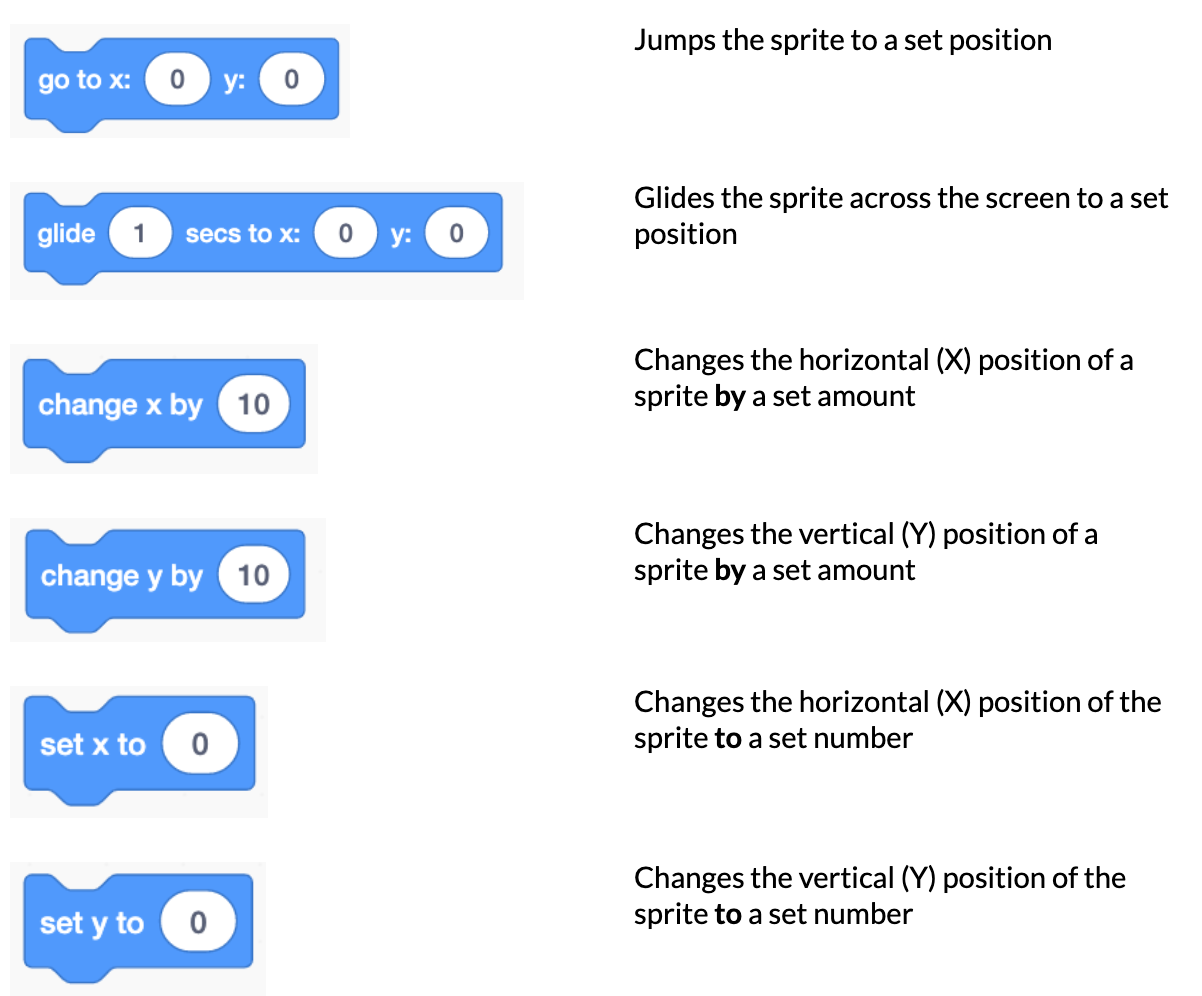
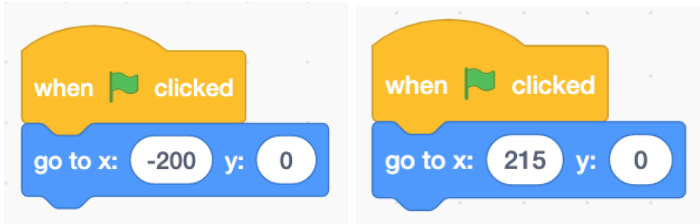
Which of these blocks could we use to make the bats appear in the correct start position?
The ‘go to x y’ block is best for this. These are coordinates we’ve used for our red and blue bats.
Conditions
To make them move we’ll add some conditions based on the keys that are pressed on the keyboard. Recap with the students; what is a condition? They are rules that dictate what happens and when it’s allowed to happen. This is also known as selection. They should have used these before if they have completed any of our other Scratch units of work.
For example, someone at home might say to you:
“You can play out with your friends on one condition, you must finish your homework first.”
Finishing the homework is the condition here, it dictates when, or if the ‘playing out’ will happen.
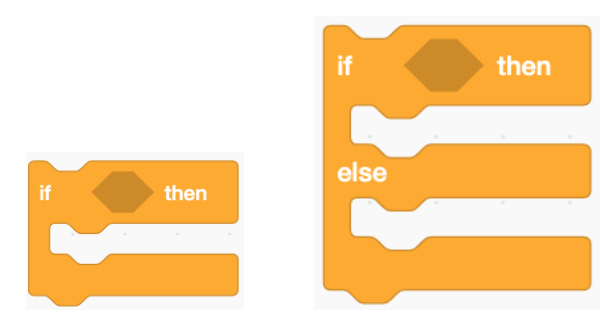
There are generally two types of conditions in most programming languages, and this is true in Scratch as well. An ‘if then’ block allows an event to happen when a condition has been met. An ‘if then/else’ block has TWO options. It allows an event to happen when a condition has been met, but triggers a second event if the condition has NOT been met - the ‘else’ part is an ‘otherwise’. For example: ‘If it’s raining wear boots, else (otherwise) wear sandals’.
Will this code work as it is? Not really, certainly the key press will not make the bat move yet. Why not? What else do we need to add?
The ‘if/then’ block needs to be able to work in more than one instance, so we need to add a loop to our code.
Loops
Can anyone explain what a loop is? What different types of loops are there?
Counted loops repeat commands a certain number of times, like this example from Scratch Jr

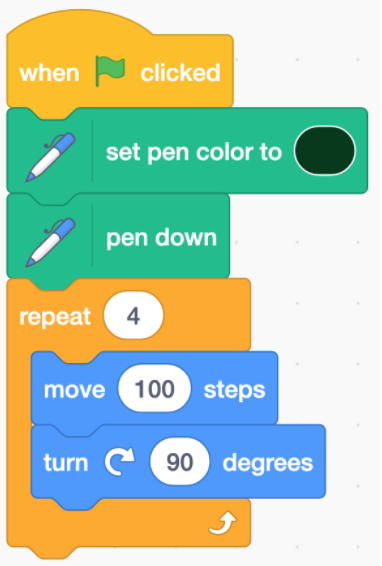
Or this example from Scratch, can you tell what it would do? (draw a square)
Each repetition of the code inside the loop is called an iteration.
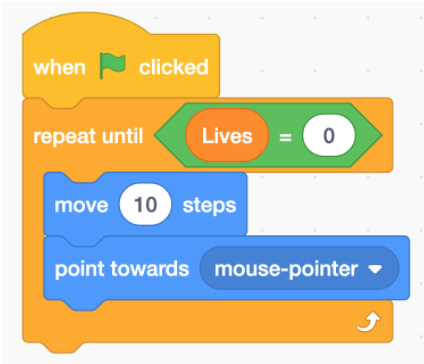
Sometimes you don’t want to repeat code a predetermined number of times. Instead you want to repeat until or while some condition is TRUE. This can be accomplished using a ‘Repeat Until’ block. The hexagon shape after the word “until” means we need some type of condition to determine when the loop will stop.
In this example, the code would make a sprite move around until their lives ran out in a game.
The third type of loop is an infinite, or Forever loop. This type of loop will keep repeating the code inside the loop until the user stops the code running.
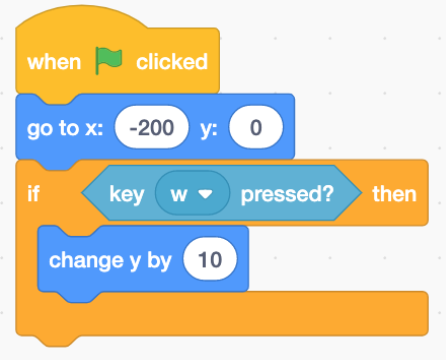
In Scratch, a Forever loop repeats the code inside it approximately thirty times a second! So it's constantly checking to see if any conditions are being met (pressing W in this case) and running the code nested in the ‘if/then’ block if it is. So it always works and the bat will always move up when we press W.
So let’s add a Forever loop!
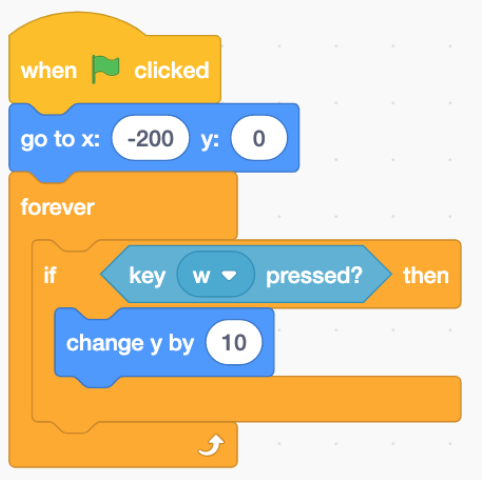
What will happen when we press W? It will change the sprite’s position by 10 on the Y axis, making it move up the screen.
Now:
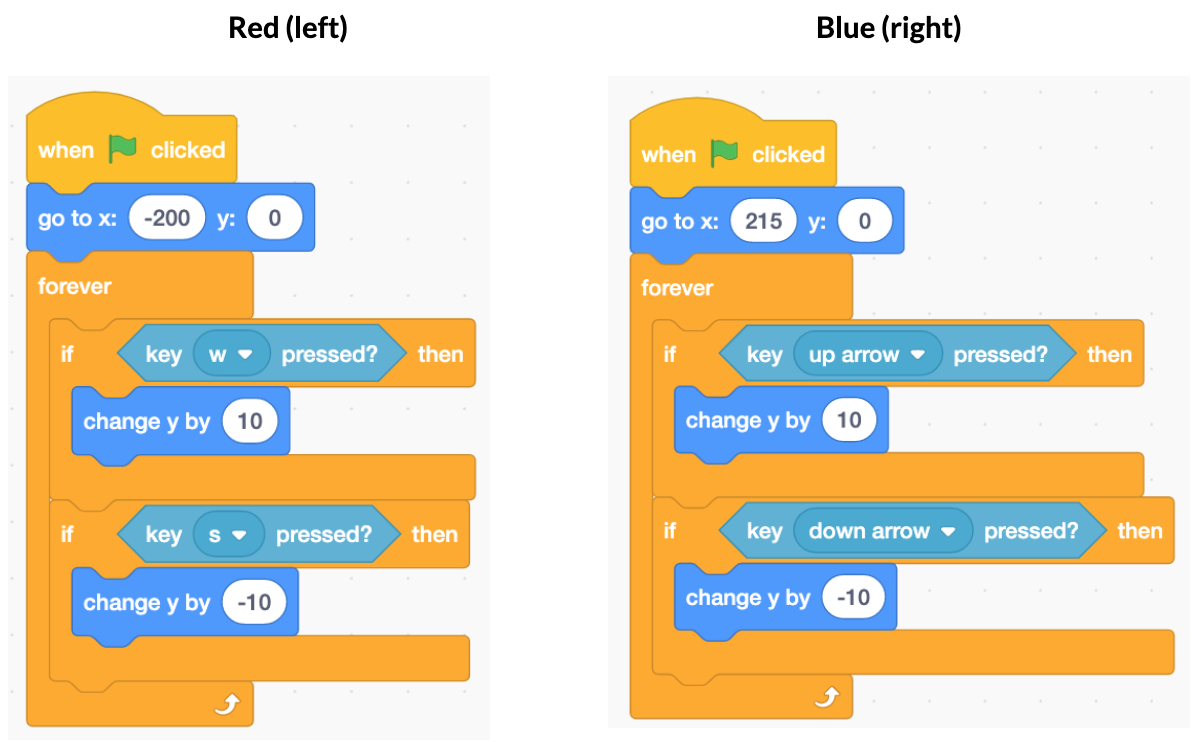
- Add a second condition to let you move the bat down the screen.
- Do the same for the second bat so that it can move with the UP ARROW and DOWN ARROW keys.
Here are the solutions for both bats, notice that a negative value is needed for the Y value to make the bats move down the screen:
Bounce the ball
Now the bats are working it’s time to make the ball move. Ask the students to take a look at this code, explain to a partner what it will do to the ball:
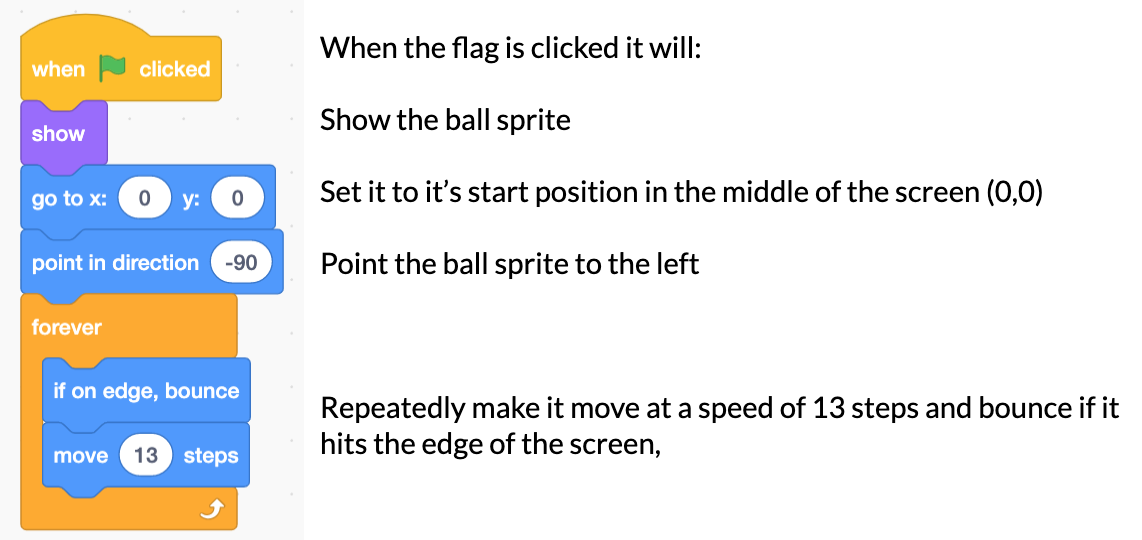
Ask the students to build the code and test it out. Could you change anything? (speed, start direction) What’s not working yet? Collision with the bats.
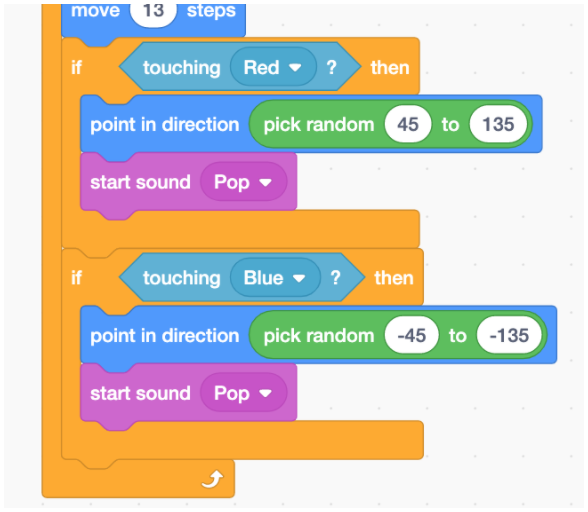
If the ball hits a bat it should obviously bounce away from it. This new code will make that work for the red player (left side of the screen).
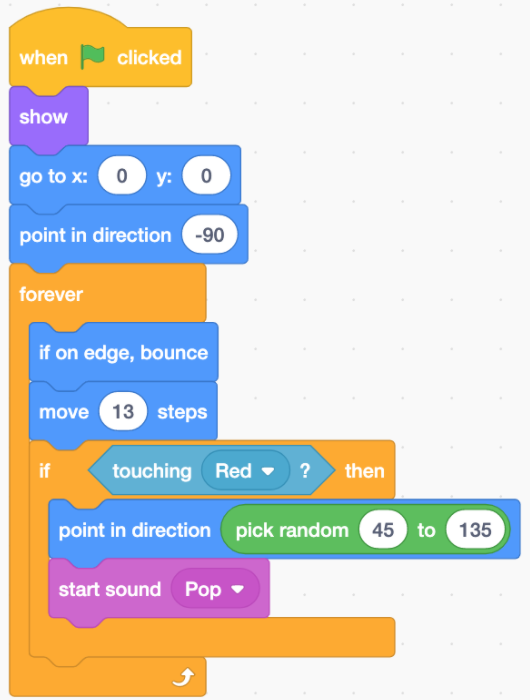
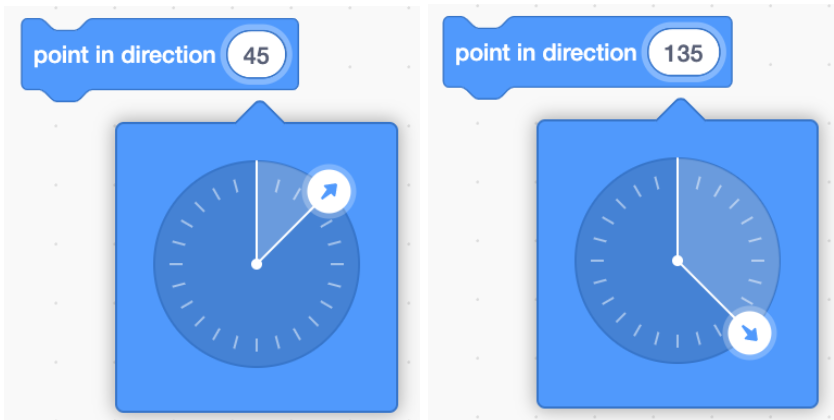
Two things happen inside the If then condition block; a new direction is given to the ball. This is random number between 45 and 135 degrees, which will give unpredictability to the ball’s movement when it comes off the bat, but always send it in the correct direction (to the right)
Secondly a start sound block plays a pop sound for some audible feedback. This is a nice feature but not essential, and is fairly pointless if you don’t have working headphones or speakers for your computers!
Can you add some similar code to make the other (blue) bat work too? Will you need to change anything? The angles in the point in direction blocks will need to be reversed so that minus numbers are used so that the ball bounces to the left from hitting the blue (right hand) bat.
Plenary
Review the process so far, what have we added to our game? What is working? What have you had trouble with? How did you solve any problems you had? What do we need to do next? What does selection or a condition mean? Where did we use it? What is a loop, what kind have we used? Why?
Now ask the students to save their work.
Saving your game
Depending on whether you are using the desktop or online versions of Scratch 3, saving may be slightly different.
Offline working
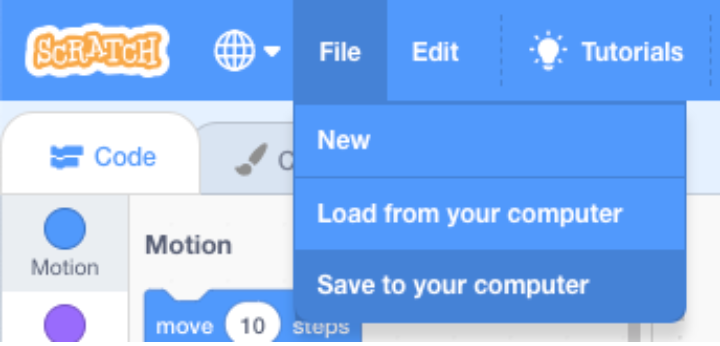
In the offline desktop version saving is very simple. Just go to File > Save to your computer and browse to wherever you would like to save your work, name your file appropriately and click Save.
Online working - with a Scratch account
This is really easy as Scratch autosaves for you! You can be really sure the save is up to date by clicking the ‘Save now’ button in the top right of the screen near your username:

Or by clicking File > Save.
Online working - without a Scratch account
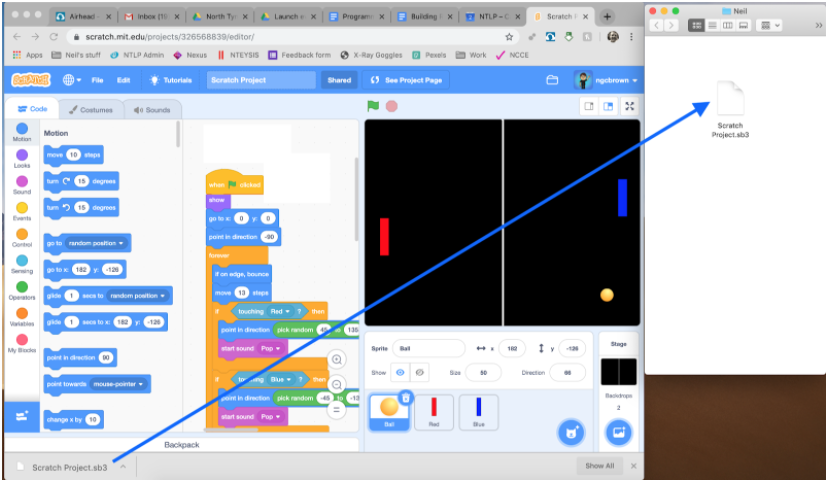
Using the online version can make things slightly trickier if you’re not signed into a Scratch account.
When you save your work, most web browsers instantly download the file by default to the downloads folder on your computer. The problem with this is that access to this folder is sometimes blocked for students on school networks, and also it doesn’t give you the opportunity to name your work when saving.
Solutions to this are:
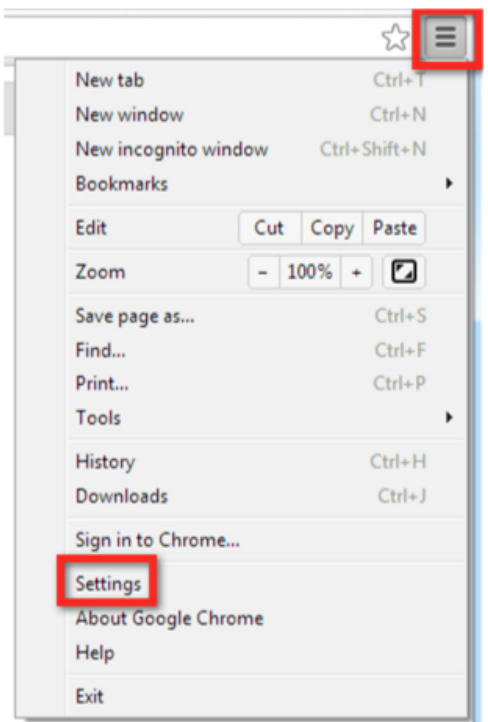
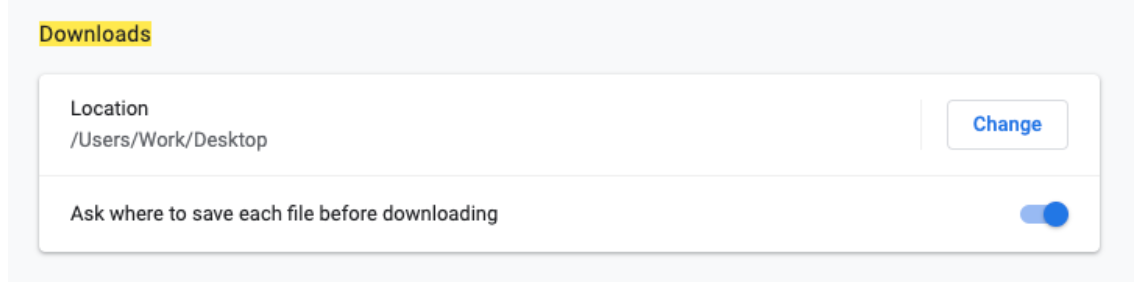
Option 1 - Ask your technician to adjust the allowed settings for your browser so files are not saved automatically to the downloads folder. In Google Chrome, go to Settings, search for Downloads and scroll down until you see the options below. Turn on the Switch for the option ‘Ask where to save each file before downloading’. This will allow students to browse for a folder and name their work.
Option 2 - If this isn’t possible we would advise setting up a class folder on your shared area for the students to save into. Within that, create another named folder for each student.
Ask the students to minimise their browser window and browse for and open their named folder. This is usually available from the File browser tool or Start > Computer and then finding the folder on your network. Resize the window so it’s not full screen. Maximise your browser window again and resize that so that both windows are visible at the same time.
Then save your work in Scratch from the File menu > Save to your computer.
When the file downloads it should also be visible at the bottom of the screen. You can drag and drop it from there to the named folder at the side of the screen. Their work is then saved and in their named folder ready for the next lesson. If you still want to rename the file, a single click on the name of the file in the folder should let you edit it or right click and choose rename.