
Project 2 – Snake part 1
Building Retro Games: Pick a project
Objectives
- Analyse an existing video game and explain how it works
- Use sequence, selection, and repetition in programs
- Use X and Y coordinates effectively to control a sprite’s movement
- Use logical reasoning to debug programs
Lesson Resources
Project 1 - Pong part 1
Project 1 - Pong part 2
Project 2 - Snake part 1
Project 2 - Snake part 2
Project 3 - Space Invaders part 1
Project 3 - Space Invaders part 2
The Retro Game
Introduce the game of Snake to the students. Ask them to watch this video of the game being played and talk to a partner and try to answer these questions:
- What do you know about the game?
- How does it work?
- What is the aim of the game?
- How do the different sprites work?
- What rules do they follow?
Discuss the answers to each question and then explain a little about the game and its history.
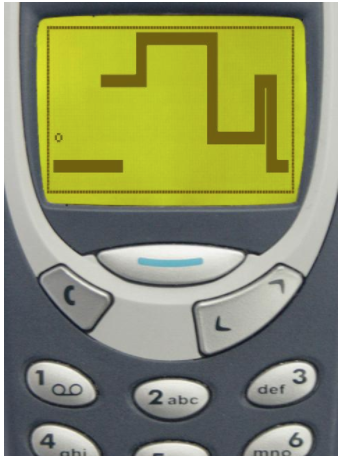
Image from: https://www.joe.ie/tech/nokia-classic-snake-is-making-a-comeback-for-ios-android-and-windows-phone-494943
Snake is the common name for a video game concept where the player manoeuvres a line which grows in length, with the line itself being a primary obstacle. The concept originated in the 1976 arcade game Blockade, and the ease of implementing Snake has led to hundreds of versions (some of which have the word snake or worm in the title) for many platforms. After a variant was preloaded on Nokia mobile phones in 1998, there was a resurgence of interest in the snake concept as it found a larger audience. There are now hundreds of Snake-like games available for mobile devices and online.
Source: https://en.wikipedia.org/wiki/Snake_(video_game_genre)
Not all snake games work in exactly the same way though. You can find one example in Google if you search ‘Snake Game’.
Create the Snake
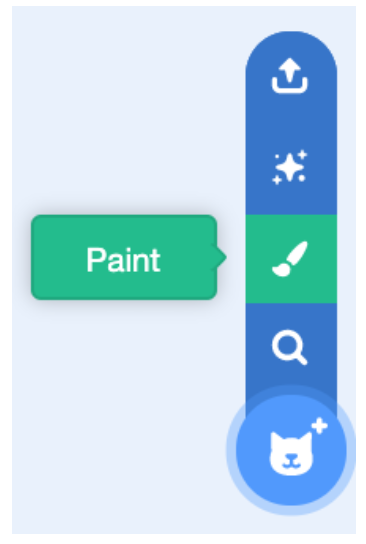
To get started, delete the cat sprite and create your own sprite by hovering over the Sprites button and choosing the paint brush option.

Click the blue Convert to Bitmap button at the bottom of the screen.

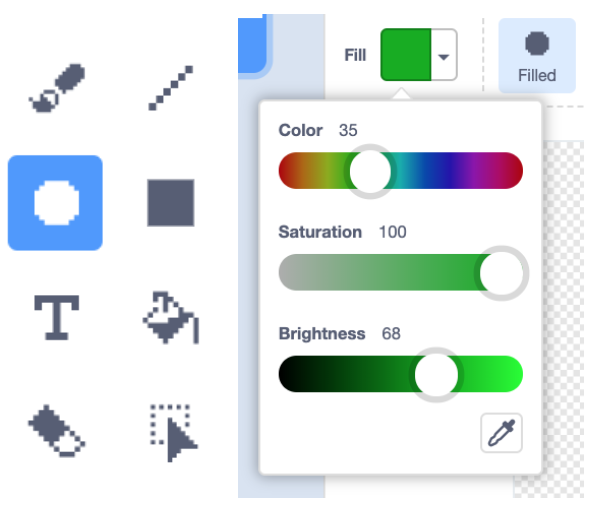
Choose the circle tool from the drawing tools and pick a colour for your snake from the colour mixing tool.
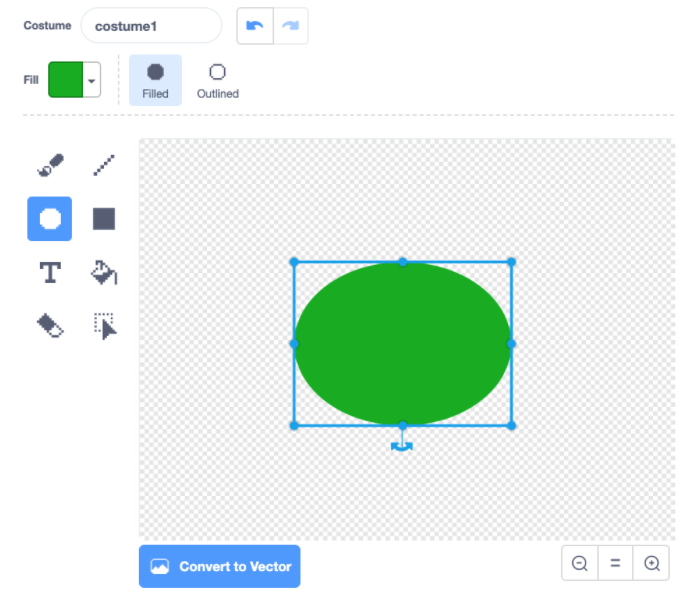
Drag out an oval shape in the middle of the screen (you can see a small grey dot in the centre of the chequered background). If it's a long way off-centre, drag it into position.
Then use the paintbrush tool to add some eyes and a small forked tongue (facing right). We used white dots (size 70), black dots (size 40) and red stripes (size 10).
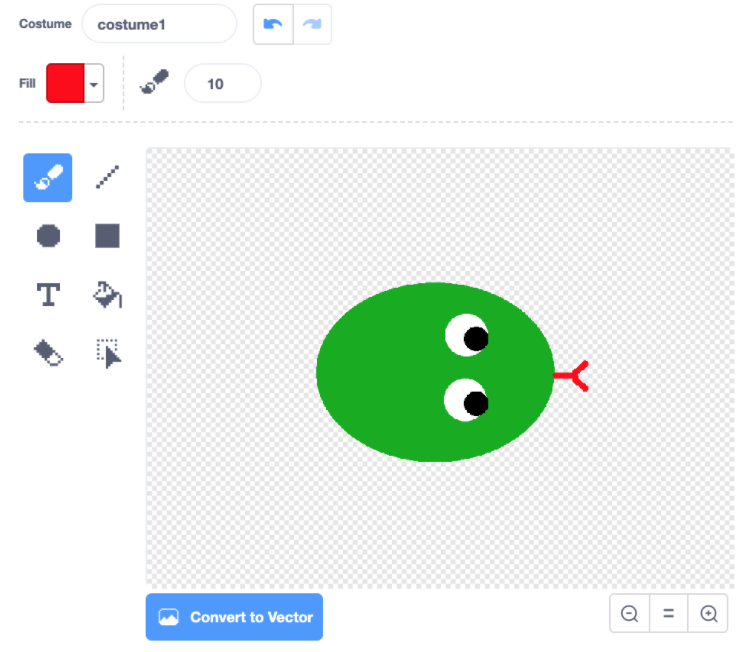
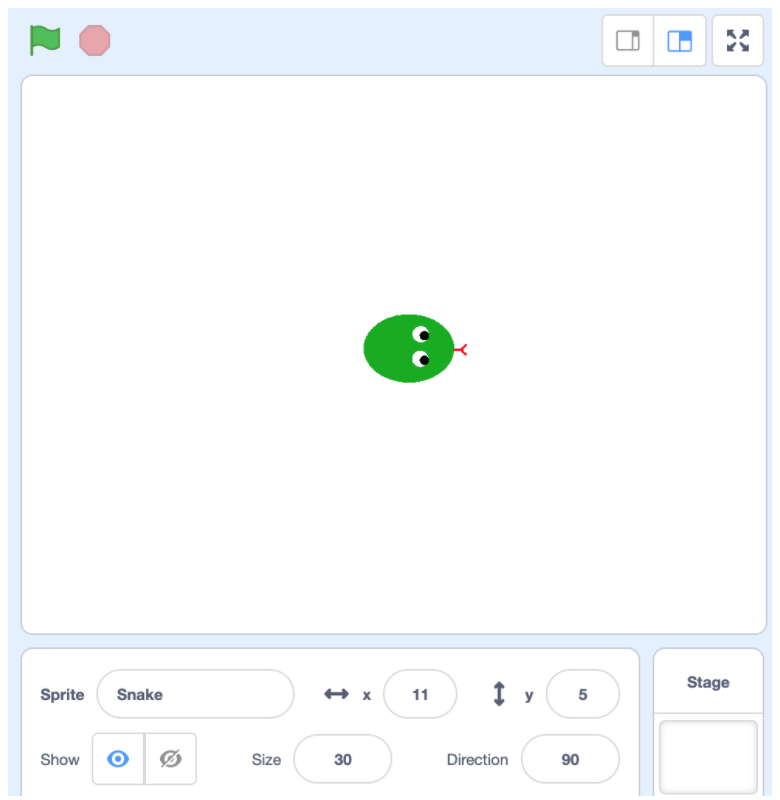
When the head is complete, resize the sprite itself to approx 30. This is done in the sprite settings underneath the stage. See below for scale.
Controlling the snake
The premise of the game is that the snake should constantly be moving, it never stands still. Our job is to keep it moving and avoid crashing into its own body or the edges of the screen.
So we’ll start our code with making the snake always move forwards. How can we make events keep happening in Scratch? We call this repeating or looping the code. What different types of loop are there?
Counted loops repeat commands a certain number of times, like this example from Scratch Jr

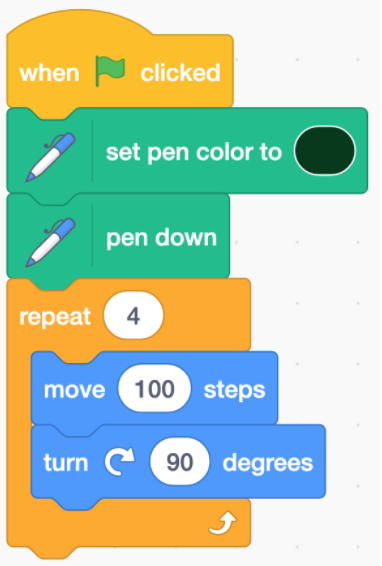
Or this example from Scratch, can you tell what it would do? (draw a square)
Each repetition of the code inside the loop is called an iteration.
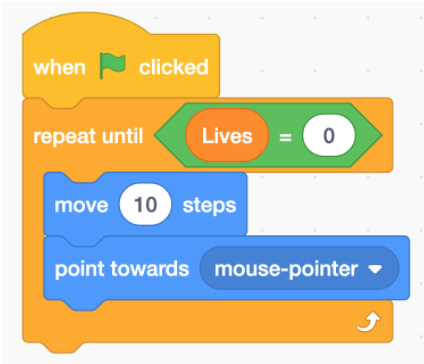
Sometimes you don’t want to repeat code a predetermined number of times. Instead you want to repeat until or while some condition is TRUE. This can be accomplished using a ‘Repeat Until’ block. The hexagon shape after the word “until” means we need some type of condition to determine when the loop will stop.
In this example, the code would make a sprite move around until their lives ran out in a game.
The third type of loop is an infinite, or Forever loop. This type of loop will keep repeating the code inside the loop until the user stops the code running.
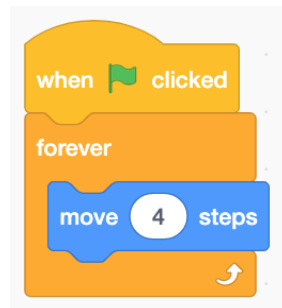
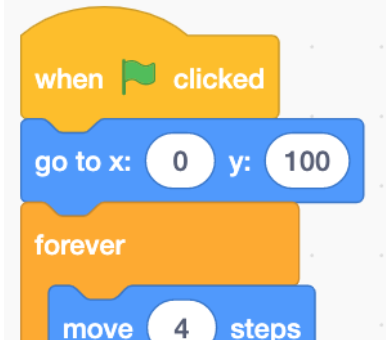
In Scratch, a Forever loop repeats the code inside it approximately thirty times a second! This will be perfect to keep our snake moving. So let’s add a Forever loop, and use a move steps block inside that to make it move the way it's facing, 4 steps should make it a sensible speed.
Controlling the snake’s movement will be done by taking inputs from the keyboard and turning them into outputs of movement for the snake.
Conditions
This will involve creating a condition. What is a condition? They are rules that dictate what happens and when it’s allowed to happen. This is also known as selection. They should have used these before if they have completed any of our other Scratch units of work.
For example, someone at home might say to you:
“You can play out with your friends on one condition, you must finish your homework first.”
Finishing the homework is the condition here, it dictates when, or if the ‘playing out’ will happen.
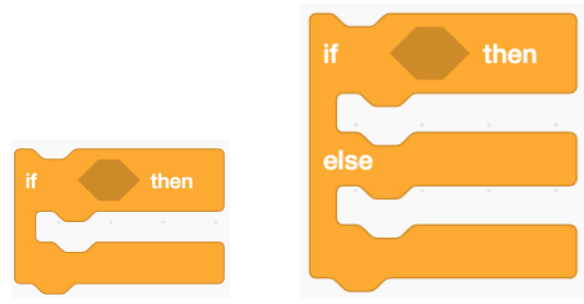
There are generally two types of conditions in most programming languages, and this is true in Scratch as well. An ‘if then’ block allows an event to happen when a condition has been met. An ‘if then/else’ block has TWO options. It allows an event to happen when a condition has been met, but triggers a second event if the condition has NOT been met - the ‘else’ part is an ‘otherwise’. For example: ‘If it’s raining wear boots, else (otherwise) wear sandals’.
The condition here is: if we press a key, we want the snake to change direction. It goes together like this:
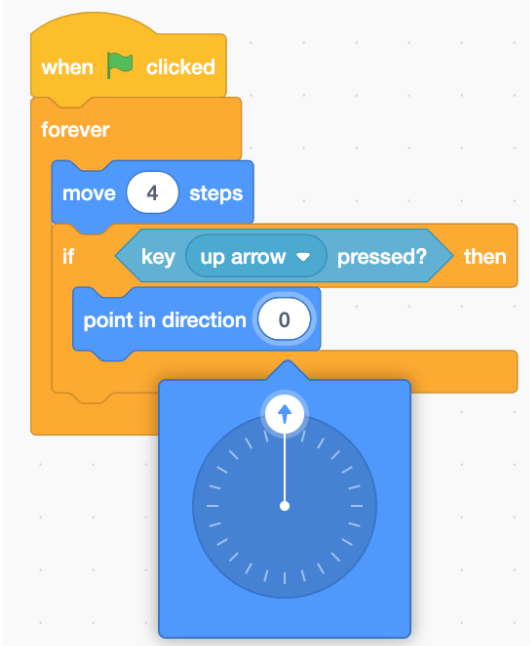
The number in the ‘point in direction’ box is in degrees, so to be pointing up the screen it needs to be on 0 degrees.
Here, we’ve added a second condition (if/then block) to cater for when the right arrow key is pressed. The degrees this time needs to be on 90.
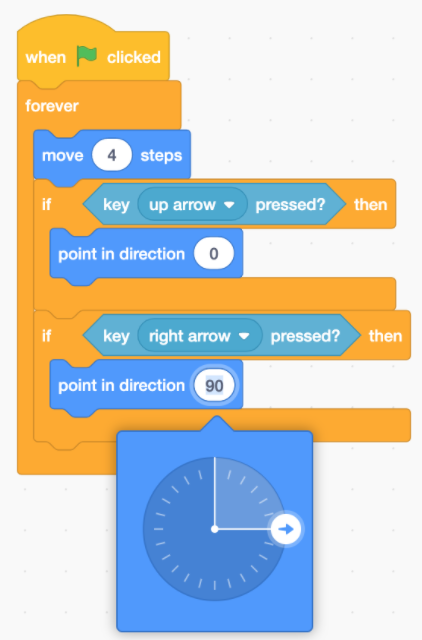
Ask the students to finish off this code themselves so the snake can move in all four directions (up, down, left, right).
Here’s how it should look when completed. We also added an extra block at the top of the stack. Ask the students what do you think this block is for?
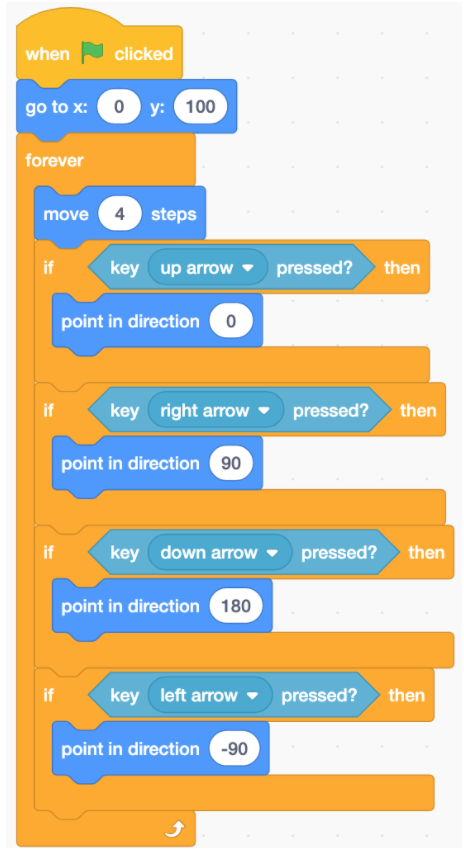
Establish that it’s a block that will send the sprite to a specific coordinate on the screen.
Coordinates
What is a coordinate? Explore your students’ knowledge of coordinates based upon what they have studied in maths and previous work with Scratch. They may have experienced using them in other contexts as well, most likely maps or perhaps the game of battleships.
They describe the position of something on a grid, and are commonly used in video games to code where a sprite should be in the game.
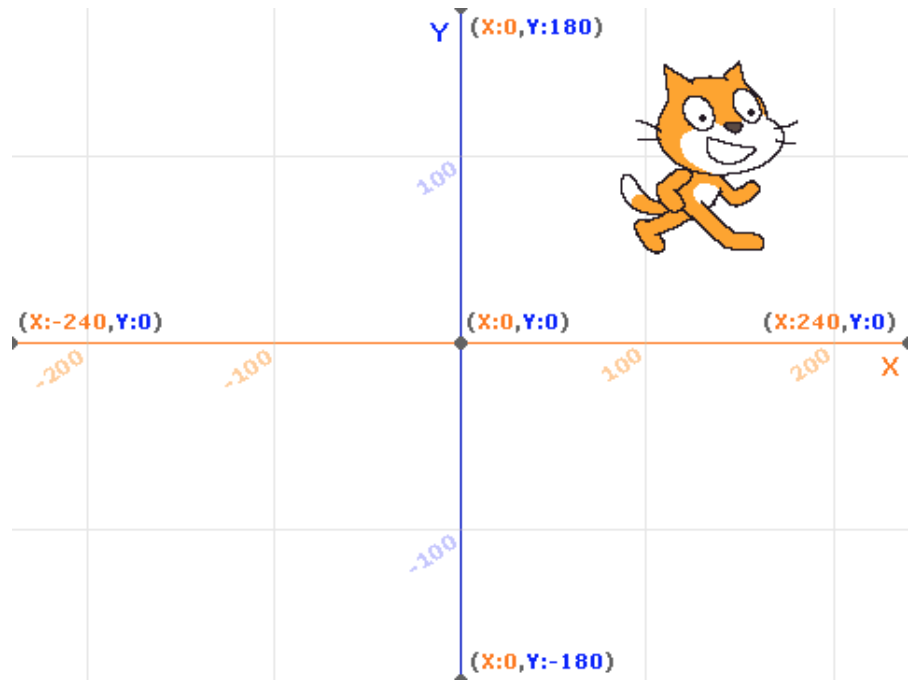
In a 2D game (and in the Scratch environment) this is done with a four quadrant coordinate grid like the one below, (0,0) being the centre of the screen:
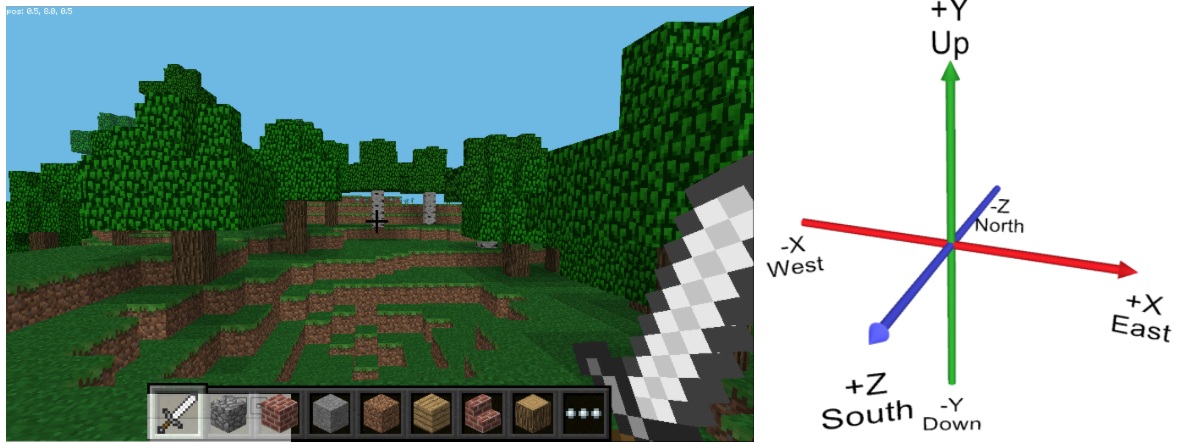
3D video games, like Minecraft or Kodu games also use coordinates but add a third (Z) axis to describe the depth position on the screen, in addition to the horizontal and vertical positions, so a coordinate might look like this (124, 87, -89).
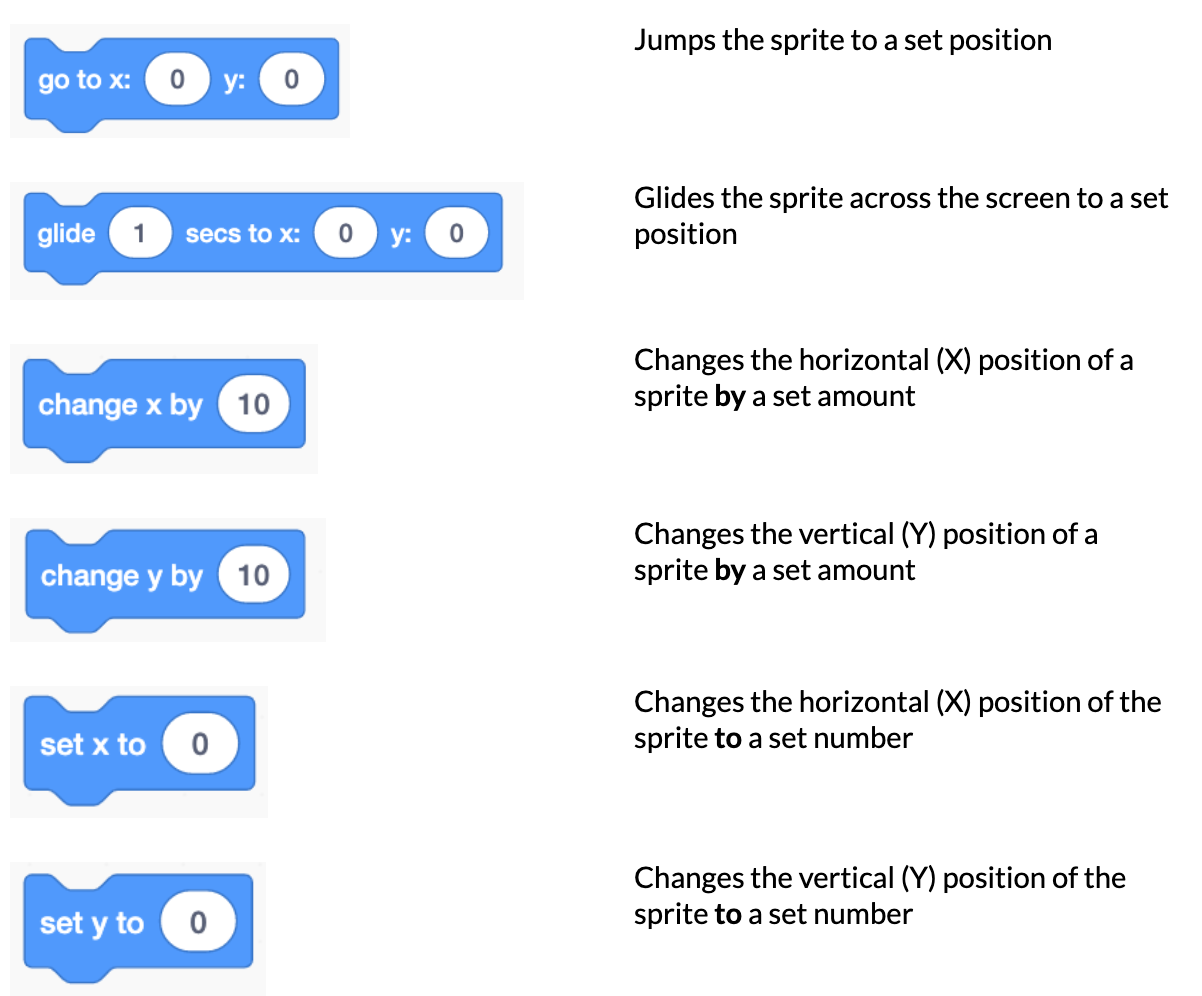
There are several blocks in Scratch that relate to coordinates and they can all be found in the motion category. If X is the horizontal position and Y is the vertical position, what do you think these blocks will do to a sprite?
Notice that the ‘go to’ block we used is outside of the ‘forever’ loop. Why do you think this is?
Its job is to send the snake head to its start position at the beginning of the game. That should only happen once. Placing it inside the ‘forever’ loop would make the code repeatedly send the sprite to that coordinate (about 30 times a second remember!) so it would be stuck and unable to move away from that position.
The coordinate (x: 0, y:100) will start the snake at the top, middle of the screen.
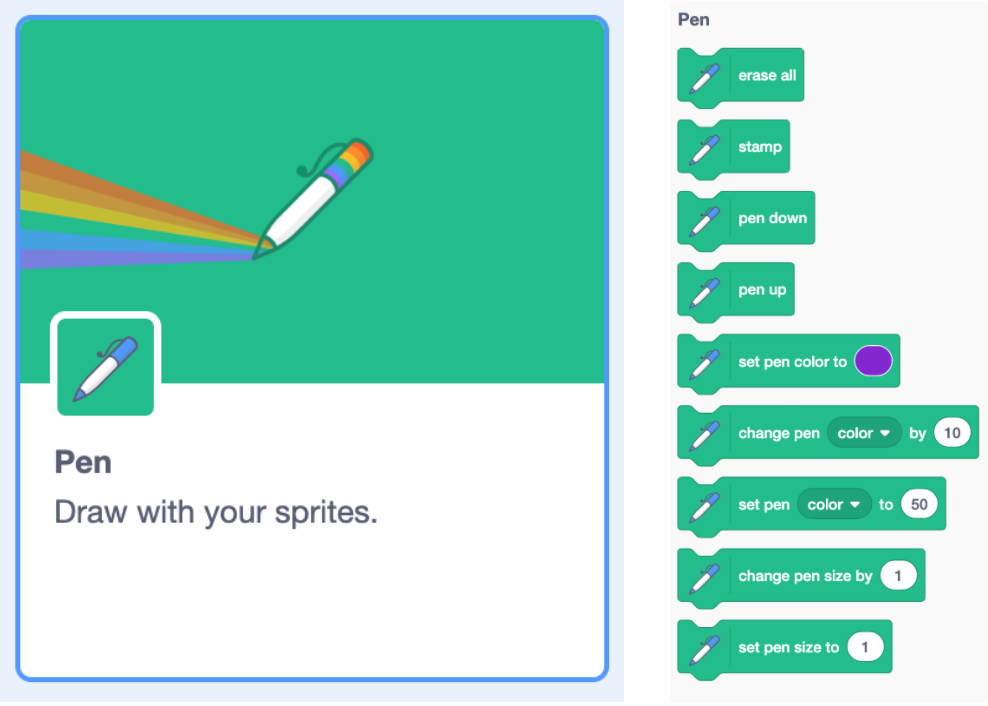
Have you noticed the snake doesn’t look much like a snake yet?! Where’s its body?! We need a way for it to grow and leave a trail of where we’ve been. To achieve this we’ll use the pen blocks. These were always visible in previous versions of Scratch, but in Scratch 3 they were moved to the extensions library. So add them in by clicking the extensions button in the bottom left of the screen. Select the ‘Pen’ option and you’ll see a new set of green blocks added to your block library.

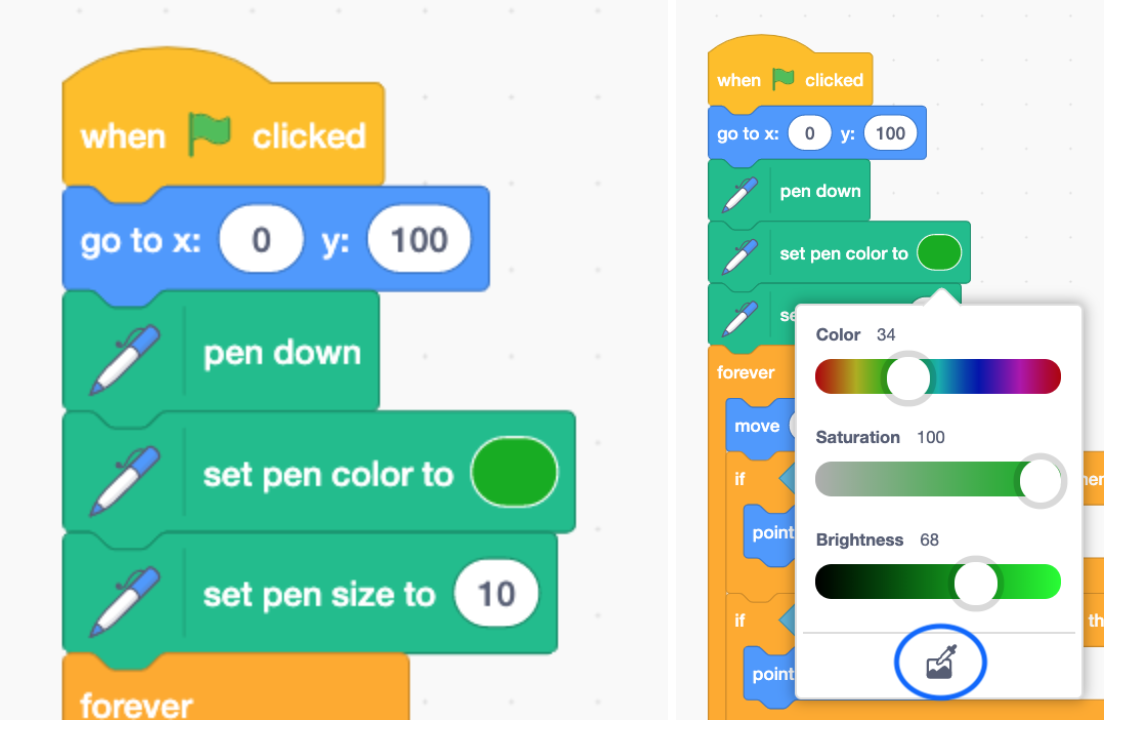
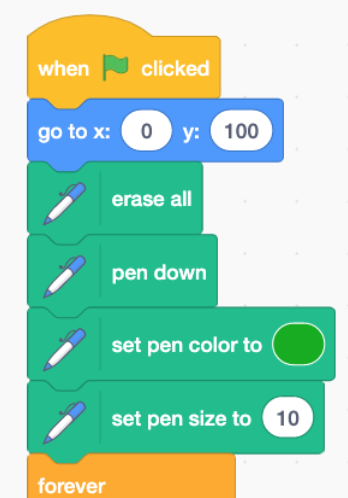
The pen follows a sprite, so when the game starts we need to do 3 things:
- Put the pen on the ‘paper’
- Choose the colour of the pen (to match your snake head)
- Choose how thick to make the pen line.
Ask the students to have a go at programming those three things. A thickness of 10 is about right for the pen line. Use the colour picker tool to get exactly the same colour for the body to match the head.
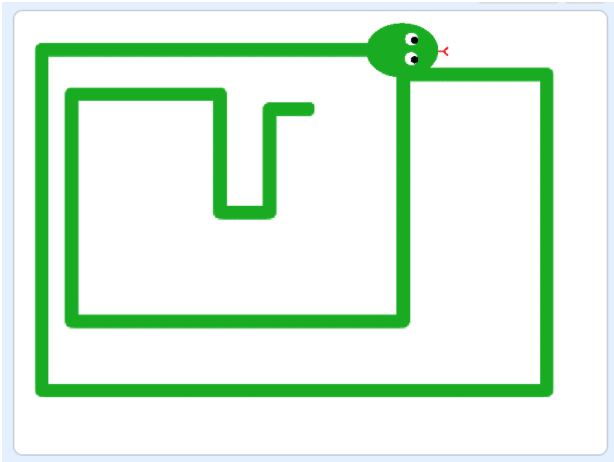
Test it out and your snake should leave a line (it’s body) wherever it goes.
Stop the game and then restart it. What problem do you have? All the lines previously drawn are still there. How could you fix that? Have a look in the pen blocks! At some point the lines need to be erased with this block, but where should it go?
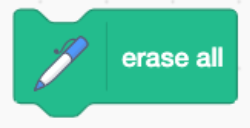
Add this block to the top of the stack so whenever the flag is clicked to restart the game all lines are erased before the game starts again. This is a great example of the students having to sequence their blocks correctly as the position of the block, and therefore when the command is executed, is really important.
Saving your game
Depending on whether you are using the desktop or online versions of Scratch 3, saving may be slightly different.
Offline working
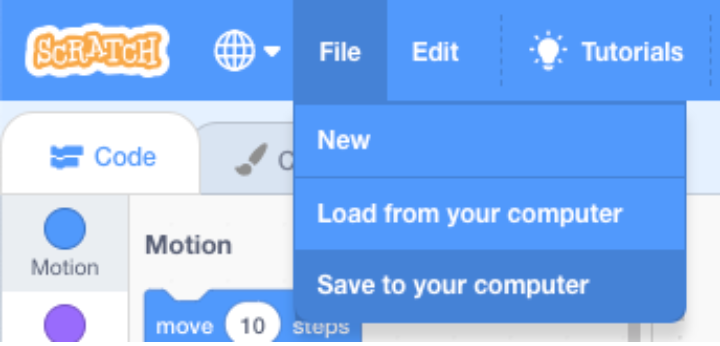
In the offline desktop version saving is very simple. Just go to File > Save to your computer and browse to wherever you would like to save your work, name your file appropriately and click Save.
Online working - with a Scratch account
This is really easy as Scratch autosaves for you! You can be really sure the save is up to date by clicking the ‘Save now’ button in the top right of the screen near your username:

Or by clicking File > Save.
Online working - without a Scratch account
Using the online version can make things slightly trickier if you’re not signed into a Scratch account.
When you save your work, most web browsers instantly download the file by default to the downloads folder on your computer. The problem with this is that access to this folder is sometimes blocked for students on school networks, and also it doesn’t give you the opportunity to name your work when saving.
Solutions to this are:
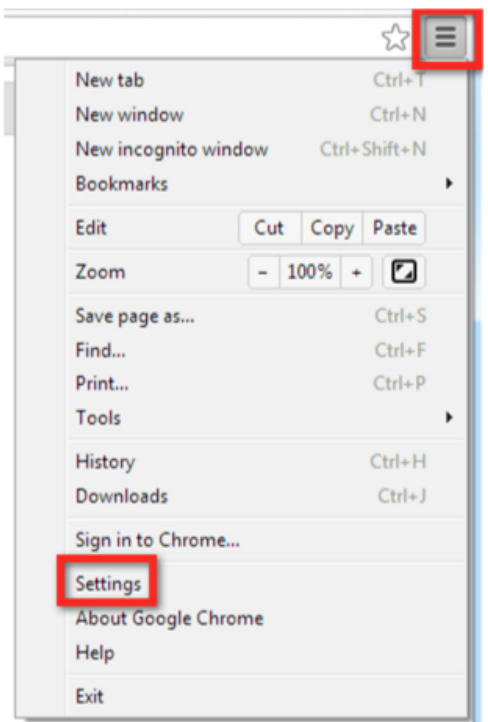
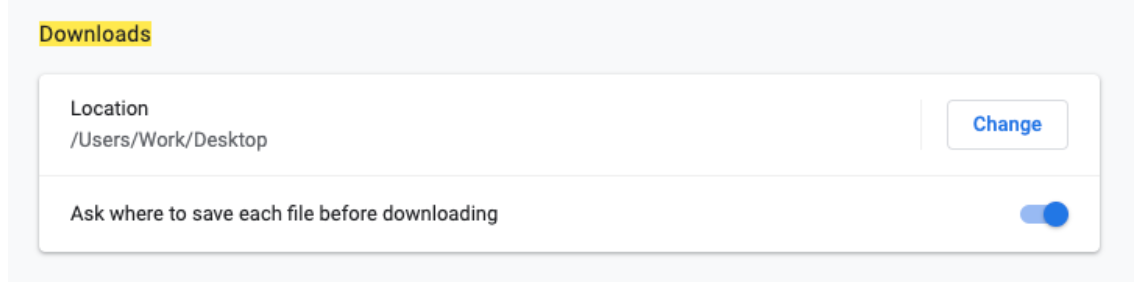
Option 1 - Ask your technician to adjust the allowed settings for your browser so files are not saved automatically to the downloads folder. In Google Chrome, go to Settings, search for Downloads and scroll down until your see the options below. Turn on the Switch for the option ‘Ask where to save each file before downloading’. This will allow students to browse for a folder and name their work.
Option 2 - If this isn’t possible we would advise setting up a class folder on your shared area for the students to save into. Within that, create another named folder for each student.
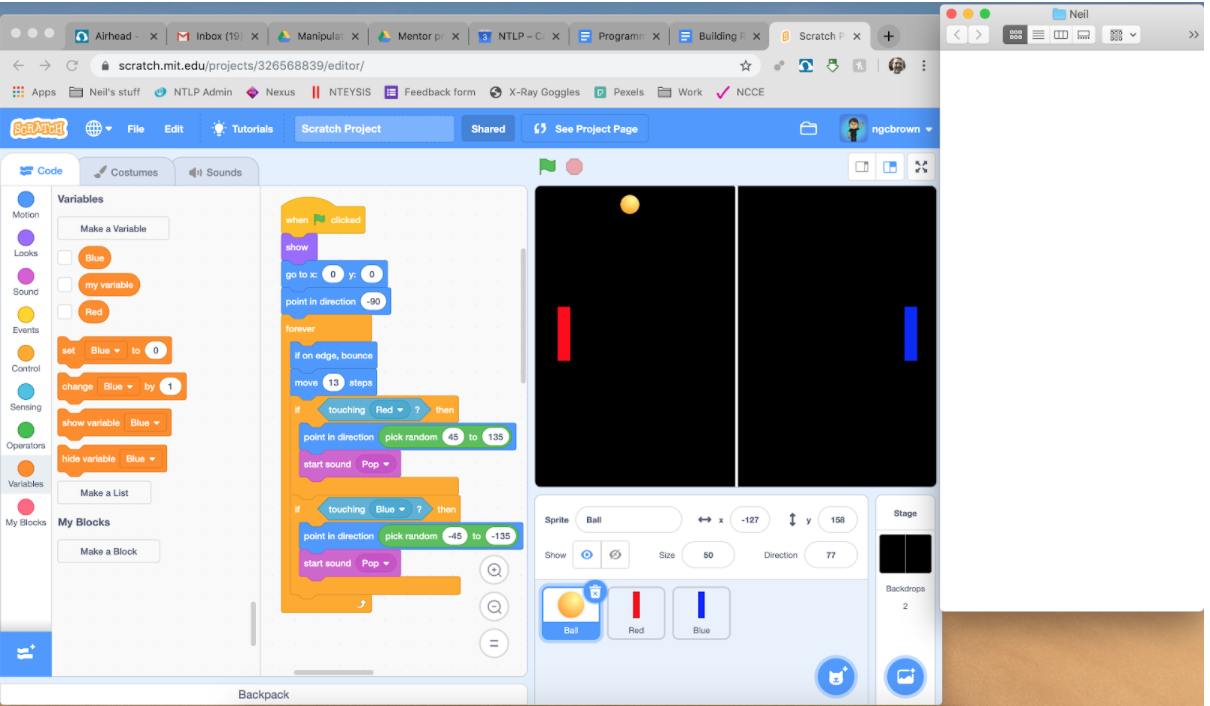
Ask the students to minimise their browser window and browse for and open their named folder. This is usually available from the File browser tool or Start > Computer and then finding the folder on your network. Resize the window so it’s not full screen. Maximise your browser window again and resize that so that both windows are visible at the same time.
Then save your work in Scratch from the File menu > Save to your computer.
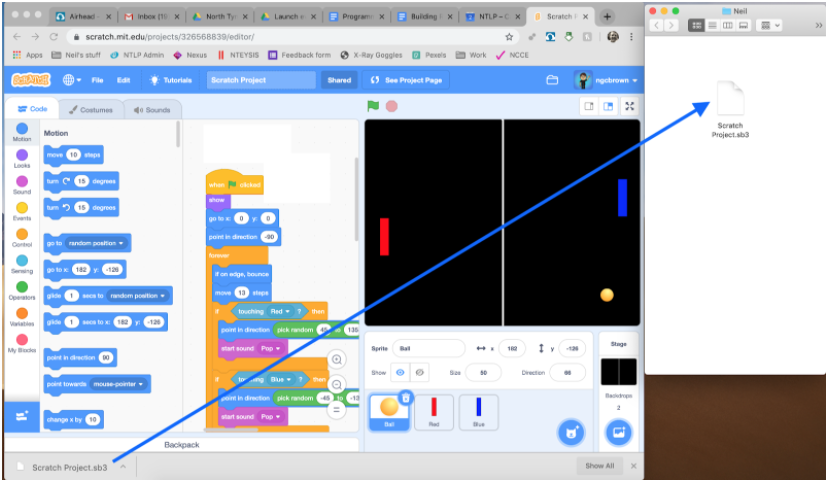
When the file downloads it should also be visible at the bottom of the screen. You can drag and drop it from there to the named folder at the side of the screen. Their work is then saved and in their named folder ready for the next lesson. If you still want to rename the file, a single click on the name of the file in the folder should let you edit it or right click and choose rename.
Plenary
Recap what we have covered in the lesson. Ask the students to talk to a partner and take it in turns to explain what the following terms mean and where they have used them so far in their code.
- Sequence
- Selection
- Repetition
- Coordinates
Then as a class, ask for an example of each from the students. In the next lesson we will complete the simple version of this game and give the students the opportunity to extend and improve the game by adding features of their own or changing things.