
Sensors
LEGO Robotics - Lesson 5
Objectives
- Understand what inputs and outputs are
- Use sensors to affect a robot’s actions
- Create conditional statements in an algorithm
Lesson Resources
- 1 EV3 Education Core set per group of 3 children (Spike Prime also works great!)
- 1 computer, laptop or tablet with EV3 classroom installed per group
- 1 USB cable per group (not needed if you are using a Bluetooth connection)
- Metre sticks or measuring tapes (1 per group)
- Calculators or a calculator app for their iPad/laptop
- Masking tape
- Lesson slides
- EV3 LEGO Education User Guide
Lesson 1 - Measure and move
Lesson 2 - Time to turn
Lesson 3 - Get in shape
Lesson 4 - Lifting and moving
Lesson 5 - Sensors
Lesson 6 - Sensors and Robot challenges
Introduction
Begin by the class to discuss with a partner; what do you think inputs and outputs on a computer could be? Establish that it means data going into or out of the computer.
Can you give some examples of inputs and outputs for humans? Our senses are constantly feeding our brain information even when we are not consciously thinking about it. While just sitting in a chair we are sensing the temperature of the room, the feeling of our clothes, perhaps a taste in our mouths, the noises in the room etc etc... even while sleeping we sense some information. Our brain is the processor and makes a decision on what to do with the input it has been given - ignore it or act upon it it many different ways.
Our responses to these inputs from our sensors could be thought of as our 'programs' - 'what to do when x or y happens'. These are usually based on past experiences where we responded in a certain way and then evaluated our satisfaction with the response, we might adapt and change our responses as we learn. A robot can also be programmed to provide it with programs, or responses for when it detects things (via its sensors). These tend to be more static programs, although machine learning and artificial intelligence can no allow some machines to alter and adapt their programs based on feedback the machine receives.
We as humans are extremely complex ‘machines’, but lots of machines also deal with more simple inputs, process the information and then produce a simple output. e.g. a television, what are the inputs and outputs for a data in a TV?
Inputs could be:
- The buttons on a remote control
- The buttons on the set itself
- External devices plugged into the television
Outputs could be:
- Sound - The volume goes up etc
- The visual display - The channel changes
- Heat - from the processors and components inside the TV
Some simpler machines, like a toaster for example, don’t process information, they are merely a circuit being completed to be on or off.
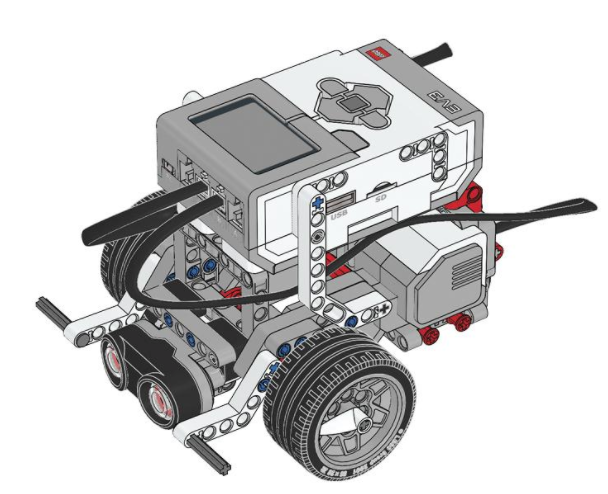
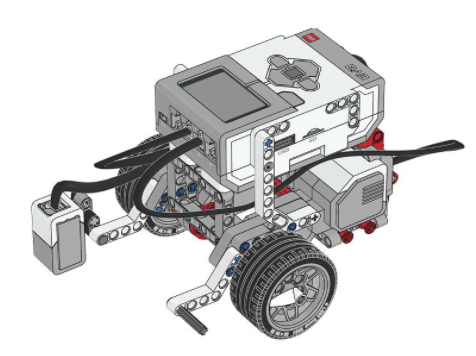
Look at some of the features of the EV3 robot, which are inputs and which are outputs:
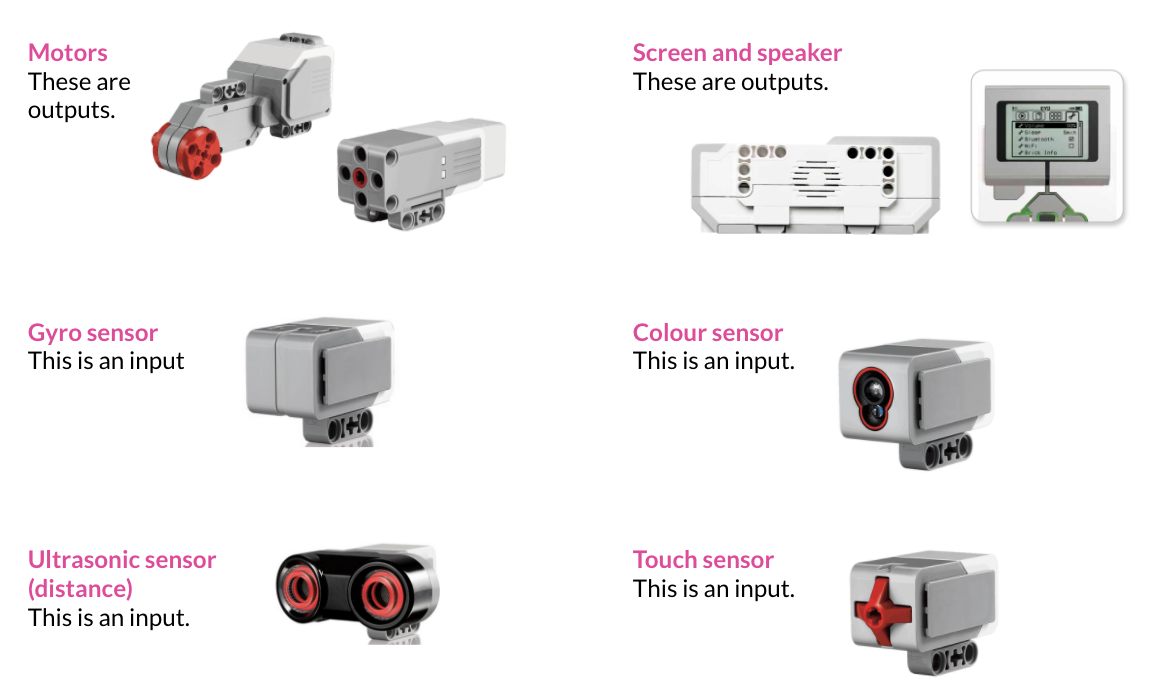
Explain that over the next two lessons they are going to explore the input sensors that the robot has and how they can be used to affect the behaviour of the robot.
Touch Sensor

What is it?
The Touch Sensor is an analogue sensor that can detect when the sensor’s red button has been pressed and when it is released. That means the Touch Sensor can be programmed to action using three conditions— pressed, released, or bumped (both pressed and released).
Using input from the Touch Sensor, a robot can be programmed to see the world as a blind person might, reaching a hand out and responding when it touches something (pressed).
Using the sensor
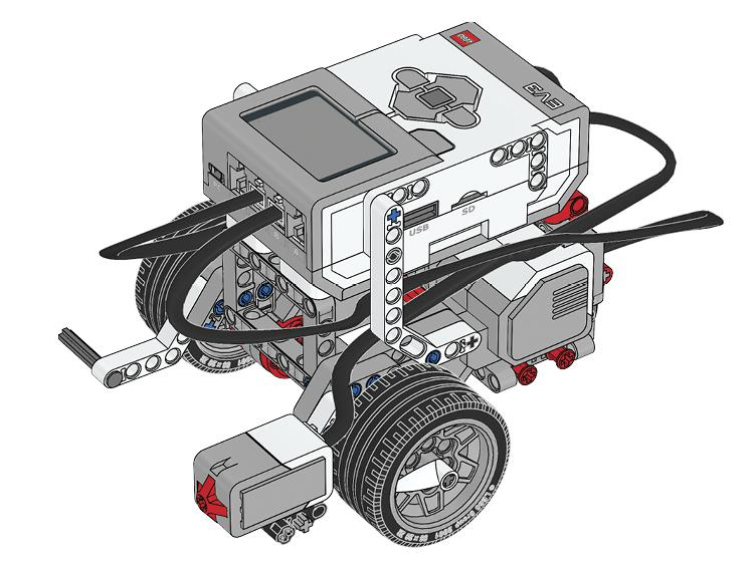
Get the students to first attach their touch sensor, and then plug it into the EV3 brick, taking note of which port it is plugged in to (1-4).
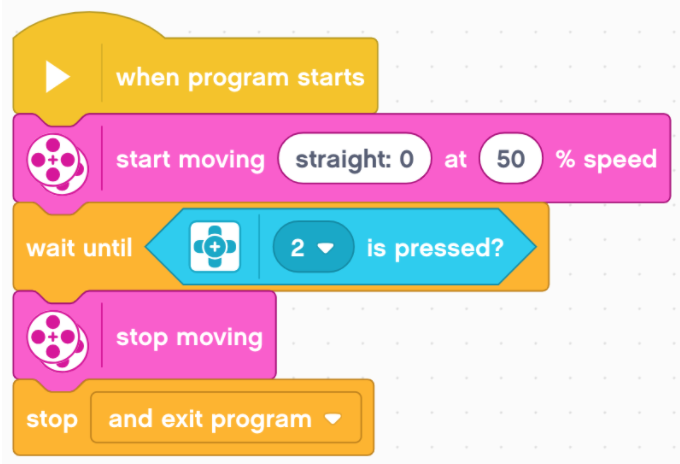
Show them the simple algorithm for testing their touch sensor: Move (unlimited and straight), wait until sensor is bumped, then stop.
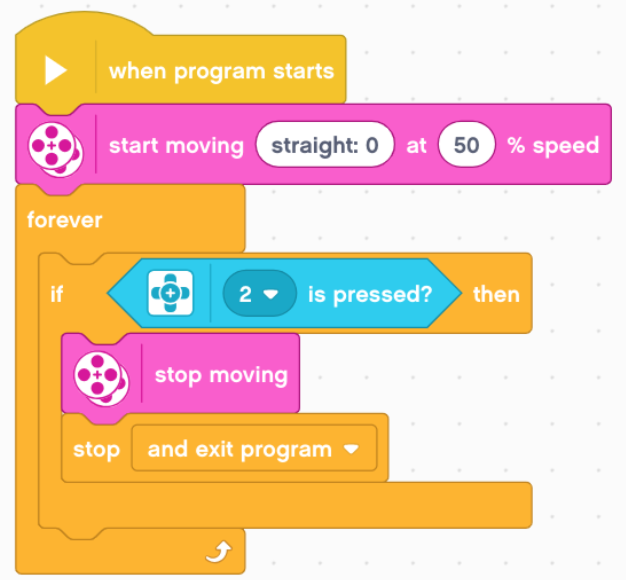
Using a IF/THEN condition block and placing it inside a FOREVER loop is another way to make it work. This can be helpful if you want more than one sensor to be able to trigger different things. Adding more conditions makes this possible.
Then ask them to experiment with what else they can make their robot do after it bumps things.
Can they program their robot to:
- Turn, face in a different direction and move after it has bumped?
- Turn and face the object it has bumped into?
- Make a noise when it hits something?
Gather the students together to look at some examples of their work. Can you think of any real life examples of when touch sensors are used?
Ultrasonic sensor
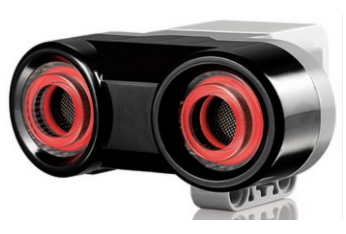
What is it?
The Ultrasonic Sensor is a digital sensor that can measure the distance to an object in front of it. It does this by sending out high- frequency sound waves and measuring how long it takes the sound to reflect back to the sensor. The sound frequency is too high for you to hear.
Using the sensor
Get the students to first attach their ultrasonic sensor, and then plug it into the EV3 brick, taking note of which port it is plugged in to (1-4).
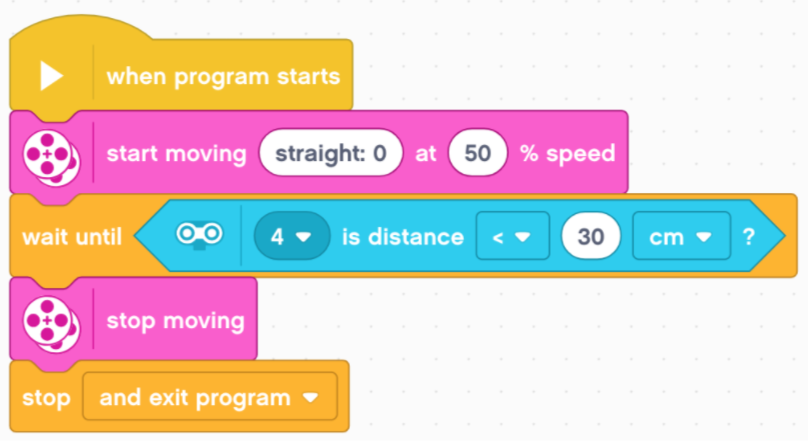
Show them the simple algorithm for testing their sensor: Move (forward and straight, rotations unlimited), wait until distance from the object is less than 30cm, then stop.
Then ask them to experiment with what else they can make their robot do after it detects something in its path.
- Detect an obstacle and move away from it without reversing.
- Use a loop and the ultrasonic sensor to repeatedly move between 2 points or avoid crashing into the walls of an enclosed area.
Gather the students together to look at some examples of their work. Can you think of any real life examples of when ultrasonic sensors are used? (e.g. parking sensors on cars, security lights).
Colour sensor
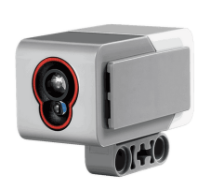
What is it?
The Colour Sensor is a digital sensor that can detect the colour or intensity of light that enters the small window on the face of the sensor. This sensor can be used in three different modes: Colour Mode, Reflected Light Intensity Mode, and Ambient Light Intensity Mode.
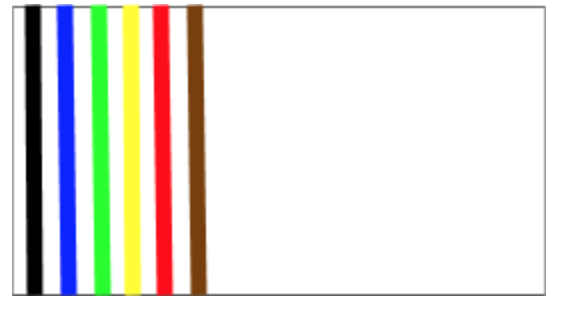
In Colour Mode, the Colour Sensor recognises seven colours—black, blue, green, yellow, red, white, and brown—plus No Colour. This ability to differentiate between colours means your robot might be programmed to sort coloured balls or blocks, speak the names of colours as they are detected, or stop action when it sees red.
In Reflected Light Intensity Mode, the Colour Sensor measures the intensity of light reflected back from a red light–emitting lamp. The sensor uses a scale of 0 (very dark) to 100 (very light). This means your robot might be programmed to move around on a white surface until a black line is detected, or to interpret a colour-coded identification card.
In Ambient Light Intensity Mode, the Colour Sensor measures the strength of light that enters the window from its environment, such as sunlight or the beam of a torch. The sensor uses a scale of 0 (very dark) to 100 (very light). This means your robot might be programmed to set off an alarm when the sun rises in the morning, or stop action if the lights go out.
Using the sensor
Get the students to first attach their colour sensor, and then plug it into the EV3 brick, taking note of which port it is plugged in to (1-4). Usually you will be measuring the colour of shade of the floor surface so the sensor needs to be facing down to the floor. For the best accuracy, when in Colour Mode or Reflected Light Intensity Mode, the sensor must be held at a right angle, close to—but not touching—the surface it is examining.
Show them the simple algorithm for testing their sensor: Move forwards (straight, unlimited rotations), until it detects the colour red, then stop.
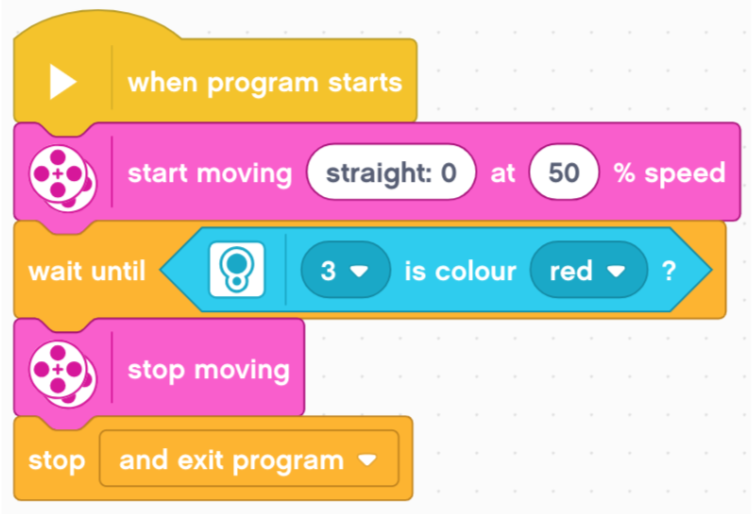
To test this you will need something red! A stripe of paper or felt tip should work fine (make sure you felt tips are good as a faded red often comes out pink). Begin on some white paper and get the robot to drive towards the red stripe, see if it stops when it reaches it.

Then ask them to experiment with some of the following tasks:
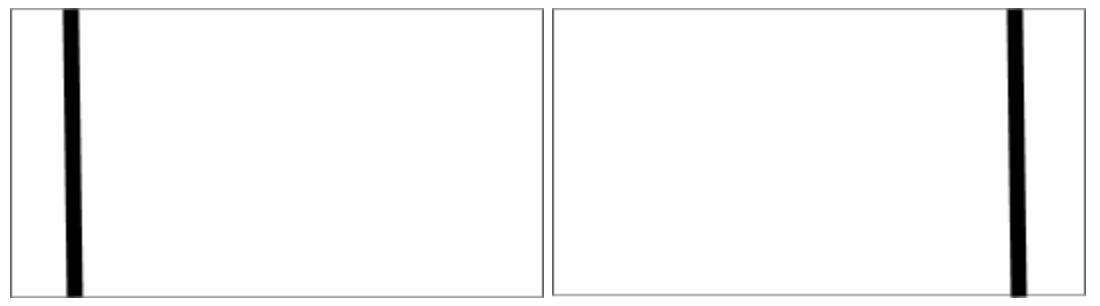
1. Set up two sheets of paper a bit like this (see below). Draw a thick black stripe at opposite ends. Can they make the robot start in the middle, drive to one of the stripes, turn when it gets there and then drive to the second stripe, then stop when it gets there (or keep moving between the two)?
2. Use some felt tips and experiment with making the robot stop at different colours. You can add more than one colour at a time as the trigger colour.
3. Make the robot perform different actions when it sensors different colours.
Using IF/THEN blocks inside a FOREVER loop is a good way to have a variety of actions that are triggered by different colours.
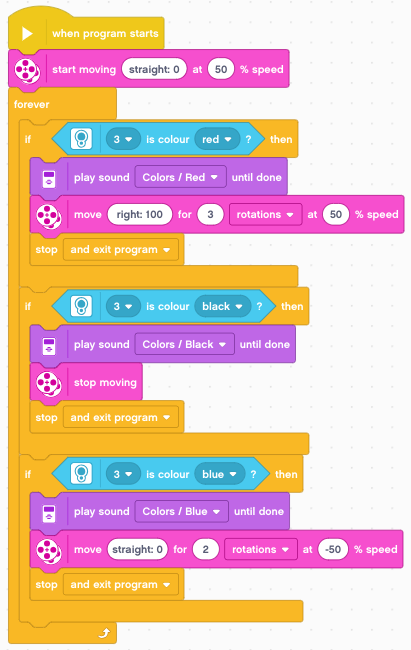
Line following
This code uses an IF/THEN/ELSE block which has the ability to provide two outcomes based on whether a condition is met or not met. In this case you would set up your robot with the colour sensor slightly to the left of a black line. If black IS detected the robot does a left turn (away from the line) but if black is NOT detected (ELSE) if turns right (towards the line). This has the effect of making the robot wiggle forwards with a side to side motion as the sensor moves towards and away from the black line. You may need to experiment with where the sensor is placed and the line you ask it to follow. It can also sometimes struggle with very tight turns.
Gather the students together to look at some examples of their work. Can you think of any real life examples of when colour or light sensors are used? (automatic lighting, robots in some large factories are programmed to follow different coloured stripes painted on the floor so they deliver parts to the correct part of the factory)
Plenary
Ask some groups to demonstrate what they have been doing with their robots using sensors. Has anyone managed to combine more than one sensor to work together?
Ask the class, so why can programming a robot to use sensors be more useful? It allows for variance, for example; how long to drive for before it stops, you don't need to worry about the distance a robot needs to travel, you can just say 'go forwards until you sense an object'.
In the final lesson the students will try out one final sensor and use everything they have learned to create and solve their own robot challenges.