
Sensors and Robot challenges
LEGO Robotics - Lesson 6
Objectives
- Design and create a problem for a robot to solve
- Design, write and debug algorithms to solve a robot problem
Lesson Resources
- 1 EV3 Education Core set per group of 3 children (Spike Prime also works great!)
- 1 computer, laptop or tablet with EV3 classroom installed per group
- 1 USB cable per group (not needed if you are using a Bluetooth connection)
- Metre sticks or measuring tapes (1 per group)
- Calculators or a calculator app for their iPad/laptop
- Masking tape
- Lesson slides
- EV3 LEGO Education User Guide
Lesson 1 - Measure and move
Lesson 2 - Time to turn
Lesson 3 - Get in shape
Lesson 4 - Lifting and moving
Lesson 5 - Sensors
Lesson 6 - Sensors and Robot challenges
Introduction
Recap the last lesson on sensors. Ask the class
- What are inputs and outputs?
- Which parts of the robot are inputs?
- Which parts of the robot are outputs?
- Which sensors did we make use of last week?
Gyro Sensor
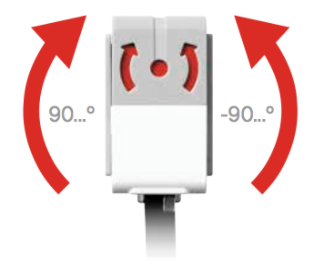
What is it?
The final sensor that comes with the EV3 Education Core set is the gyro sensor. This is a digital sensor that detects rotational motion on a single axis. If you rotate the Gyro Sensor in the direction of the arrows on the case of the sensor, the sensor can detect the rate of rotation in degrees per second. (The sensor can measure a maximum rate of spin of 440 degrees per second.) You can then use the rotation rate to detect, for example, when a part of your robot is turning, or when your robot is falling over.
Using the sensor
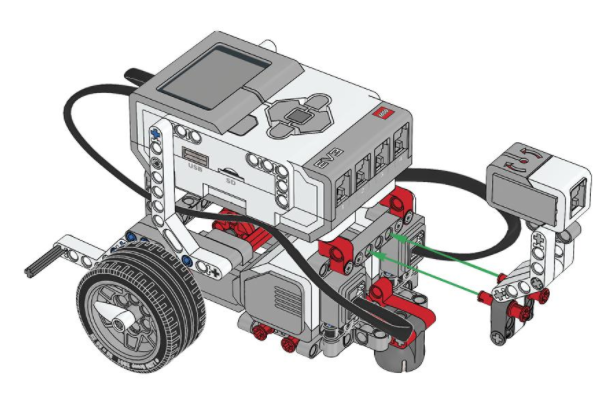
Get the students to first attach their gyro sensor, and then plug it into the EV3 brick, taking note of which port it is plugged in to (1-4). Try to keep the sensor and robot very still as you attach it as it can affect how well it works.
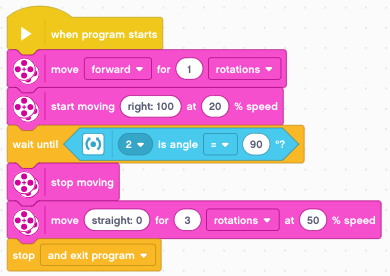
This program demonstrates using the gyro turn wait block in change mode:
- The robot drives forwards for 1 rotations.
- The robot begins to turn right in a spin turn. Notice the speed is down on 20. You will have better results with the gyro sensor if you make your turns slow.
- The gyro sensor waits until it rotates through 90 degrees.
- The robot stops
- The robot drives forward for 3 rotations and stops at the end of the program.
The gyro sensor is not always 100% accurate as sometimes the robot can start moving before it begins registering a turn, so you might end up turning 87 or 93 degrees. This is called turn lag and can be compensated for either manually, or by using other maths operator blocks. You can find out more here at EV3lessons.com.
Even if you don't enter that level of complexity, it can still be a useful tool and is worth experimenting with.
Building robot challenges
The final task is designed to let your students apply and demonstrate everything they have learned to this point, and also get creative. They should design, create and test a robot challenge for another group to complete it could be a mazes or obstacle courses to navigate, or a more open area with items to move into or out of set areas.
Give them a choice of equipment that they are allowed to use. Small PE equipment (bean bags, ropes, small balls) building blocks and masking tape all work well.
In the first half of the lesson they must:
- Design a robot challenge for another group.
- Write clear instructions for another group of what they must do in the task.
- Be able to solve the challenge themselves to prove it is achievable for another group (get them to save their working program).
- Leave it set up and ready for another group.
They can use sensors, the robot's arm, base it just on movement or a combination of all three. Stress that the challenges must be achievable and realistic for the time they have, both to create and test it, and for others to complete it. They should also have a way to clearly mark the start point and where any moveable object should go (and be returned to) for consistency. Masking tape or large sheets of paper make this easy.
Completing the challenges
In the second half of the lesson rotate the groups so they all have another group’s challenge to try and complete. You may wish to have a couple of backup challenges ready as well in case any groups don’t manage to complete the first part successfully or if they complete challenges quickly.
If any groups are successful, ask them how they would extend it to make it more challenging, and get them to re-write the task as such. They can also have a go at another group's challenge.
Alternative challenges - FIRST LEGO League Challenge, Robot Game mats
Alternatively, you might want to test your students’ abilities by letting them take on the FIRST LEGO League Robot Game challenges. You can find out more about FIRST LEGO League Challenge here, or get in touch if you want to know more or sign up your school for our North Tyneside competition.
We have a variety of FIRST LEGO League Robot Game sets that are available to loan from us. These are sets we have kept from previous years of competition. Visit our loan kit page to book a kit for your lessons.
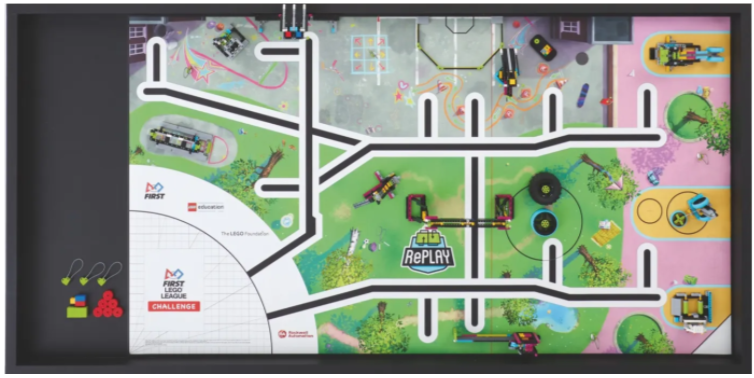
FIRST LEGO League challenge guides
These are all the documents which explain the missions and rules for each year's Robot Game missions. Please get in touch if you have any questions or need any more help with it:
2020/21
- RePlay Game Rulebook (includes field setup)
2019/20
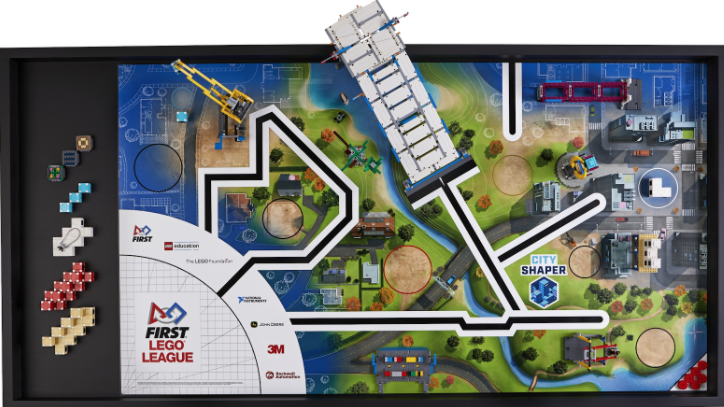
- City Shaper Game Guide (includes field setup)
2018/19
- Into Orbit Game Guide (missions on p.22 onwards)
- Into Orbit Field Setup
2017/18
- Hydro Dynamics Challenge Guide (missions on p.21 onwards)
- Hydro Dynamics Field Setup
2016/17
- Animal Allies Challenge Guide (missions on p.21 onwards)
- Animal Allies Field Setup
Plenary
Gather the groups back together at the end and feedback what they did, how they went about solving the problem and how successful they were. Other groups may be able to suggest other approaches or ideas for solving the same problems.