
Collecting data with online forms
Databases - Lesson 5
Objectives
- To compare different methods of collecting data
- To understand and explain the difference between open and closed questioning
- To create and use an online questionnaire for data collection
Lesson Resources
Lesson 1 - What is a database?
Lesson 2 - Weather data
Lesson 3 - Building and searching a database
Lesson 4 - Turning data into graphs
Lesson 5 - Collecting data with online forms
Lesson 6 - Analysing results and presenting findings
Introduction
Ensure you have familiarised yourself with building and sharing Google or Microsoft forms before the lesson. (see the guidance below).
Databases are only useful when they have data in them, and at some point that data needs collecting.What different ways can we collect data? Sometimes we might collect data using technology such as sensors collecting weather data or traffic counters on roads, other times it might be done by research (as they did with the weather website) or if the data is about people then we need to collect that from people, usually by surveys/ questionnaires.
What are the positives and negatives of doing this manually? (going round with a clipboard and asking everyone) -
Positives:
- more personal
- gives the chance to probe deeper with questioning.
Negatives:
- time consuming
- limited by time, place and accessibility.
What sorts of questions can we ask? What’s the difference between an open and closed question? Discuss the difference, which are best when?
Put the children into small groups of about 3 and ask them to think of around 5 suitable questions they could ask people about the weather and countries they have visited, perhaps linked to holidays. Encourage them to try to have some open and some closed questions. They should jot down their ideas on paper or whiteboards.
For example:
- Do you prefer snowy or sunny holidays?
- What is the hottest country that you have visited?
- What is the coldest country that you have visited?
- Rate these types of weather on how much you like them: Sun, rain, snow, wind.
We’ve already seen how some web tools, such as Google Docs/Office 365 can save us time and effort if we want to collect data from a group, and that method worked well when it was just collecting data from our own class, but it wouldn’t really be appropriate if you wanted to collect data from a much larger group, or from people you didn’t know such as the general public. Online questionnaires are great for this.
Introduce the children to Google or Microsoft forms (depending on the system you use in your school) and explain that this is an online questionnaire, what are the positives and negatives of collecting data like this?
Positives
- not restricted by time and place, could be sent out globally and respondents could answer it at all different times
- works on most web enabled devices,
- can be sent out to lots of people,
- data easy to manage,
- quick and easy to complete.
- can include media (images and videos)
- users only see the form, not the database
Negatives
- needs internet access,
- some people might ignore it
- doesn’t give the chance to ask follow up questions.
Main task
Explain that we are going to have a go at creating our own online questionnaires for collecting data, but first we need to know how to do that!
Google Forms are both free tools designed for this job. You can create forms from your Google Drive or Office 365 account. Guidance for both systems can be found below.
Making a Google Form
You can find Google's help and guidance on using Google Forms HERE.

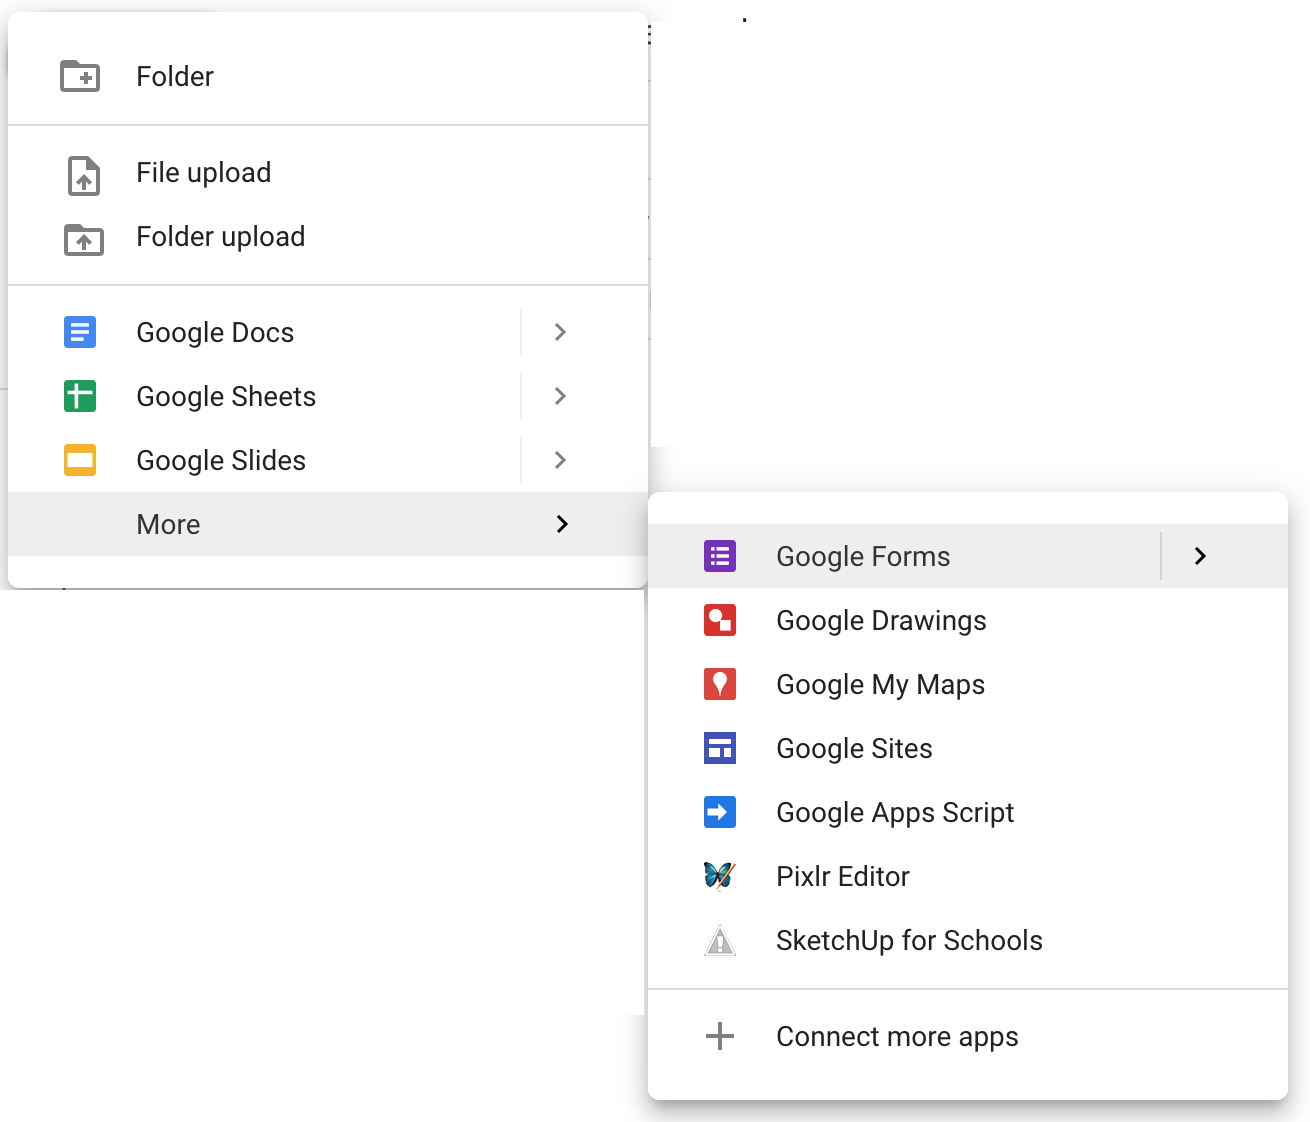
From your Google Drive click on New > More and click on Google Forms. Work through building the forms a bit a time together.

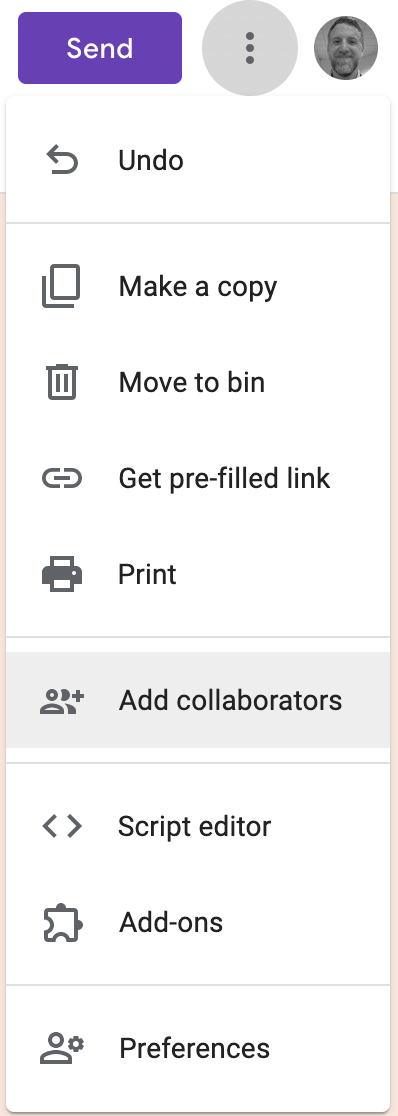
As soon as the new Form opens, ask the student that made the form to click on the three dots in the top right of the form and choose Add collaborators.
Their forms should have no more than five questions and in this instance, might be best done on one computer to allow discussion about the questions they are adding.
When the page loads, first thing to do is to name your form, then go straight to the first untitled question that is ready for you.
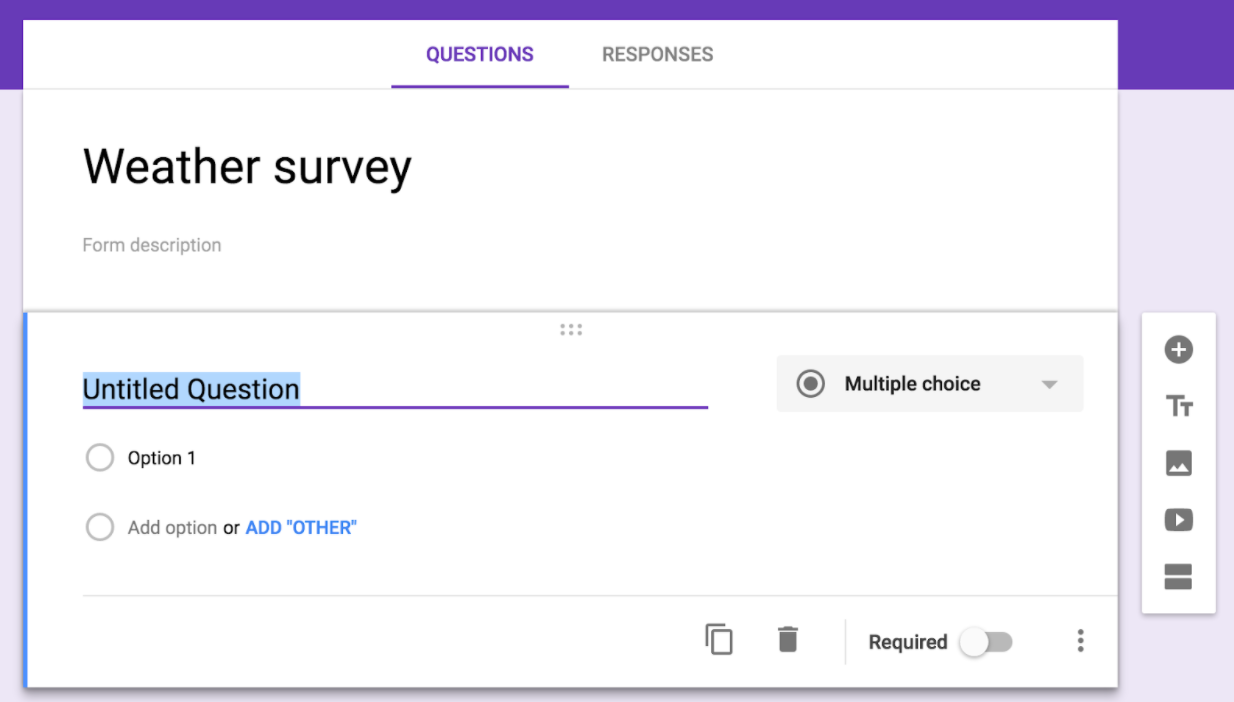
There are a number of different question types that are available to use and not all are appropriate for all questions so discuss these first. Can you explain how this question might work? When might you use it? Can you give me an example of any question that would work for this style of question type?
Question types
Click on Multiple choice to see the list of available options.
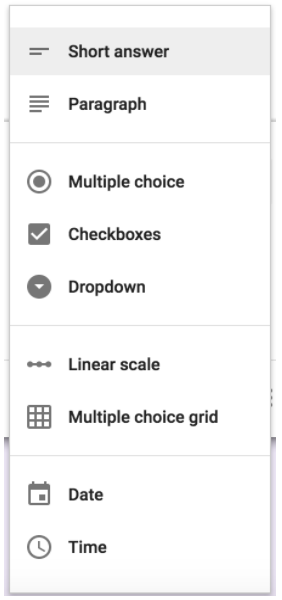
Short answer - For ... wait for it... short answers! But these type of questions allow free text entry. Best used when you cannot predict what a user’s answer would be or there is a large amount of options for them to pick from. Can sometimes lead to data issues from user error in spelling mistakes etc.
Example question for this type - What is your name?
Paragraph - As above but users get a much bigger box to type into. Good for when you want detail and description in an answer.
Example question for this type - Explain how you feel about school and why?
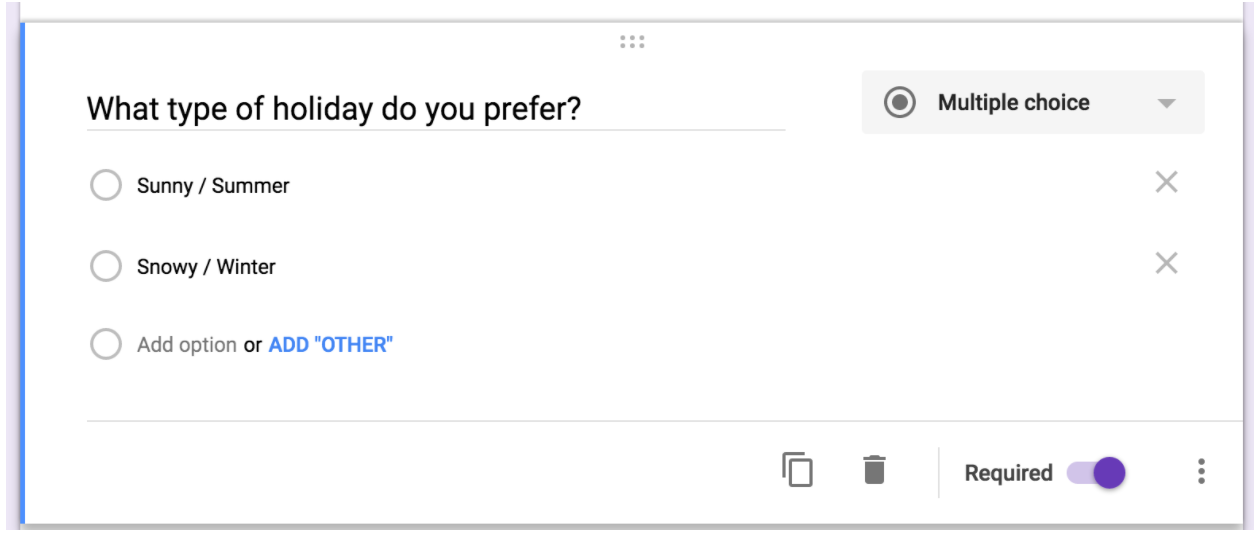
Multiple choice - Pick one answer from a pre-set list that you provide for the user. You can also add an ‘other’ option to this type of question (if wanted) to give the user more choice.
Example question for this type - Choose your favourite flavour of crisps from this list.
Checkbox - As above, give the user a list of options to choose from however, this option allows them to select more than one answer from the list. Also allows an ‘other’ option (if wanted).
Example question for this type - Select all the sports you regularly play from this list.
Dropdown - Like multiple choice but answers are hidden in a dropdown menu that the users can choose from. Does not allow an ‘other’ option.
Example question for this type - Choose your favourite drink from this list.
Linear Scale - Rate something on a scale of your choice. Great for letting users show opinions on matters. You label the ends of the scale so they know which end is positive and negative and then you choose the size of your scale (up to a maximum of 0 - 10).
Example question for this type - How much did you enjoy your lunch today? (1= not at all, 5 = best meal ever!)
Multiple choice grid - This can be used in different ways, but is generally like rate on a scale for a number of items which go down the left hand side of the grid, the options the user has to choose from go across the top of the grid.
Example question for this type - To what extent do you agree with the following statements?

Date and Time - Both these just give users the facility to add a specific formatted date or time. This could be when they completed the form, or an answer to a time or date question.
Example question for this type - What is your date of birth? What time do you normally go to bed?
Go through some of the other options available for building your Google form:
Other options
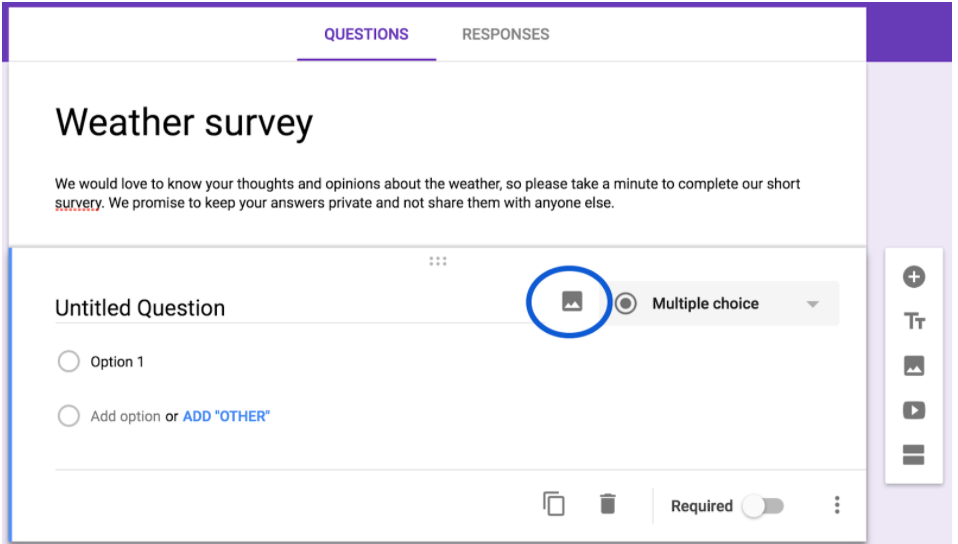
You can also add images to questions or answer options if wanted. These can be used to illustrate the question or could be part of the question (e.g. Name the building in this picture) and are totally optional. To add images, hover to the right of any question or option line and you’ll see the image button appear (mountain range), click and upload.
Question images allow resizing with handles in the corners and can be aligned or deleted by hovering over the image and clicking the three dots button that appears.
Answer option images are automatically fixed to a set size and can only be deleted once added.
The buttons to the right of the screen let you: add more
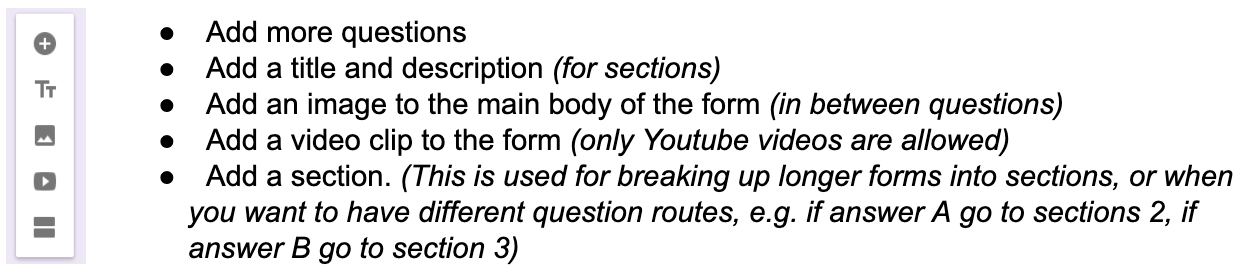
Once added, when you click on any question you will see options at the bottom to duplicate it, delete it and make it a required question (this means users won’t be able to submit their form until they have answered the question).
If you want to reorder questions you can just drag them around the screen when you click on the six dots at the top of each question box.
Looks
When you’ve finished adding your questions, go back to the top of the screen.

Here you can change the way your form looks, click on the palette icon and you can choose from a simple colour theme of your choice, or if you click the image icon on the colour palette you can choose from a huge range of illustrations and photographs to make your form look great.
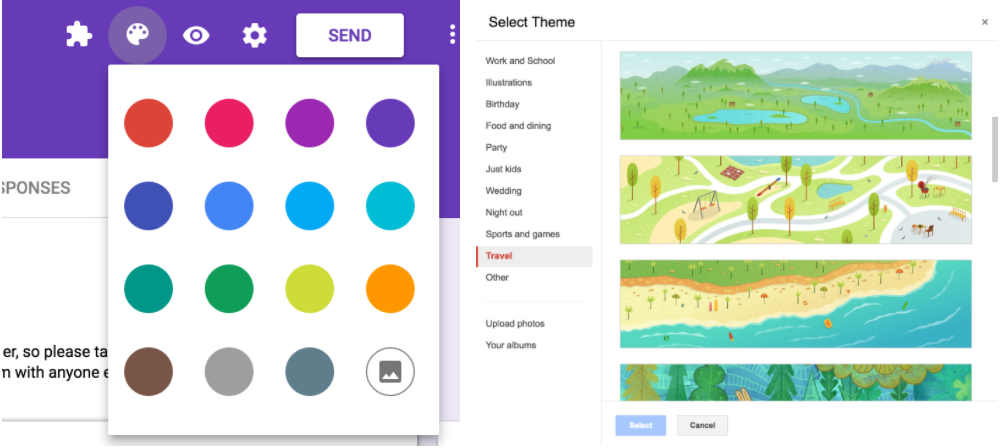
The eye icon gives you a preview of how your form will look to the user.
Then go into settings with the gear icon.
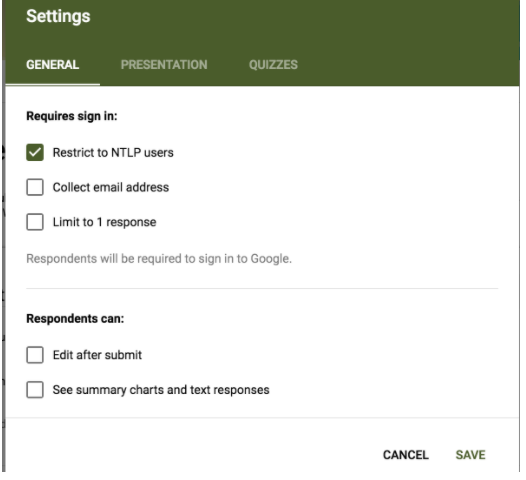
The main setting to consider is the top one; ‘Restrict to NTLP users’. Leaving this ticked means people you want to fill out your form have to have a NTLP account and be signed in. Having this option will automatically collect their username when they complete the form (so you have that info in your database), but it does make it more restrictive by forcing them to have an account and sign in.
Normally we’d recommend UNTICKING this box, which means you can send it to anyone to complete (This is particularly useful for doing things like parental surveys) without them needing to have an NTLP account or be signed in. If you still want to collect user info you can add a ‘name’ question at the top of your form, but anonymous data is often fine. Save any changes you make.
Sending the form
Finally you’re ready to send it out to your audience, hit the SEND button!
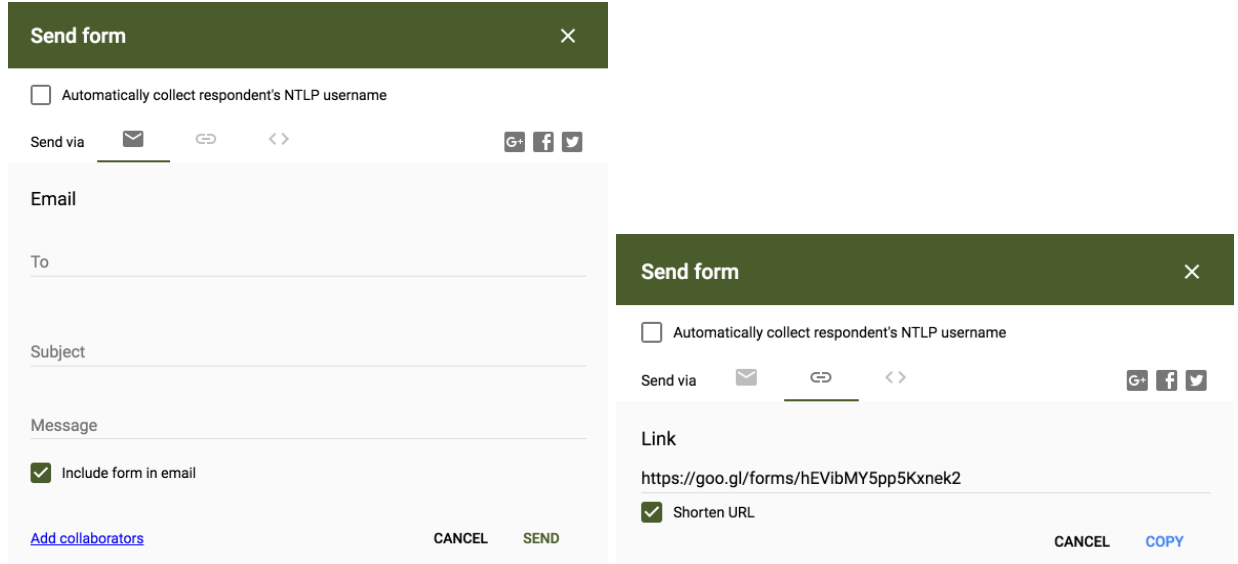
Here you get a choice of how you want to distribute your form to the world (or classmates). The first option lets you email it to them, just fill in the details and tick the ‘include form in email’ option if you want it (otherwise they just get a link to the form).
Or click on the link option to see a URL that you can give to users to reach your form, this is perfect if you wanted to send it out by other means such as a text message to parents or having it as a link on a website (you can shorten the URL by ticking the box below the link) which is better for text messages etc.
There are also options for sending it straight to social media and for embedding the form on a website.
Making a Microsoft Form
You can find Microsoft's help and guidance on using Forms HERE.
Log in to your 365 account and open Forms.

If it's not visible, check the All apps button to reveal it and other 365 apps.

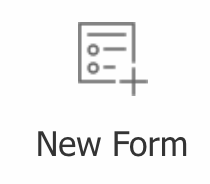
Then ask JUST ONE OF THE PAIR to click New Form.
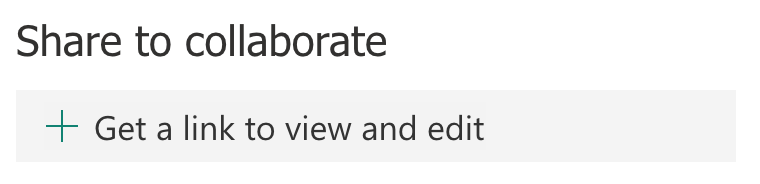
As soon as the new Form opens, ask the student that made the form to click Share in the top right of the form and choose Share to collaborate.
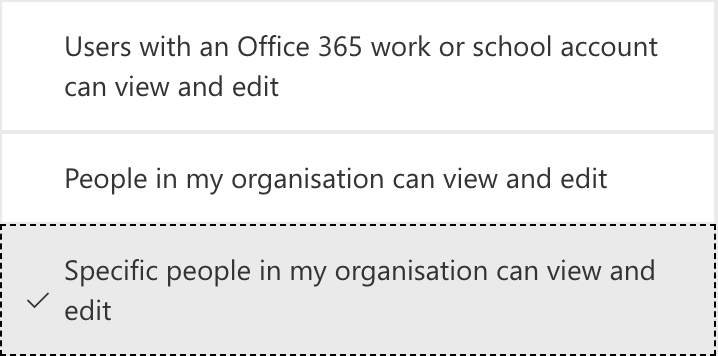
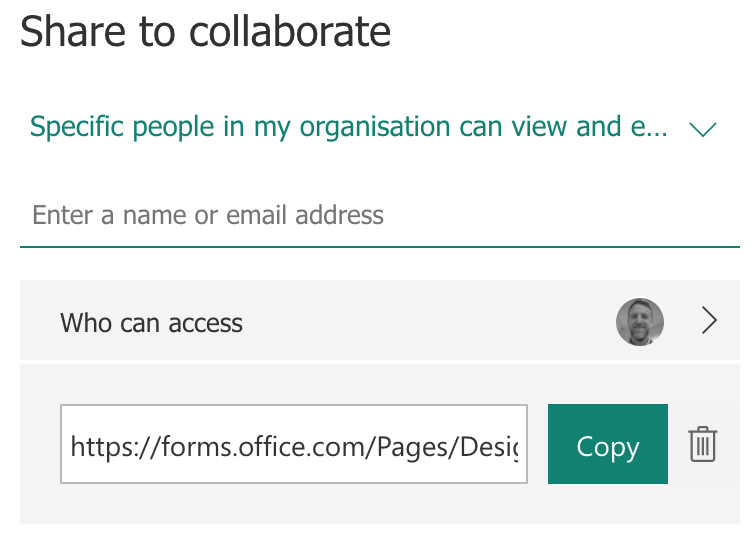
Change the permissions of the form to Specific people in my organisation can view and edit.
They can then add their partner's email address to add them as an editor. Both students will then be able to work on the form and it will be saved in both of their OneDrives (it will appear in 'Shared' for partner number 2).
Their forms should have no more than five questions and in this instance, might be best done on one computer to allow discussion about the questions they are adding.
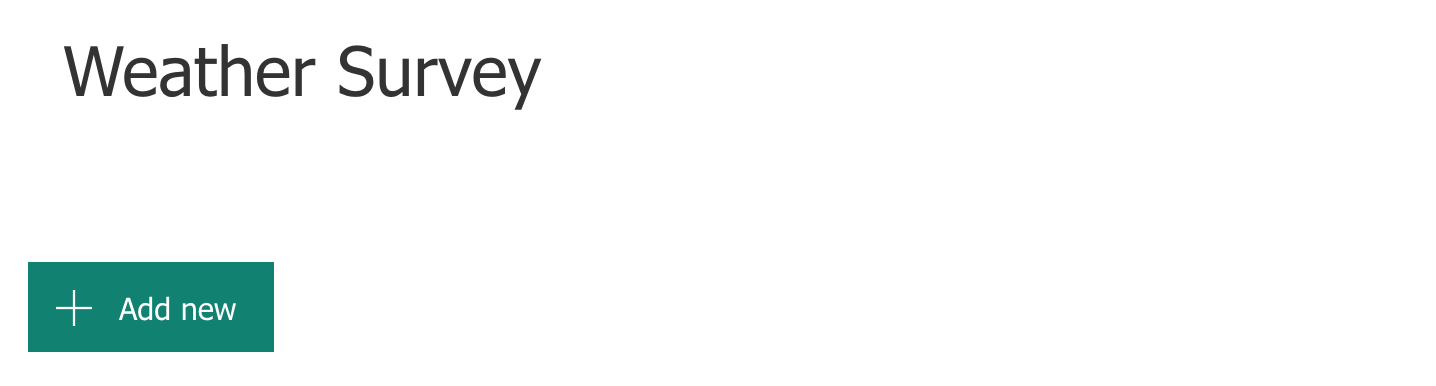
When the page loads, first thing to do is to name your form, then click + Add new to add your first question
There are a number of different question types that are available to use and not all are appropriate for all questions so discuss these first.
- Can you explain how this question might work?
- When might you use it?
- Can you give me an example of any question that would work for this style of question type?
Question Types

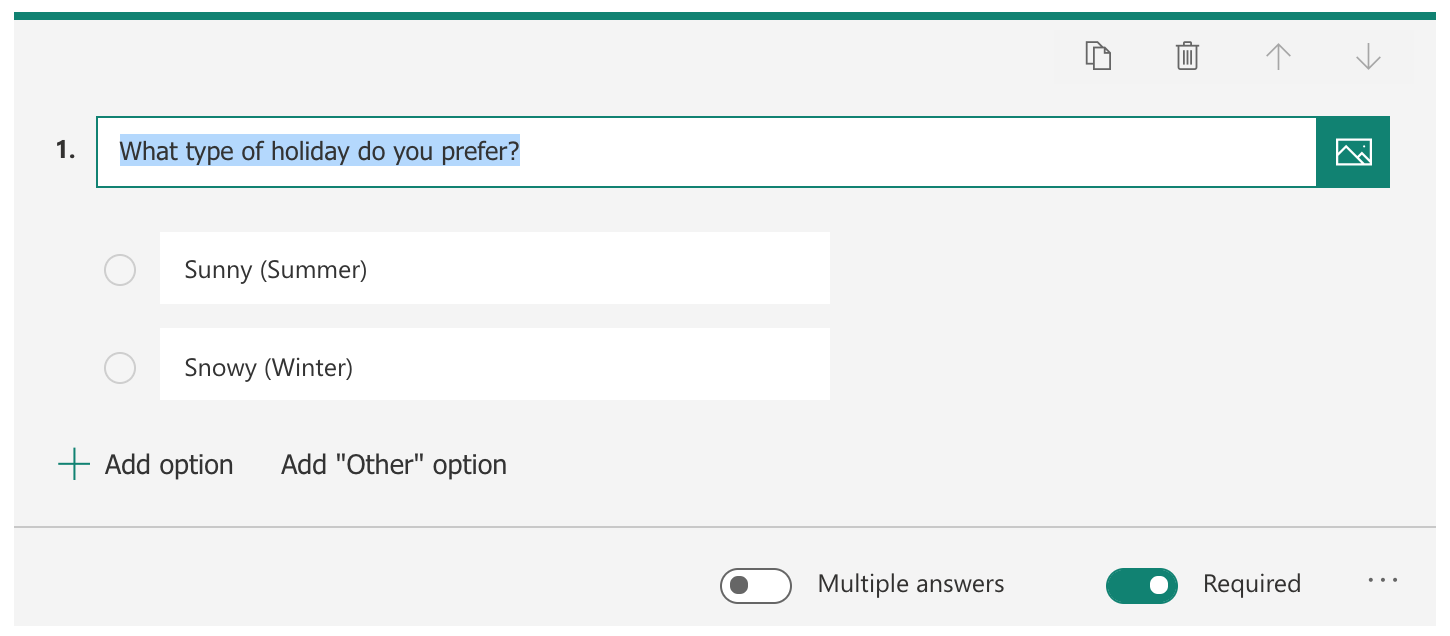
Choice - Pick one answer from a pre-set list that you provide for the user. You can also add an ‘other’ option to this type of question (if wanted) to give the user more choice. Flicking the 'Multiple answers' switch when editing this question will let users choose more than one response.
Example question for this type - Choose your favourite flavour of crisps from this list.
Text - These type of questions allow free text entry. Best used when you cannot predict what a user’s answer would be or there is a large amount of options for them to pick from. Can sometimes lead to data issues from user error in spelling mistakes etc.
Example question for this type - What is your name?
Rating - Rate something on a scale of your choice. Great for letting users show opinions on matters. You label the ends of the scale so they know which end is positive and negative and then you choose the size of your scale (up to a maximum of 0 - 10).
Example question for this type - Rate today's lunch? (1 to 5 stars)
Date - This gives users the facility to add a specific formatted date. This could be when they completed the form, or an answer to a date question.
Example question for this type - Please enter your date of birth?
Once added, when you click on any question you will see options to make it a required question (this means users won’t be able to submit their form until they have answered the question).
Style your form
Click on the Theme button at the top of the page to style your form.
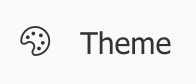
You can make simple colour changes to the background or choose one of the illustrated themes. You can also customise your theme with the + sign where you can add your own background or colour.

Form settings
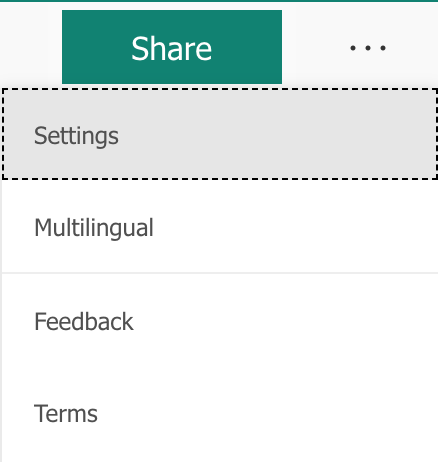
The three dots in the top right of the screen allow you to access the form settings
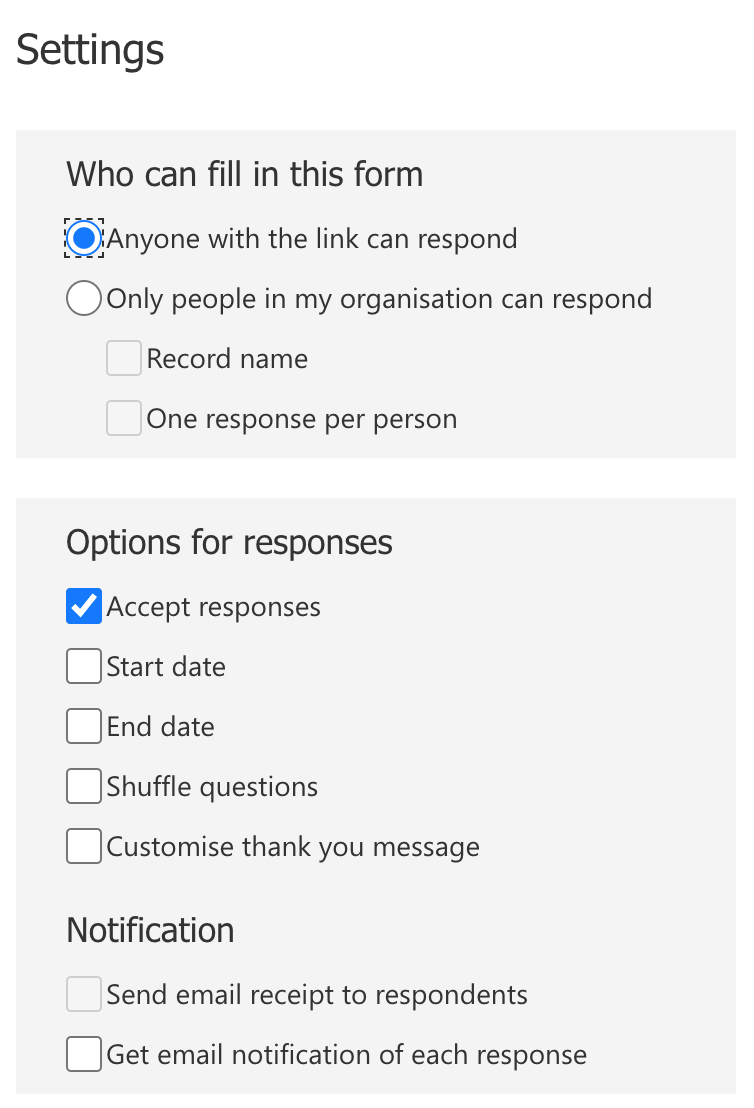
Here you find a number of choices such as who can complete your form and when it can be completed. It can sometimes be useful to change the 'who' to Anyone with the link, this is good for when you want to send your form to a wider audience of people that wont have a 365 account linked to your organisation.
Sending out your Form
Finally, on the form editing page, click Share.

This gives you a number of options for how to send your form out to people, but in this lesson we're just going to use the email option.
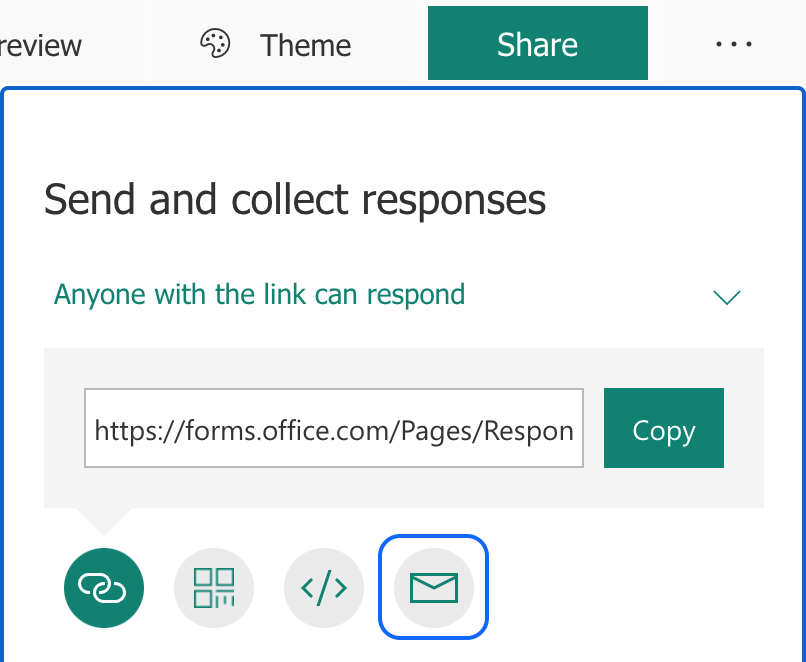
As you click this, your email account should automatically open and an email containing a link to complete the form should be generated. All the students need to do is add email addresses.
Completing the forms
Ask each group to Email their questionnaire to at least 10 people not in their group. They could also send it to you (the teachers) and if you have more than one form entry in your school, members of the parallel class.
To ensure everyone gets sent surveys, you could split your class into three groups (of around 10) A, B and C.
Group A should email their forms to everyone in B, B should send them to C, and C should send forms to A.
Once they have completed and sent their forms out, they should go back to their email inbox and complete and surveys that others have sent to them ready for the next lesson.
Plenary
Ask the students to feedback at the end; were there any questions that didn’t make sense in the forms you completed? Why? Were the forms well designed? Had they chosen the correct types of questions?
In the next lesson the students will be analysing the data that they have collected.
Before the next lesson, create an example form (like theirs) and populate it with some data for the next lesson.