KS2 Sample lesson
Building Retro Games: Project 3, Lesson 1
Objectives
- Analyse an existing video game and explain how it works
- Understand and use sequence, selection, and repetition in programs
- Use X and Y coordinates effectively to control a sprite’s movement
- Understand and use variables to control functions in a game
Lesson Resources
The Retro Game
Introduce the game of Space Invaders to the students. Ask them to watch this video of the game being played.
While watching, they can talk to a partner and try to answer these questions:
- What do you know about the game?
- How does it work?
- What is the aim of the game?
- How do the different sprites work?
- What rules do they follow?
Discuss this answers to each question and then explain a little about the game and its history.
Space Invaders is a 1978 arcade game created by Tomohiro Nishikado. Space Invaders was the first fixed shooter and set the template for the shoot 'em up genre. The goal is to defeat wave after wave of descending aliens with a horizontally moving laser to earn as many points as possible.
Space Invaders was an immediate commercial success; by 1982, it had grossed $3.8 billion with a net profit of $450 million, making it the best-selling video game and highest-grossing "entertainment product" at the time. The many versions of the game are estimated to have grossed over $13 billion in total revenue as of 2016, making it one of the highest-grossing video games of all time.
Space Invaders is considered one of the most influential video games of all time. It helped expand the video game industry from a novelty to a global industry, and ushered in the golden age of arcade video games. It was the inspiration for numerous video games and game designers across different genres, and has been ported and re-released in various forms.
(source: https://en.wikipedia.org/wiki/Space_Invaders)
Introduce the game of Space Invaders to the students and explain a little about its history.
Now let’s get on with making our own version!
The Background and Sprites
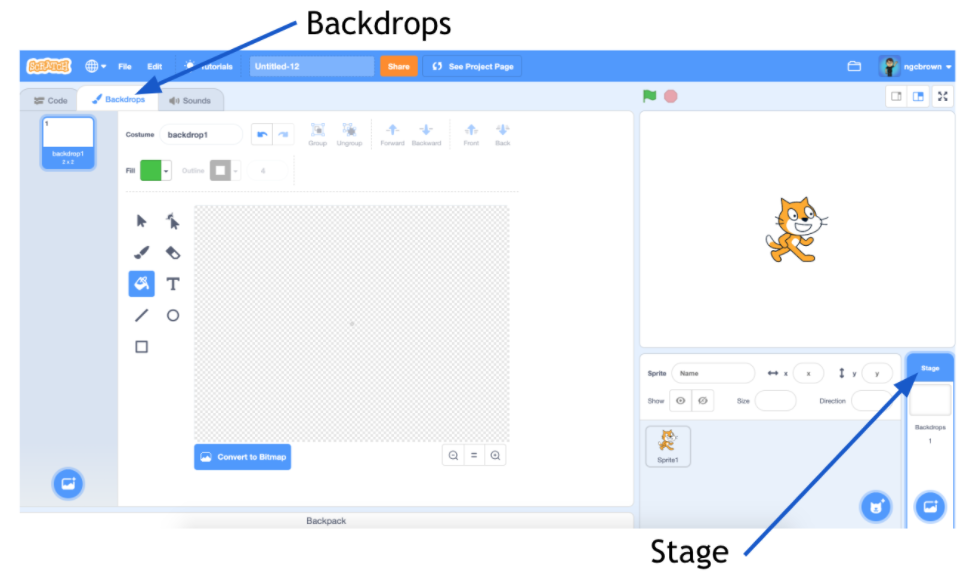
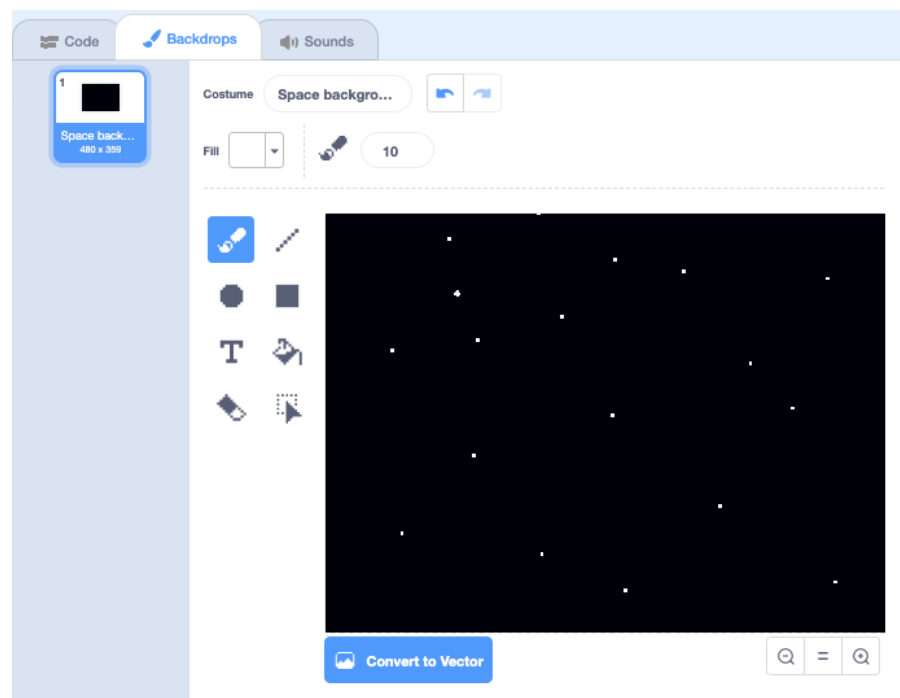
To get started, click on the Stage section in the bottom right of the screen, then select the Backdrops tab in the top left of the screen. Here you will find the paint editor for backgrounds in your projects.
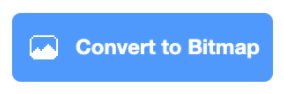
Click the blue Convert to Bitmap button at the bottom of the screen.
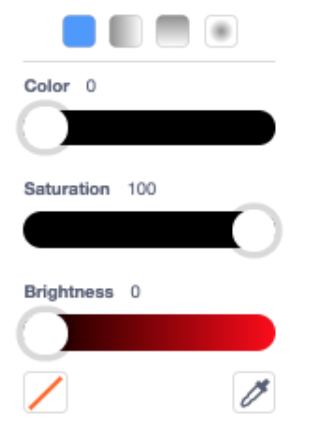
Choose the Fill tool from the drawing tools and select black from the colour mixing tool, then fill in the background.
Then use the brush tool on size 5-10 to add some white dots to create a starry scene.
Now let’s add some sprites for the game. In the original game the cannon sprite looked like this:
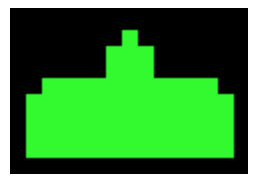
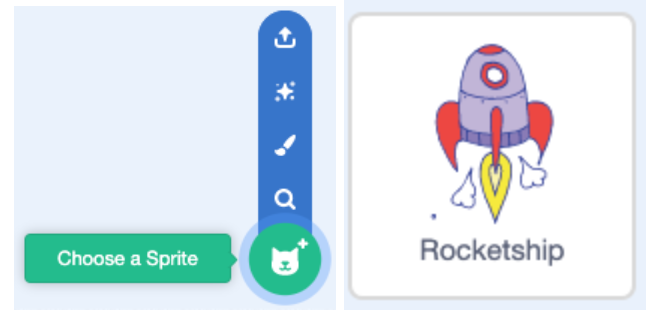
You can have a go at drawing your own version with the brush and/or shape tools, or perhaps use a sprite from the library, such as this rocket ship:
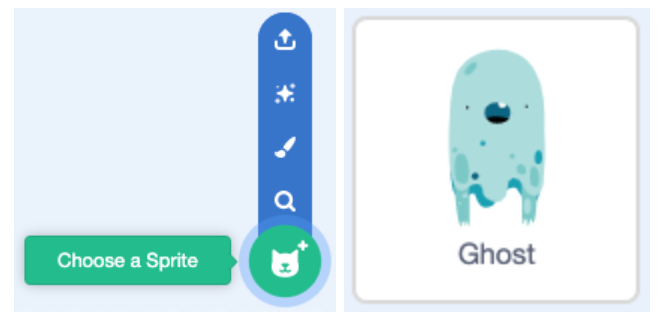
Now let’s make an alien. There were a few varieties in the original game, some of them looked like this:
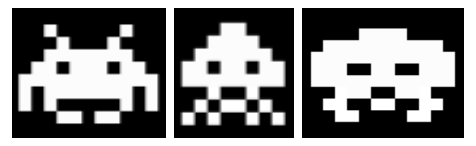
You can try drawing your own or choose anything to shoot down from the sprite library. This ghost makes quite a good alien.
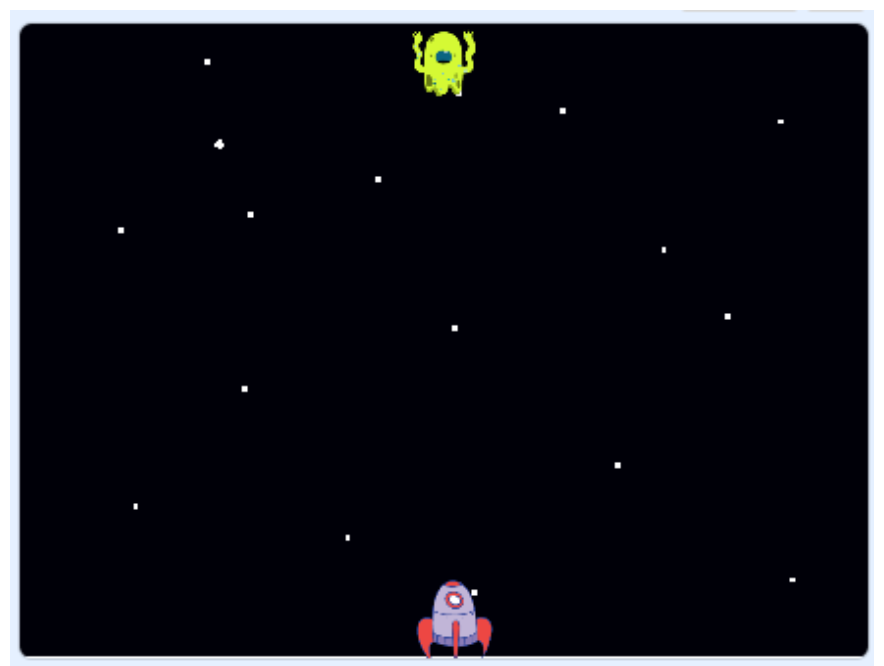
Next, make any colour adjustment you might want to and then resize both sprites so they fit at the top and bottom of the screen appropriately. A size of around 30 should work and the scale should look something like this:
Controlling the cannon
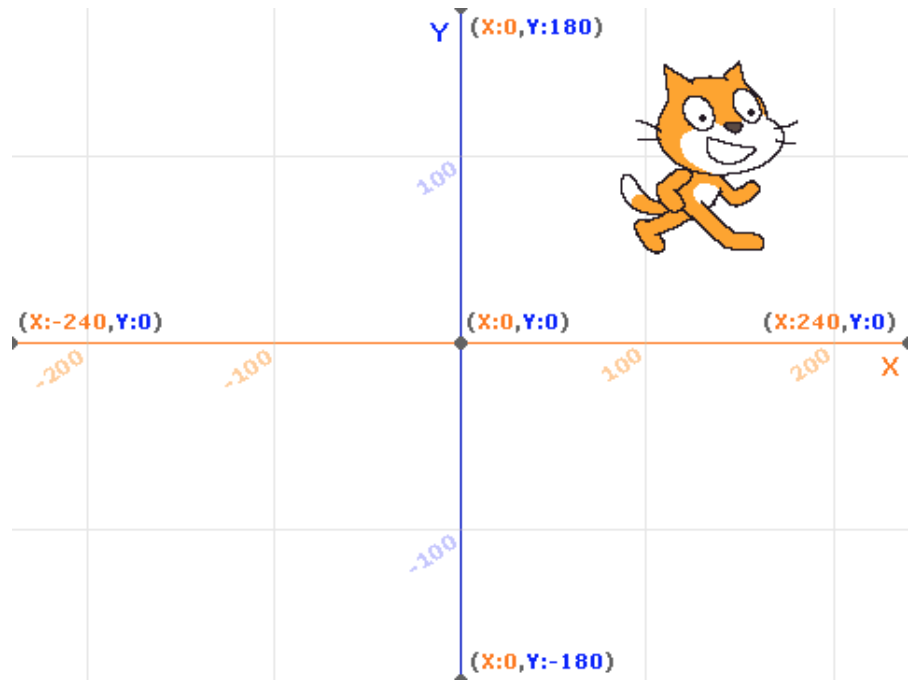
First, let’s set the start position of the cannon. What is a coordinate? Explore your students’ knowledge of coordinates based upon what they have studied in maths and previous work with Scratch. They may have experienced using them in other contexts as well, most likely maps or perhaps the game of battleships.
They describe the position of something on a grid, and are commonly used in video games to code where a sprite should be in the game.
In a 2D game (and in the Scratch environment) this is done with a four quadrant coordinate grid like the one below, (0,0) being the centre of the screen:
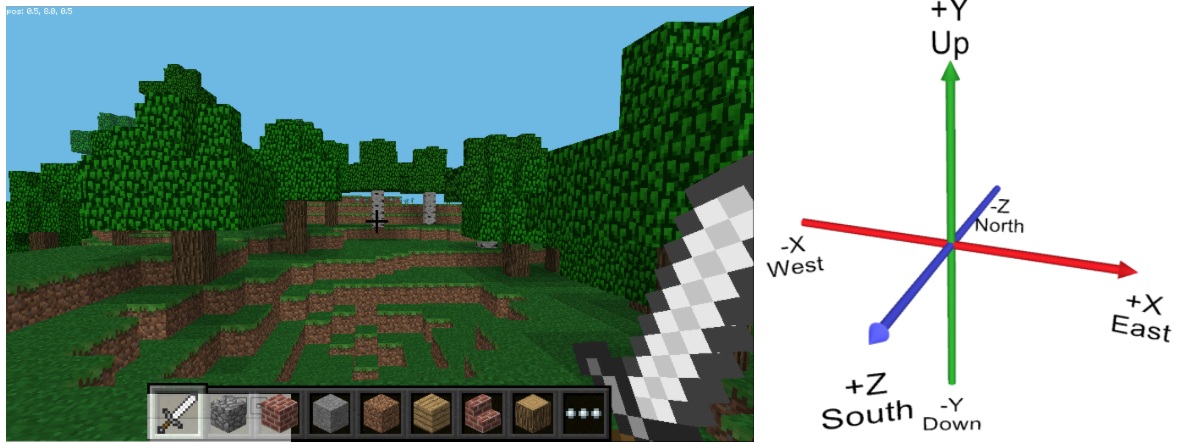
3D video games, like Minecraft or Kodu games also use coordinates but add a third (Z) axis to describe the depth position on the screen, in addition to the horizontal and vertical positions, so a coordinate might look like this (124, 87, -89).
There are several blocks in Scratch that relate to coordinates and they can all be found in the motion category. If X is the horizontal position and Y is the vertical position, what do you think these blocks will do to a sprite?
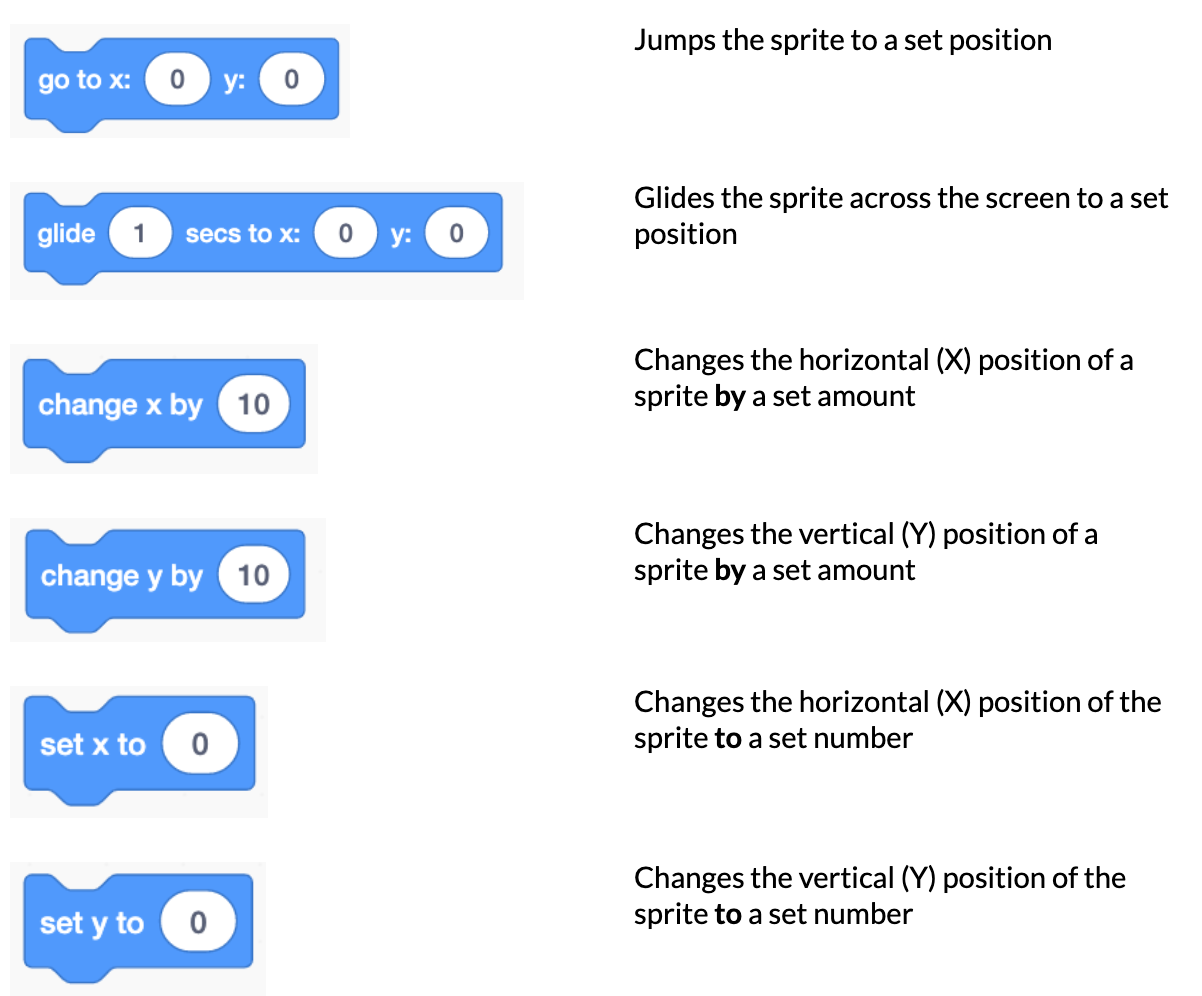
Which of these blocks could we use to make the cannon appear in the correct start position?
The ‘go to x y’ block is best for this. These are coordinates we’ve used for our cannon.
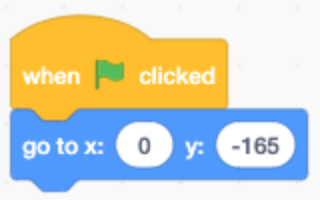
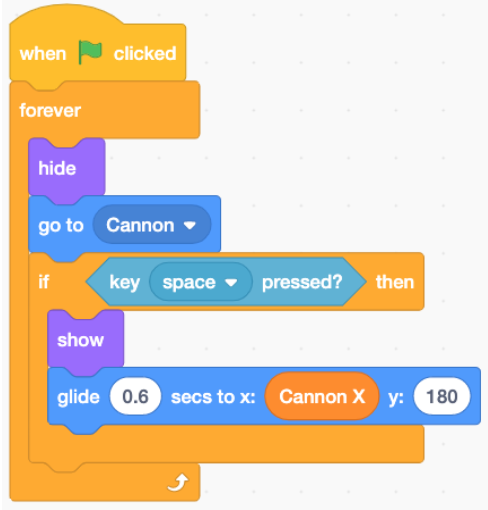
Now we need the cannon sprite to move. It's important that it can only move horizontally left and right and stays at the bottom of the screen like in the original game.
To make it move we’ll add some conditions based on the keys that are pressed on the keyboard. Recap with the students; what is a condition? They are rules that dictate what happens and when it’s allowed to happen. This is also known as selection. They should have used these before if they have completed any of our other Scratch units of work. Here’s an example of what we need, but will this code work as it is? Not fully, Why not? What else do we need to add?
The ‘if/then’ block needs to be able to work in more than one instance, so we need to add a loop to our code. Can anyone explain what a loop is? What different types of loop are there?
Counted loops repeat commands a certain number of times, like this example from Scratch Jr.

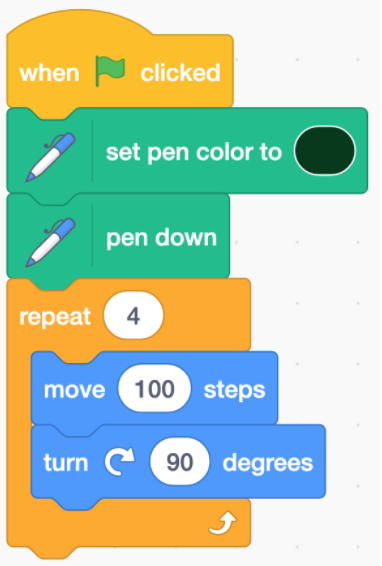
Or this example from Scratch, can you tell what it would do? (draw a square)
Each repetition of the code inside the loop is called an iteration.
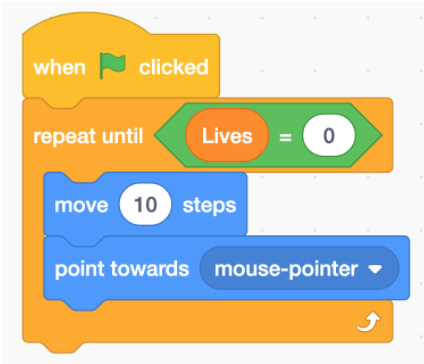
Sometimes you don’t want to repeat code a predetermined number of times. Instead you want to repeat until or while some condition is TRUE. This can be accomplished using a ‘Repeat Until’ block. The hexagon shape after the word “until” means we need some type of condition to determine when the loop will stop.
In this example, the code would make a sprite move around until their lives ran out in a game.
The third type of loop is an infinite, or Forever loop. This type of loop will keep repeating the code inside the loop until the user stops the code running.
In Scratch, a Forever loop repeats the code inside it approximately thirty times a second! So it's constantly checking to see if any conditions are being met (pressing W in this case) and running the code nested in the ‘if/then’ block if it is. So it always works and the bat will always move up when we press W.
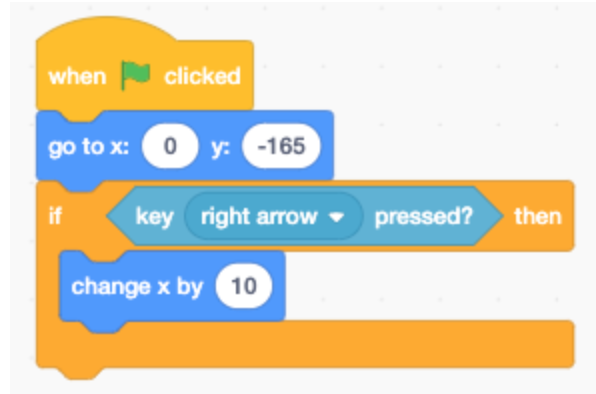
So let’s add a Forever loop!
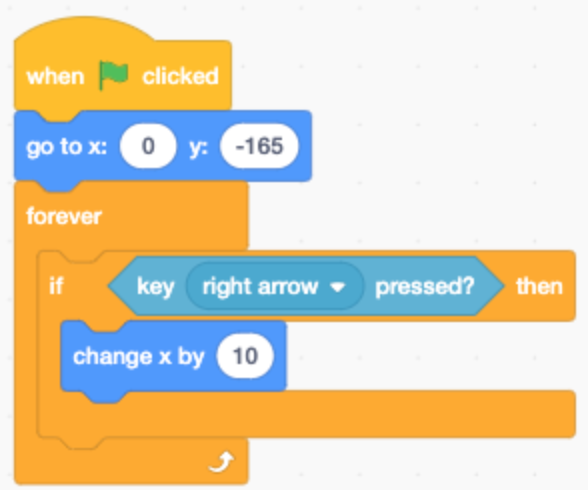
What will happen when we press → ? It will change the sprite’s position by 10 on the X axis, making it move to the right..
Now, add a second condition to let you move the cannon to the LEFT.
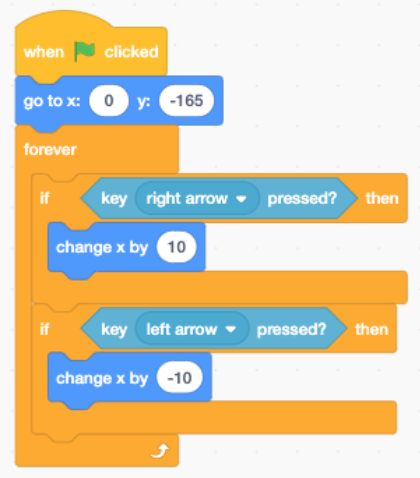
Here's the solution, notice that a negative value is needed for the X value to make the cannon move left.
Move the alien
All we want the alien to do is scroll left and right across the top of the screen, this is pretty easy to achieve. Ask the students to have a go themselves at solving the problem.
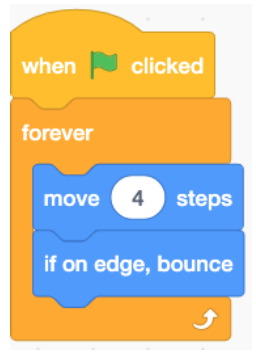
Programming the alien to keep moving forwards but bounce when it hits the edge of the screen will do the job. The number of steps will control its speed.
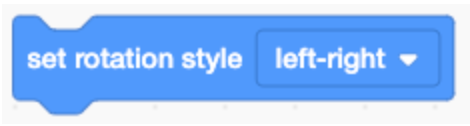
If your sprite is flipping upside down when it turns, you can change its ‘rotation style’ in the direction settings. Click the double arrow option (rather than the rotating arrow).

You can also now achieve this with a coding block, which was a new feature added in Scratch 3.
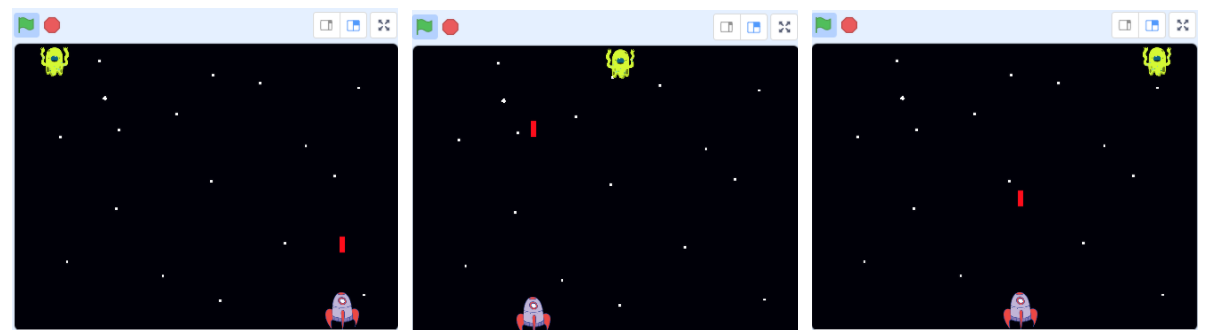
Now both the cannon and alien are moving we need to be able to shoot the alien down.
The laser
This part is a little trickier than you might first think. The laser needs to be a separate sprite that can move independently to the cannon, but it always needs to appear to shoot from the cannon sprite. Some of the time it needs to follow where the cannon is, and then it needs to shoot up the screen from wherever the cannon happens to be when we press a key. This creates some (very solvable) challenges!
First create the third sprite. Draw your own, convert it to a bitmap and then use the rectangle tool to draw a tall thin box.
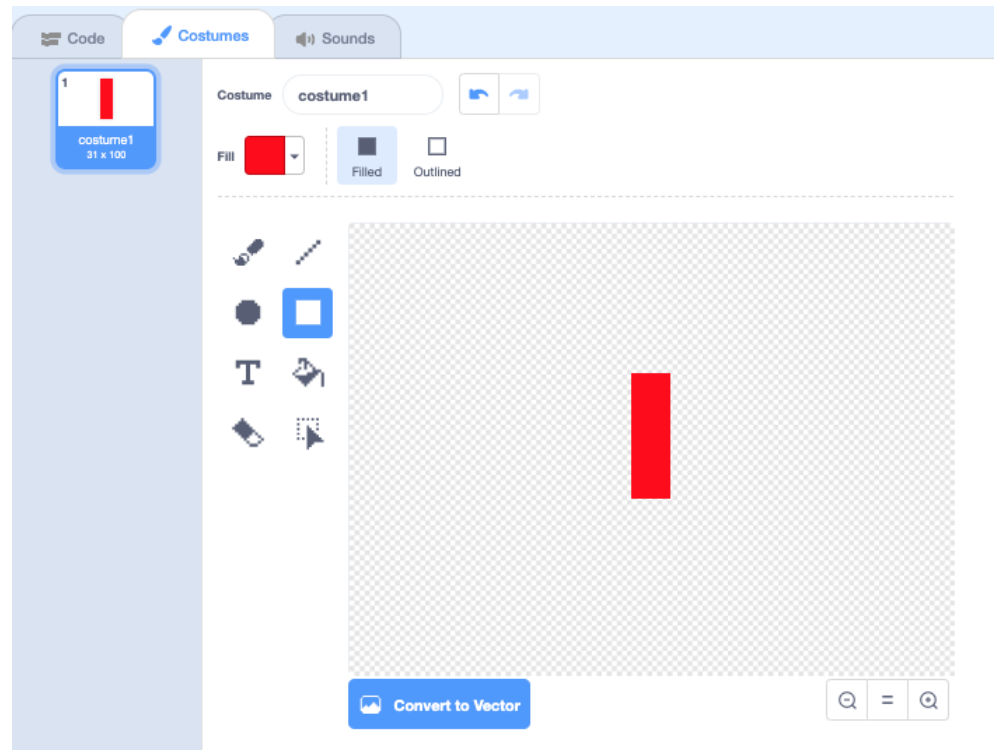
Shrink it down to be about half the height of your cannon (rocket). Size 20 worked for us but it depends on how big you draw it initially. Re-name it ‘Laser’ in the sprite properties box.

Let’s have another think about what we want this sprite to do. Ask the students to talk to a partner and come up with the pseudocode (how it should work in their own words) for the laser. Emphasise that we’re not interested in the actual Scratch code for making it work at this point.
Collect their ideas and, if needed, share these points.
It should always:
- be where the cannon sprite is
- be hidden
Until we press a key, then:
- appear
- move up the screen in a straight line
- disappear at the top of the screen
- go back to the cannon so we can fire it again
Let’s see if we can work through that pseudocode and turn it into real working code. The first two points can be achieved with this code:
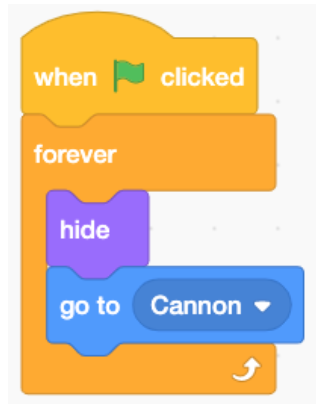
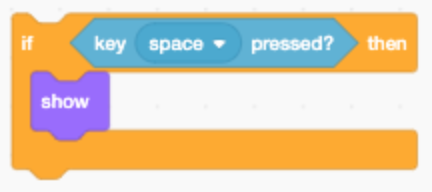
It hides and always goes to wherever the cannon (Rocket sprite) is. Pressing a key to fire the cannon is going to need another condition, let’s use the spacebar to trigger that. First it appears.
To make it move smoothly up the screen the ‘glide to X, Y’ block works well, but it poses a problem. What is the coordinate it should glide to?

The problem is that there isn’t one fixed coordinate that we can enter in the block as it will always vary, well the X coordinate will. The Y position should remain constant, what value for Y will take it to the top of the screen? 180 is the top of the screen. The X coordinate for the laser’s path needs to be in line with wherever the cannon, or else it will always shoot to the same place.
We can solve this problem with a variable. Students should have come across these before in other coding work, such as lesson 3 in our Scratch Maze Games unit of work.
Variables are a place in a computer’s memory that can store a value, think of it like a notepad that can hold some information for us to use again later.
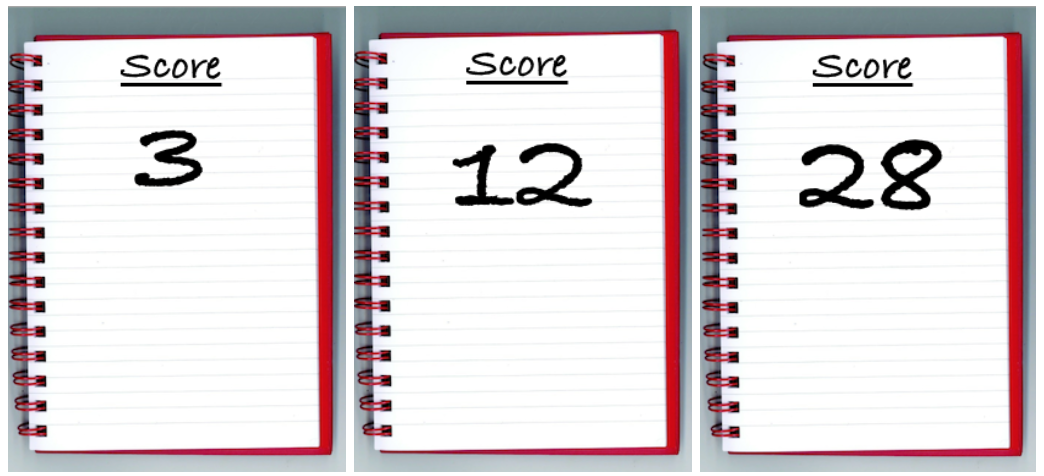
We give each variable we use a name and can then refer to it at any point we like in our code to apply and use its current value. On the notepads above, the variable’s name is ‘Score’. The value of Score could change but it will still be the same variable, and someone could ask “What’s the score?” at any point, which could be checked and reported back. Or the value of the variable could dictate how or when things happen, for example, the game ends when the score gets to 30. All this (and much more) can be done with variables in code.
The information a variable holds can be different things such as numbers, text, punctuation, or a True/False value.
The example of algebra is another good one. Here, the name of the variable is Y, but what is its value?
15 + Y = 22
3 x Y = ?
21 - Y = ?
We can tell from the first calculation that its value must be 7 (as 15 + 7 = 22). Once we know the value of Y we can then apply it to other calculations, such as the other two above. We read the name of the variable but we always apply its value to where it's being used.
So in Scratch that might be something like this:
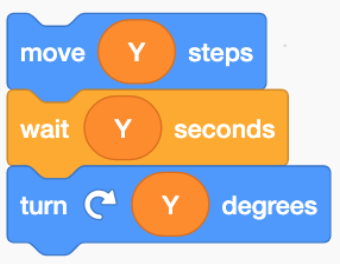
These blocks all have the variable Y instead of a number in them. So if Y still = 7, the sprite would move 7 steps, wait 7 seconds and then turn 7 degrees. We can also report the variable’s value to the user in a few ways such as a speech bubble or by having it visible on the stage.

But of course we can change the value of Y! This would alter what the code would do anywhere that we have used the variable’s name. So it saves us time of having to edit each number separately if we want to try out different numbers for moving, turning or if the variable needs to go up or down on its own such as if it represented a score in a game.
So when we use a variable, at the beginning of the code we always give them a value to start with. We call that assigning a variable. You can also assign a new value to the variable at any other point in your program.
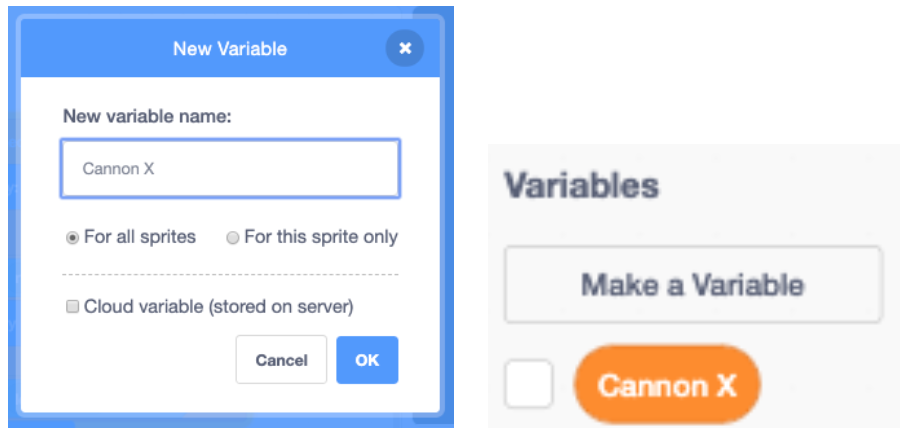
Variables in Scratch need to be created. Go to the Variables section and click Make a variable, then name it ‘Cannon X’. Untick it in the block list so its value is NOT visible on the game screen.
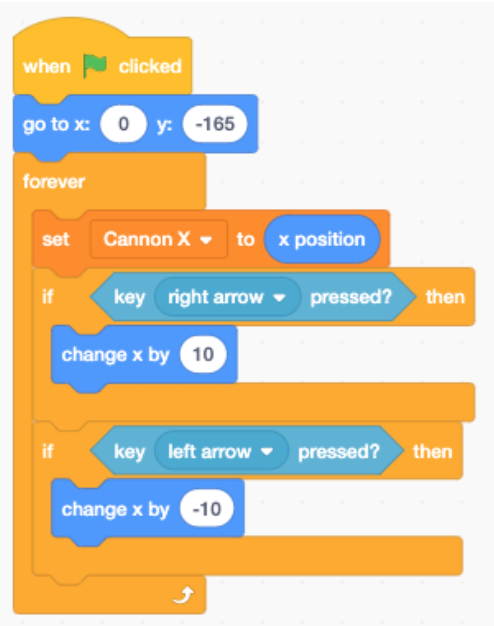
Back on the cannon (rocket) sprite, add some code that sets the value of ‘Cannon X’ to the whatever the sprite’s current X coordinate is. This must be inside the Forever loop so it constantly update the variable’s value when we move the cannon around.
Be sure to use ‘set’ and not ‘change’ in the variable blocks and find the ‘x position’ block at the bottom of the motion blocks.
Return to the laser sprite and now let’s modify the ‘glide to X, Y’ block we previously selected.
Adding the name of the variable ‘Cannon X’ to the X coordinate will apply its value (which is the same as the X position of the cannon at any time) to the X position of the laser, so when it fires up the screen it’s always in line with the cannon, like this!
The ‘seconds’ number in the glide block will control the speed of the laser’s movement. We found 0.6 seconds is about right, but feel free to tinker with this!
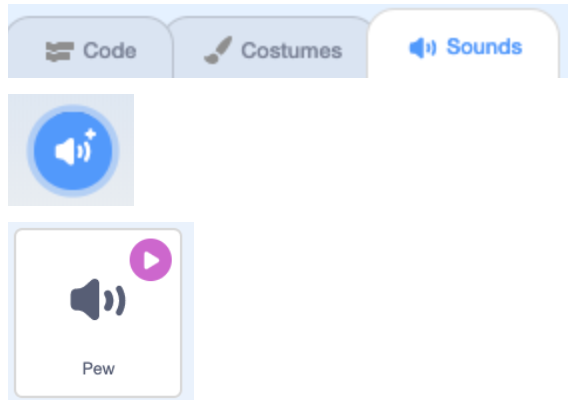
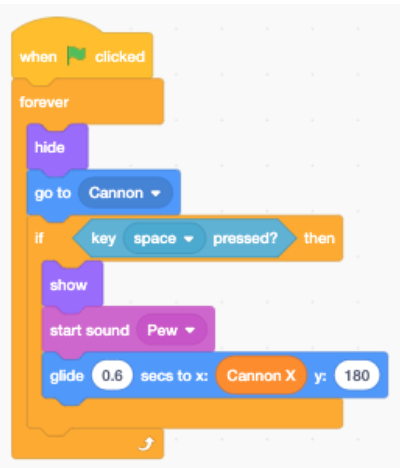
Finally you might want to add a little sound effect in at this point (if you have working headphones). Something short is best! On the laser sprite go to the Sounds tab and then click the sounds button to access the library of effects. The sound called ‘Pew’ is perfect for a laser noise.
Be sure to use the ‘Start sound’ block (in the Sound block category), not ‘Play sound until done’ as this will ensure the laser sprite starts its movement while the sound is playing. Add the ‘start sound’ block just after the ‘show’ block, inside the ‘if then’ block.
Plenary
Review the process so far:
- What have we added to our game?
- What is working?
- What have you had trouble with?
- How did you solve any problems you had?
- What do we need to do next?
- What does selection (a condition) mean? Where did we use it?
- What is a loop, what kind have we used? Why?
Now ask the students to save their work.
Saving your game
Depending on whether you are using the desktop or online versions of Scratch 3, saving may be slightly different.
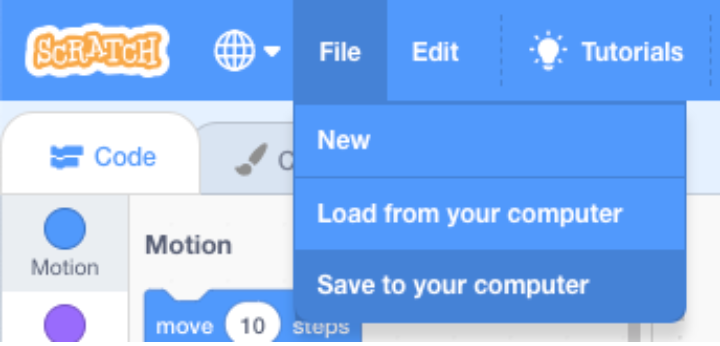
Offline working
In the offline desktop version saving is very simple. Just go to File > Save to your computer and browse to wherever you would like to save your work, name your file appropriately and click Save.
Online working - with a Scratch account
This is really easy as Scratch autosaves for you! You can be really sure the save is up to date by clicking the ‘Save now’ button in the top right of the screen near your username:

Or by clicking File > Save.
Online working - without a Scratch account
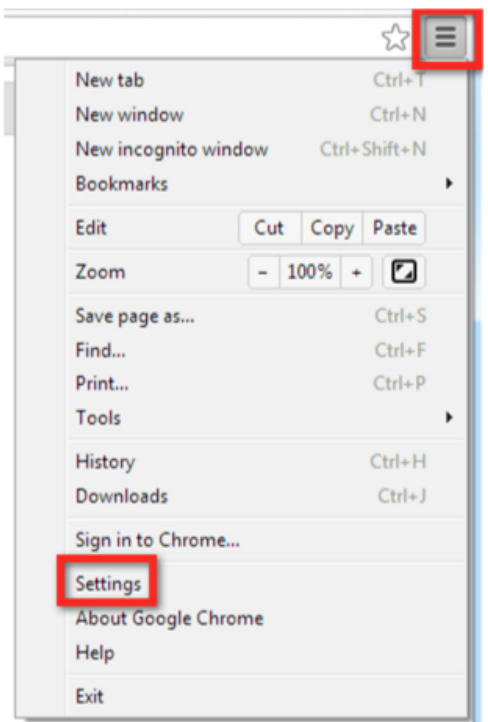
Using the online version can make things slightly trickier if you’re not signed into a Scratch account.
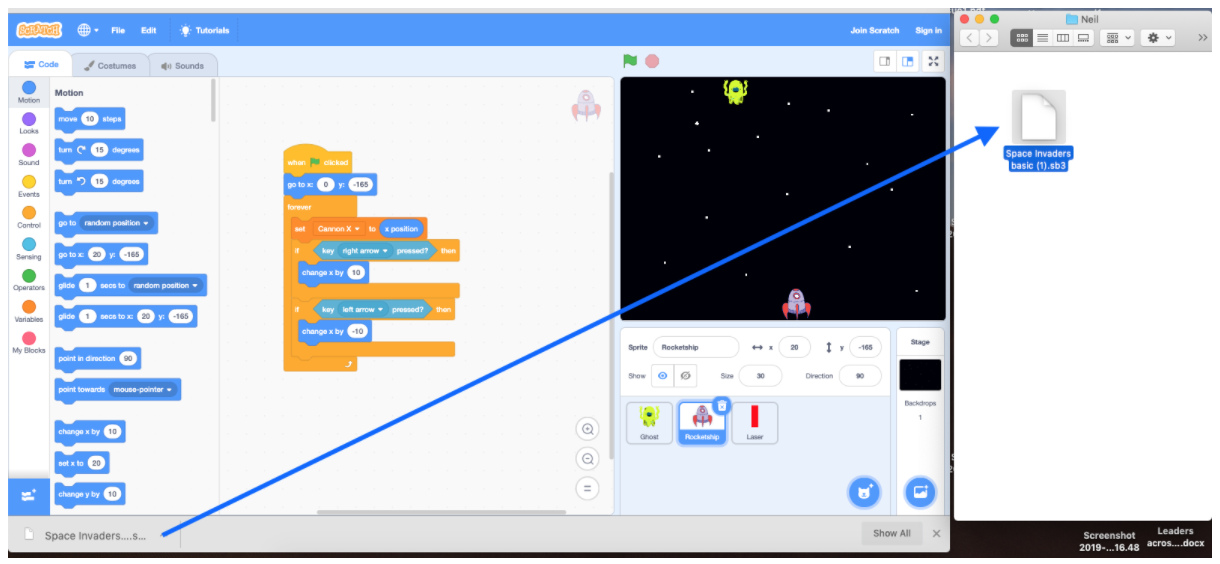
When you save your work, most web browsers instantly download the file by default to the downloads folder on your computer. The problem with this is that access to this folder is sometimes blocked for students on school networks, and also it doesn’t give you the opportunity to name your work when saving.
Solutions to this are:
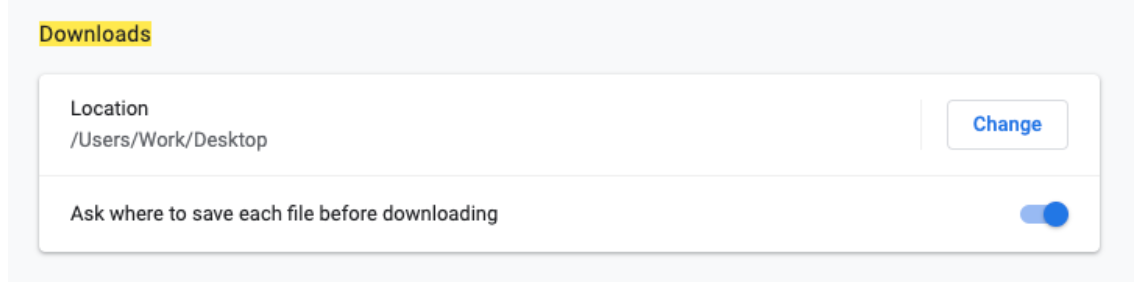
Option 1 - Ask your technician to adjust the allowed settings for your browser so files are not saved automatically to the downloads folder. In Google Chrome, go to Settings, search for Downloads and scroll down until you see the options below. Turn on the Switch for the option ‘Ask where to save each file before downloading’. This will allow students to browse for a folder and name their work.
Option 2 - If this isn’t possible we would advise setting up a class folder on your shared area for the students to save into. Within that, create another named folder for each student.
Ask the students to minimise their browser window and browse for and open their named folder. This is usually available from the File browser tool or Start > Computer and then finding the folder on your network. Resize the window so it’s not full screen. Maximise your browser window again and resize that so that both windows are visible at the same time.
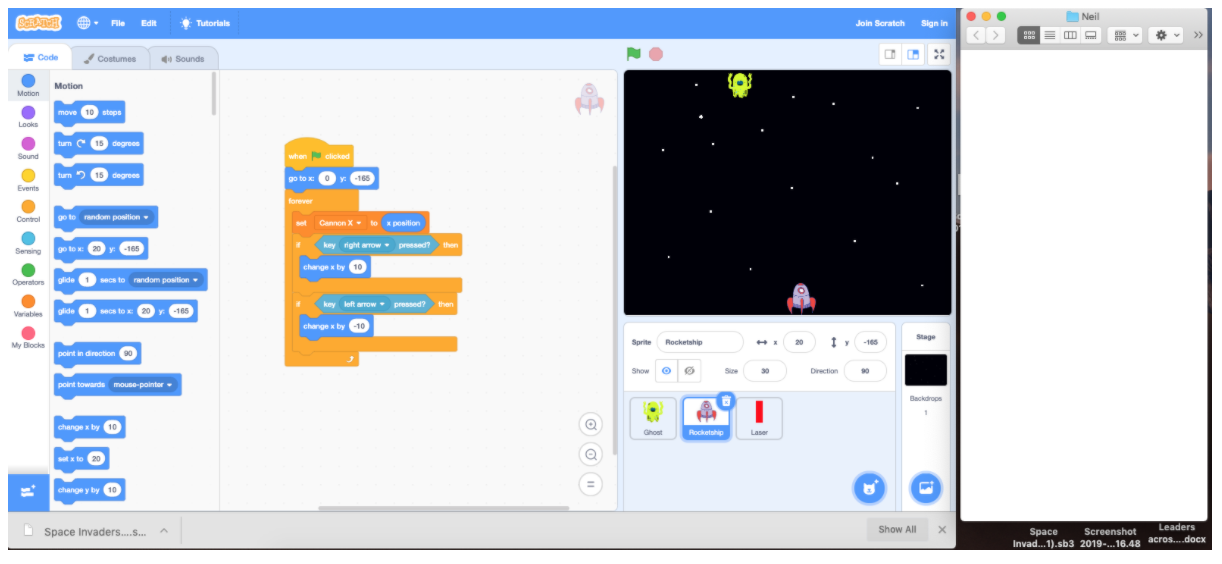
Then save your work in Scratch from the File menu > Save to your computer.
When the file downloads it should also be visible at the bottom of the screen. You can drag and drop it from there to the named folder at the side of the screen. Their work is then saved and in their named folder ready for the next lesson. If you still want to rename the file, a single click on the name of the file in the folder should let you edit it or right click and choose rename.