
Inputs, loops, conditionals, variables… games!
Taking micro:bits further - Lesson 5
Objectives
- Understand looping as a form of iteration
- Understand and use variables in a program
- Understand and use conditional statements
- Combine inputs, loops, conditional statements and variables to create a micro:bit game
Lesson Resources
- Lesson Slides
Lesson 1 -
Lesson 2 -
Lessons 3 & 4
Lessons 5 & 6 -
Introduction - Loops
In computer programming, iteration is the repetition of a sequence of code. A loop is a form of iteration. A loop repeats code until a certain condition is met.
Start things off with ensuring all students understand the concept (and purpose) of using loops. If we take the instructions for walking in a square shape, they could be broken down like this:

This is actually only two instructions, repeated four times, what are the instructions we’re repeating? We call this a loop!
It’s likely they will have had experience of this from other coding programs they should have use:
A loop in Scratch:

A loop in LEGO WeDo:
A loop in LEGO Mindstorms:
A loop in Logo:

A loop in Sonic Pi (Ruby):

Loops save us time and effort as they allow us to write the code once and specify how many times to repeat it, instead of having to write it out many times.
Making a game
In this lesson we’ll be combining using loops with many of the other things the students have learned from the earlier projects in this unit, such as using variables, conditional statements, inputs and outputs and controlling LEDs, all to make a game for their micro:bit called ‘Catch the Egg’.
Take a look at this short video to see how the game works:
‘Eggs’ randomly fall from the top of the screen, the player controls the ‘basket’ and must move it quickly to catch the eggs before they fall and hit the floor.
Show the students the video (a couple of times in needed) and ask them to talk to a partner and consider:
- How do you think the game works?
- What will we need to code to make it work?
- What would you do first?
Take some ideas and suggestions from them and gauge their understanding of roughly how the game works. We’ll need to:
- Create the egg,
- Create the basket,
- Be able to control the basket,
- Make the egg fall in different places,
- Make it know when we’ve caught an egg and award points,
- Add levels or ways to increase the difficulty as the game goes on.
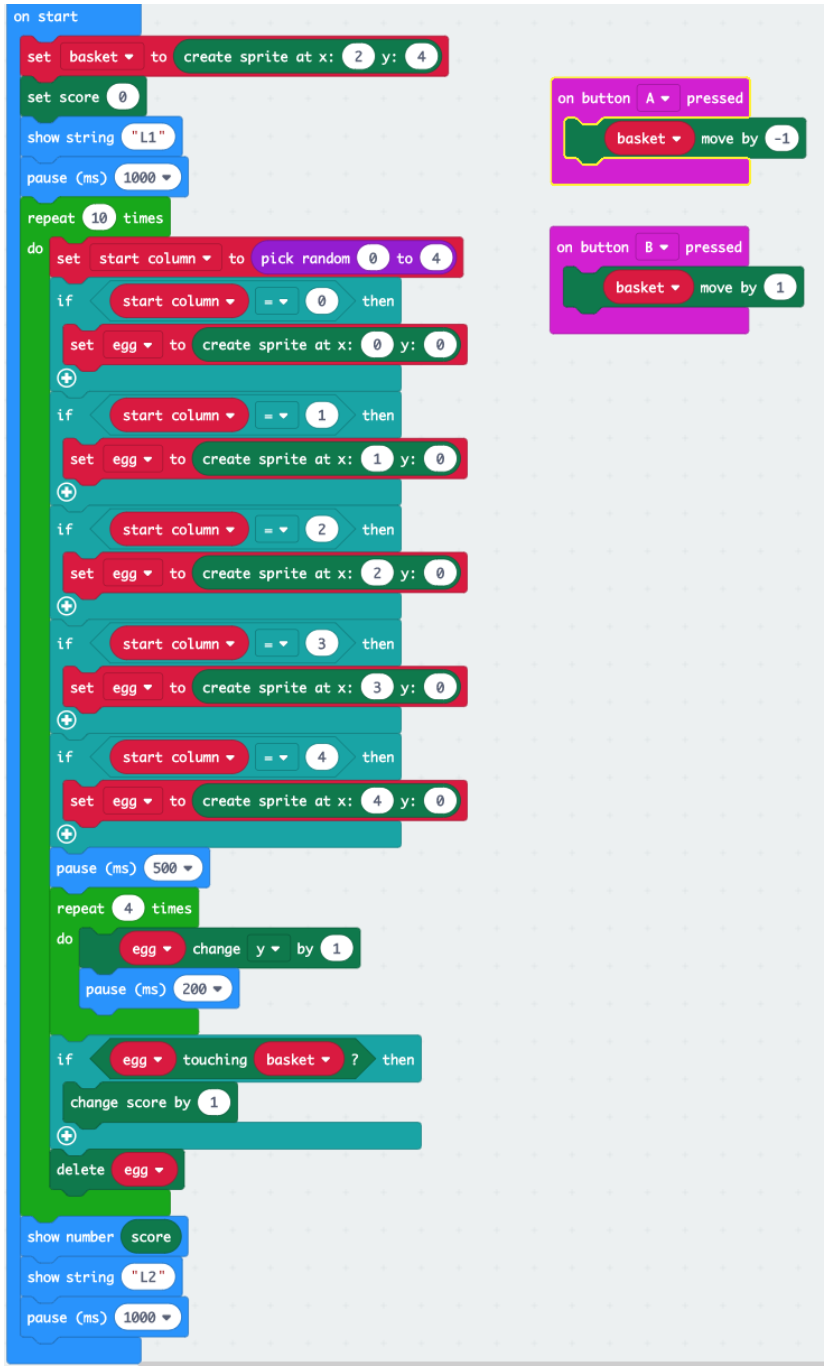
To get started create three new variables, name them ‘egg’, ‘basket’, and ‘start column’. We’ll use all of these to control different elements of the game at different points.

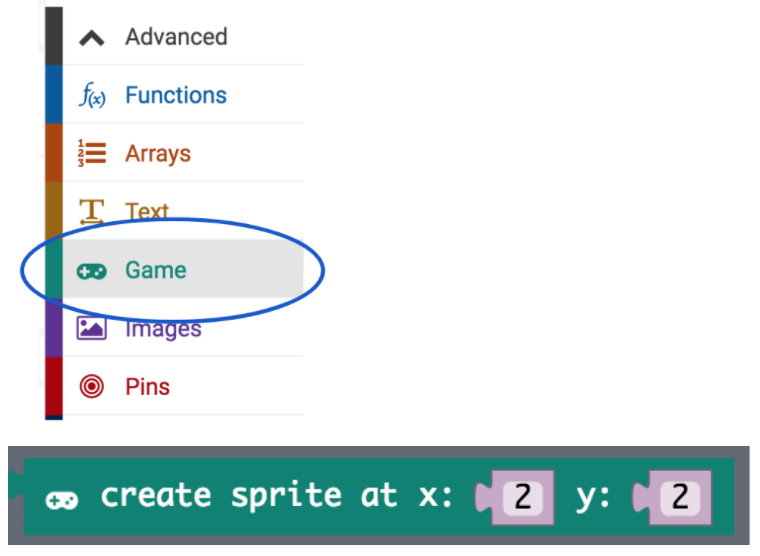
In the micro:bit block editor open the ‘Advanced’ section at the bottom of the category list and go to Game. This gives us some interesting new blocks which are really useful for creating elements to be used in games. One of the options is the ‘create sprite (at a coordinate)’ block. Student should have come across the word sprite before if they have used Scratch as that is also what characters or objects in a program are referred to as.
Due to the micro:bit’s more limited LED display, sadly we can't have cats, monsters, cars or other things found in Scratch as our sprite, so in this case it refers to a single LED pixel on the LED grid that can be controlled and moved around.
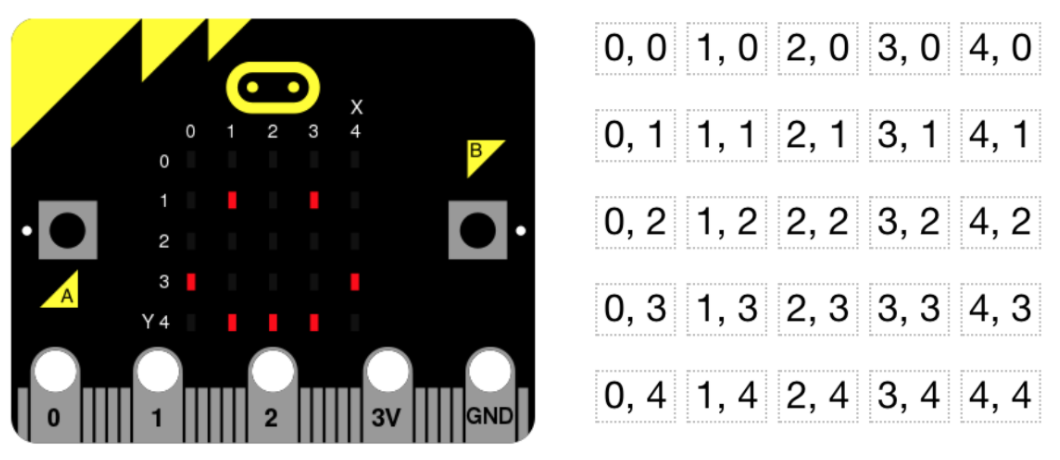
So the block above uses coordinates to position a sprite, something students should have some experience with from maths lessons or, again if they have used Scratch or other coding programs. If needed refresh their memories of how coordinates work highlighting that X describes a horizontal position and Y describes a vertical position.
However, the coordinate grid layout for the micro:bit is a bit different to a normal graph, where we’d expect to find the coordinate (0,0) in the bottom left of the graph.
Instead, (0,0) can be found in the top left. Here are all the possible coordinates for the LED grid:
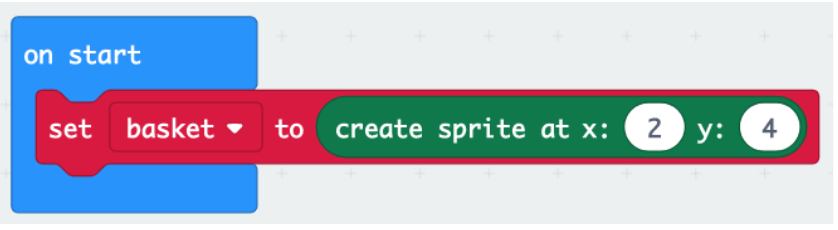
The Basket
The basket in our game is the LED dot we move around to catch the falling ‘eggs’.
To begin with we’re going to attach a sprite to our ‘basket’ variable, and tell it where to start, (2,4) is the middle of the screen on the bottom row.
This code will make the basket sprite move right when the input of button B is pressed. Refer back to lesson 2 when they investigated inputs and outputs and show this to the students if needed.

Ask them to add it to their program and then ask, Can you write some more code to make the basket move left?
Solution:
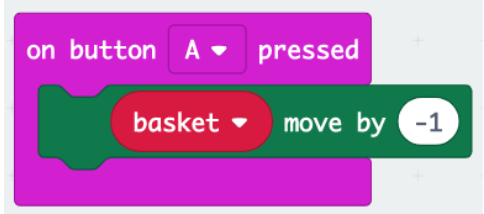
Establish that the ‘move’ numbers are referring to the X coordinate and therefore have to be positive to move right and negative to move left.
The Egg
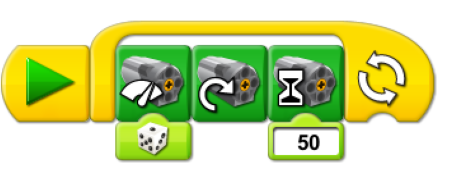
The egg is another LED sprite that falls from the top of the screen from random starting positions. Have we done anything with using random numbers before in our other projects?
To achieve the random positioning of which column it falls from, we’ll re-use the concept we used with our Magic 8 ball program.
Discuss this code with a partner, what’s happening and why?

Here's what's going on:

But this is just part of what we need. As it is, the Egg could only ever appear in the first column, or not at all. Ask the students to extend this code to allow the egg sprite to start from any of the 5 columns.
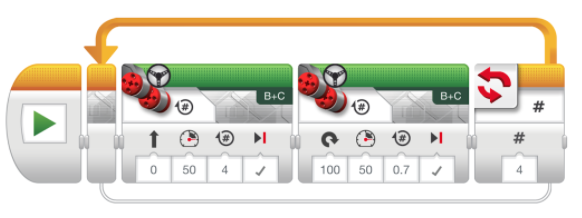
Solution:
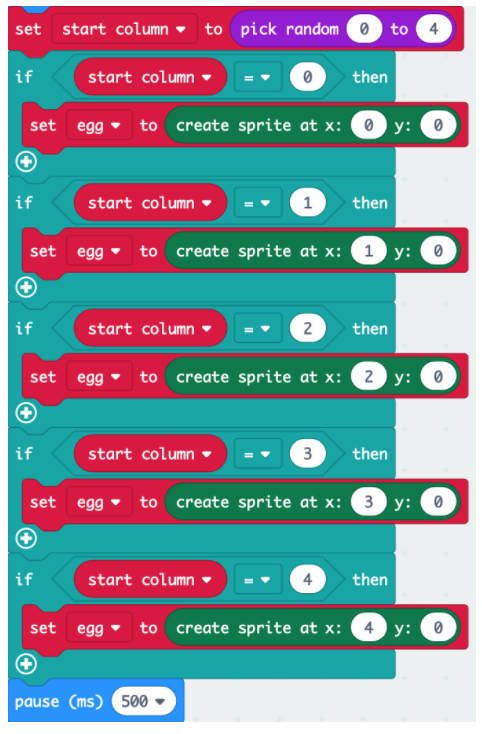
So now a random number from 0 to 4 is chosen and assigned to the start column variable. For all the possible outcomes of that number, the egg sprite is positioned in a different column. This will now give us truly random starting positions each time for the eggs.
Now we’ve set the start position of the egg, what should happen next? The egg should fall down the screen.
This block in the game category will make the egg sprite move down the screen one place (on the y axis)
![]()
What would be the best way to make it move down the screen four places to the bottom of the screen?
Some students might suggest changing the number in the block to 4, like this:
![]()
But why won’t this work? This will make the sprite just jump down four places to the bottom of the screen, i.e, from the top row straight to the bottom row, so we won’t see it moving down a row at a time - which is what we want. What could be the solution? (clue - think of the square from earlier!)
The repeat block and the pause will make the egg sprite scroll down the screen one row at a time, but 4 times (for the four rows under the top row for the LED screen).

But this will only drop the egg once, we want it to be (initially) dropped twenty times in our game, ask the students to add another loop to make that happen.
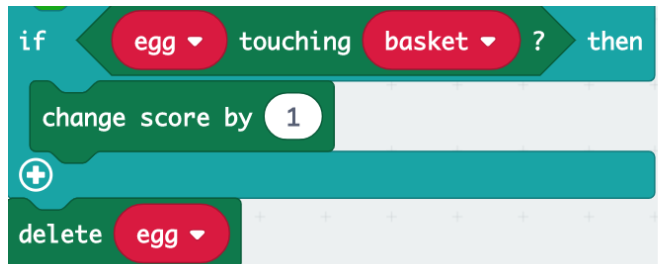
Next we need to add some collision detection, so the game knows when the two sprites touch and we manage to catch an egg with our basket. Ask the students to use an ‘if’ block and their variables, and explore the ‘game’ blocks to see if you can make a point be awarded when the egg sprite touches the basket sprite.
Solution:
The finished code is shown below. A couple of finishing touches have been added:
- The egg sprite is deleted after each run of the first loop, this makes it disappear when it has been caught or missed.
- After 20 runs for the loop (20 eggs dropped), the basket is also deleted so the screen clears.
- After a short pause, the ‘game over’ feature runs which adds a nice little animation at the end of the game also reports the score back to the player.

Time to download it to the micro:bit for final testing and playing!
Extending with levels
The final challenge for students is to expand the game so it has levels.
- Can you create three levels (or more) where the egg drop gets gradually faster as the player progresses?
- Can you make the egg drop at a random speed in the final level?
Solution:
- Level 1 (L1) string is added at the top
- Egg drops 10 times on level 1
- Egg drops at 500 m/s per row for level 1
- Score is shown at the end of the level
- L2 string is shown before next level starts
- Egg drops 10 times on level 2
- Egg drops at 300 m/s per row for level 2
- Score is shown at the end of the level
- L3 string is shown before next level starts
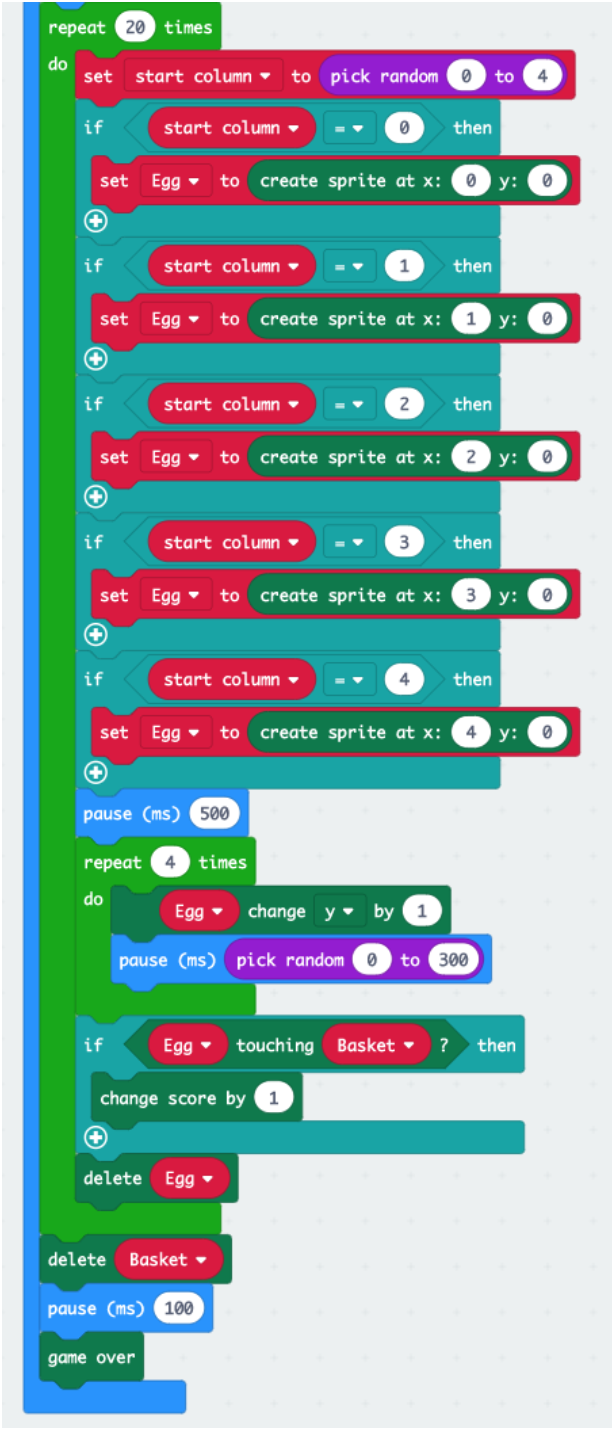
- Egg drops 20 times on level 3
- Egg drops at a random speed from 0 to 300 m/s per row for level 3
- Basket is deleted at the end of the game
- Game over animation and final score is shown at the end of the game
Plenary
Review the project and the students’ understanding of some of the key coding concepts:
- What is a loop and how have we used them today?
- Explain to your partner what a variable is and why they are needed in our code today
- What is a condition? How did we make use of them?
- Has this given you any ideas for extending the project further or coming up with another idea based on some of the things you’ve done?