
Radio coded messages
Micro:bit Mastery - Lesson 4
Objectives
- Understand, explain and use the radio function on a micro:bit to wirelessly transfer data.
- To send, receive and decode a coded message.
Lesson Resources
- Lesson Slides
- BBC micro:bits (minimum 1:2 students)
- micro USB cables to connect micro:bits to computers
- 1 computer per micro:bit
Lesson 1 - Conditions, variable and random outputs
Lesson 2 - Dig into the data
Lesson 3 - AI Machine Learning
Lesson 4 - Radio coded messages
Lesson 5 - More secure messaging
Lesson 6 - A smart light switch
Before you start
Before you begin, please read these important notes:
- This unit of work was created and added to our scheme in autumn 2025.
- It has been designed to follow on from our unit of work: Getting Started with the BBC micro:bit, which has been updated and moved to the Year 4 section in our scheme of work.
- If your students are new to a BBC micro:bit, we would recommend beginning with the ‘Getting Started’ unit, instead of these lesson.
- If your class have covered that unit already, or are quite experienced with using a micro:bit, go ahead and dive in to this unit, and have fun!
Micro:bit classroom

We would recommend delivering your lessons using the micro:bit classroom feature on microbit.org. This is very simple to use and gives really useful classroom management options for your lesson, such as:
- being able to send code to your students,
- view and edit their code from your screen,
- freeze their screens when you need their attention
- download a report of the lesson, including images of their screens
- save the entire session and resume it at a later date
All without the hassle of having to create student accounts. No usernames and passwords are needed.
You can find out more and watch a introduction video at microbit.org/teach/teaching-tools
You can get started with a lesson at classroom.microbit.org
Students will work in pairs in this lesson, so you may want to consider and organise that before the lesson.
Introduction - Sending and receiving data
Today, we are going to investigate how we can use one micro:bit to send data wirelessly, to another. Begin by showing the class the diagram of all the micro:bit's features from previous lessons. Ask - What feature to you think will be needed for this?
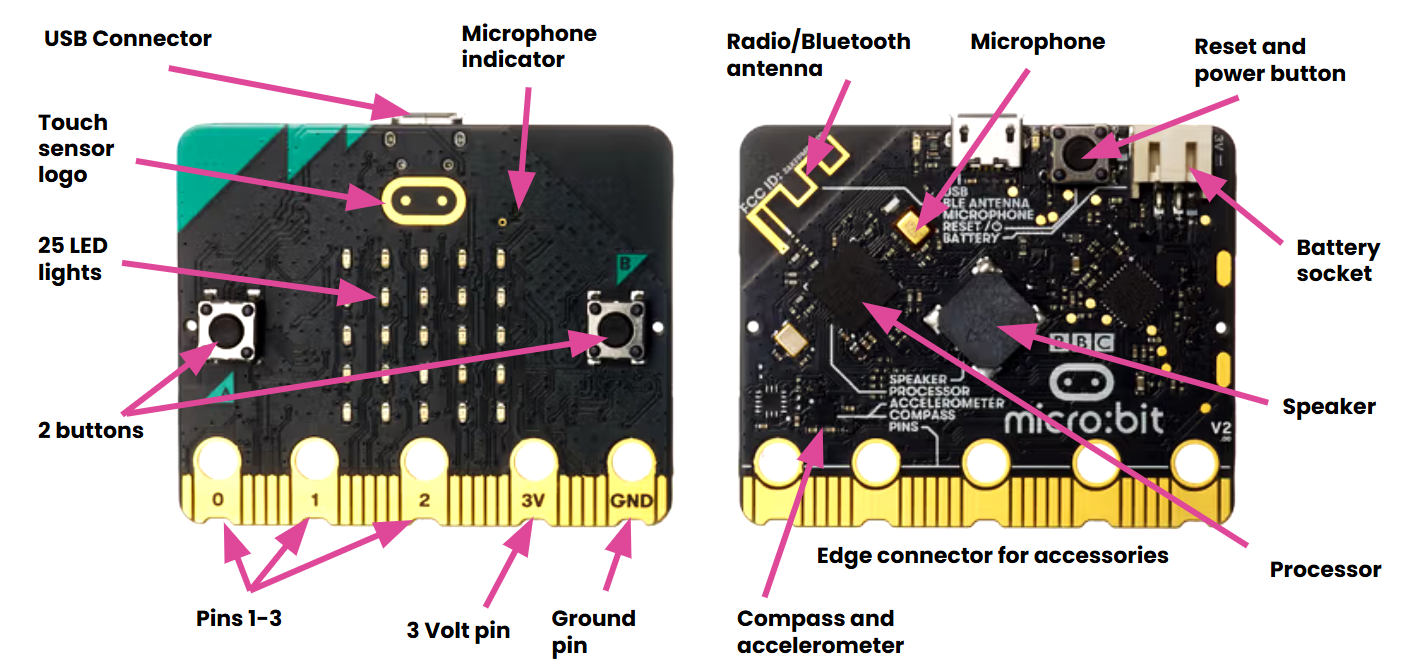
Take their ideas and then ensure that they are aware that it is the antenna on the micro:bit which can send and receive data when paired with another micro:bit. It is also a Bluetooth antenna to allow wireless communication with other devices such as a laptop or tablet.
Introduce the lesson objectives at this point.
Sending an image
We're going to start with sending a message from one micro:bit to another that displays an image on the receiver micro:bit... in this case, a teleporting duck!
Open your micro:bit Classroom and invite the students to join using your class code and passwords. Then ask them to connect their micro:bit to their browser by clicking the three dots next to the Download button in the MakeCode editor, then Connect Device and follow the steps in the on-screen guide.
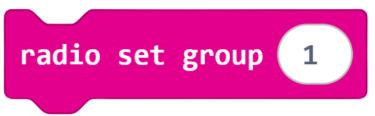
The key to sending radio messages with your micro:bit is making sure you share the same radio group. A group is like a radio channel.
There are 256 groups to use (0-255). You can use any, but each radio group should be unique to each pair of students so messages don’t go to the wrong person. Assign each pair in the class with a radio group to use for the lesson. They should use this for all activities.
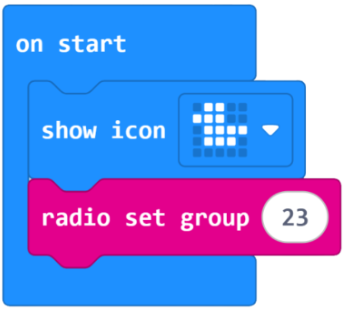
We'll start with this very simple code that will display the duck icon when the program starts and set our radio channel. This is where the students must enter the radio group number that you have assigned to them.
Now we need a way to trigger when we want to send the duck. Ask the class - What could we use as a way to start the send?
Let’s use an input, so we can control when it is sent. Pressing a button, the touch sensor logo or a movement like ‘shake’ will all work well.
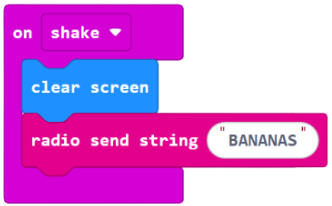
Now add this new code. Ask the class - What will it do?
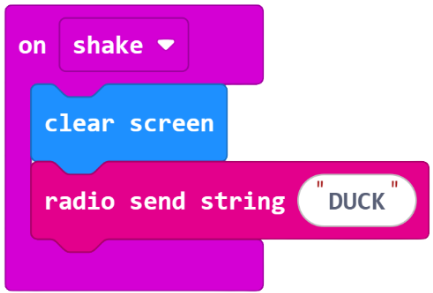
When the shake input is received it will clear the screen on micro:bit A so the duck is gone. Then we’ll send a radio message. A string is just a collection of letters or numbers. Type ‘Duck’ in the box. This is the sending part of the code.
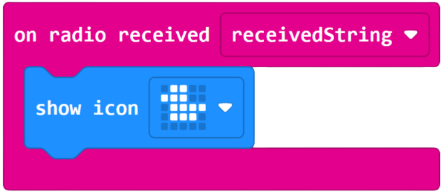
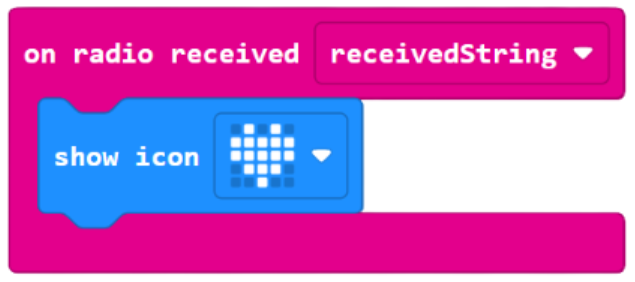
Next we need to program the micro:bits with what to do when they receive the message. On radio received’ is the receiver block. It waits for any string being sent to it on the correct radio group channel. The output of the duck icon is then shown.
Ask the students to build, download and test it. The code must be downloaded to both their micro:bits for it to work.
Ask - What could you change to personalise the code?
The icons and the string message that is sent could both be changed.
What actually happens?
So what is actually happening here? Ask the class:
- Is the duck image actually sent through the air to the other micro:bit?
- Can you explain what actually happens?
Step 1 - We show a duck output on micro:bit A
Step 2 - We clear the screen on micro:bit A and send a radio signal.
Step 3 - The radio signal input is received by micro:bit B and the same duck output is shown.
But - It's the signal (string) that is actually sent, and this could say anything. The receiver is just waiting for any string (text) input.
And any output image could happen after receiving the radio input.
Sending more than a duck
Now we have an idea how the radio function works, it would be nice if we could send more than a single image, or at least be able to communicate better with two micro:bits.
We can send text messages directly with similar code. Ask the class - what has changed here?
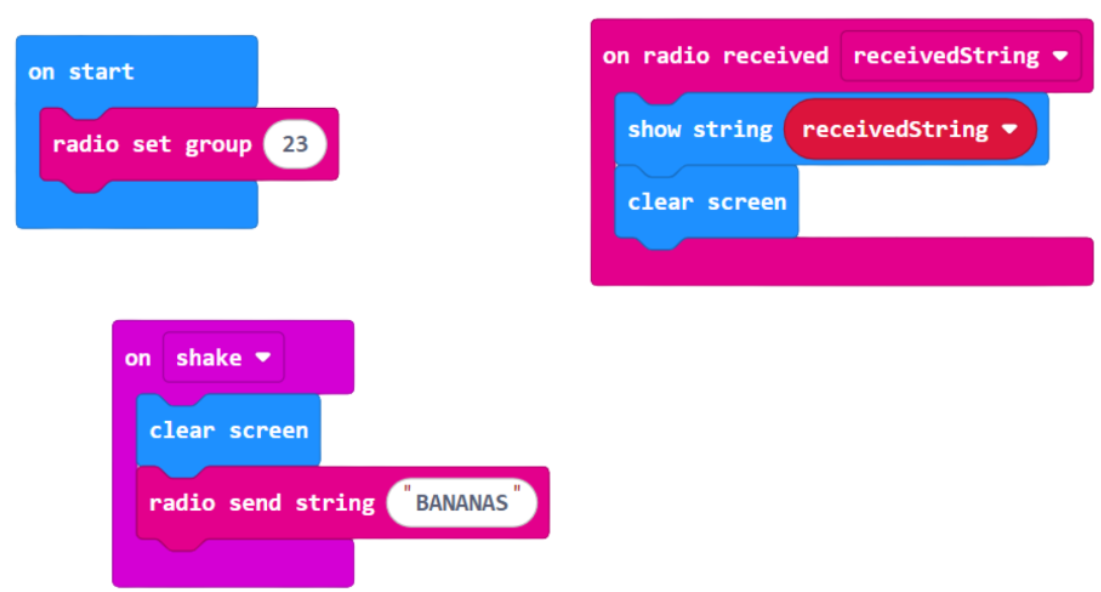
- The image icons have gone.
- We still send a string radio signal, but this time, the receiver code will actually show what was written because of the show string block and the receivedString variable.
- This variable where the text message is stored.
Ask the class to give it a try. Remind them on their responsibility to keep all messages polite and appropriate and your school student acceptable use policy.
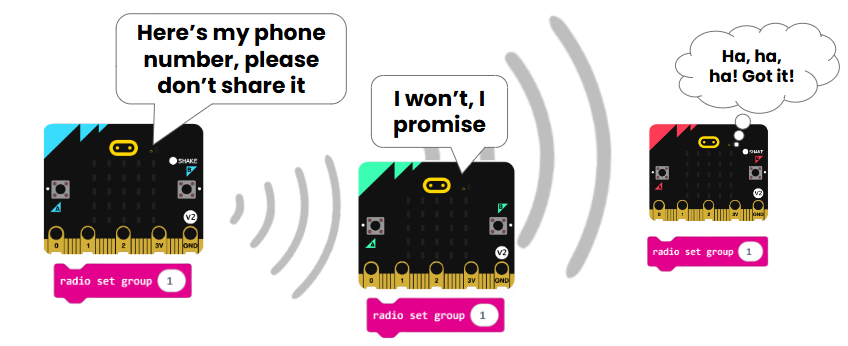
How secure?
When they have had a go at sending a message, ask the class - Is this a secure way to send a message? Why?
It's not very secure as anyone on the same radio channel could intercept and read our message.
Ask the class - What methods do people use to make messages more secure?
Sending messages in a coded format is a method that has been used for hundreds of years.
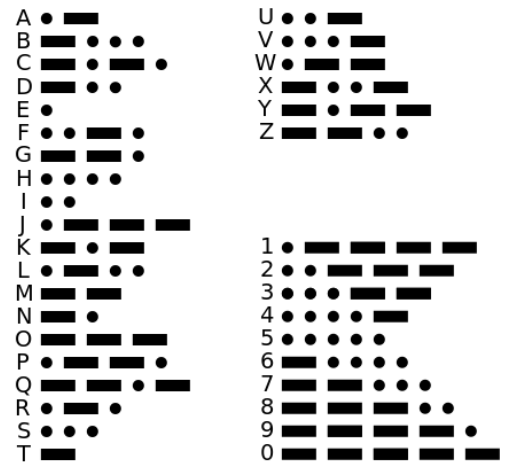
Morse code
Morse Code was developed in the 1830s and is named after Samuel F. B. Morse, an inventor of the telegraph machine. It is a way of converting text into a code which can be transmitted using a series of dots and dashes, which can be represented by sound or light.
This the Morse Code alphabet and numerals:
Let's write some code so that we can send messages as Morse Code between our micro:bits.
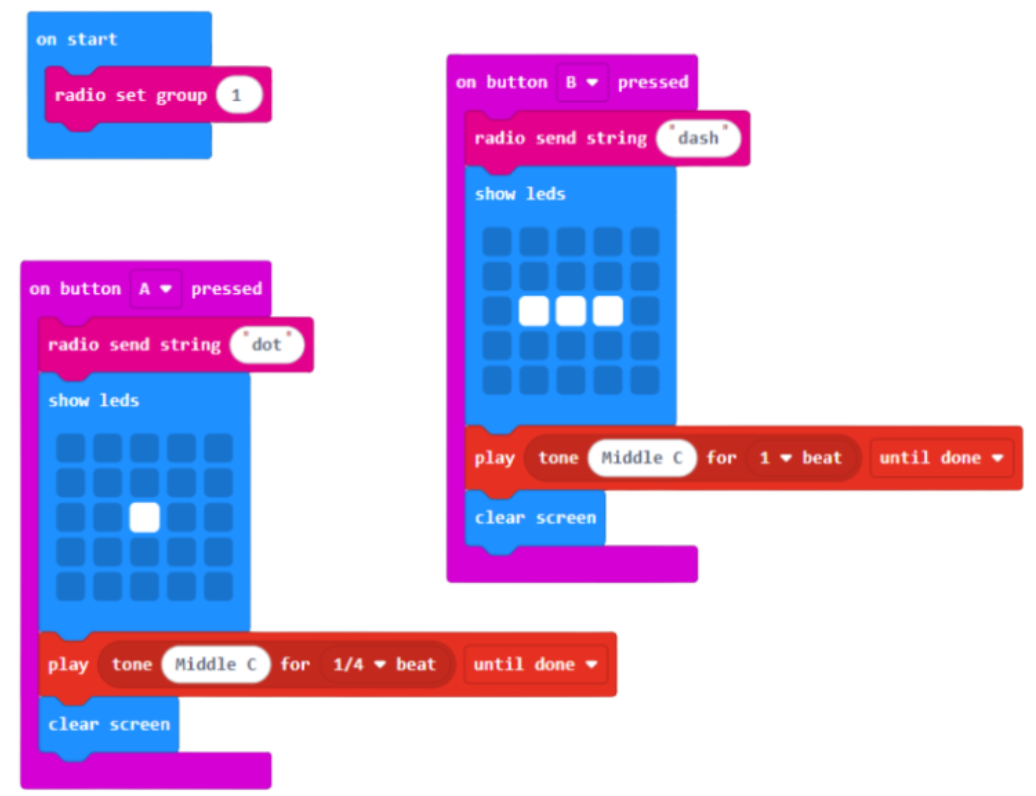
Sending
Ask the class to read the following pseudocode and see if they can turn it into code. They can work together with their partner.
- Set the radio group
- When you press A:
- show a dot
- play a short sound.
- Send a radio string called ‘dot’
- Clear the screen.
- When you press B:
- show a dash
- play a longer sound
- send a radio string called ‘dash’
- Clear the screen.
Here’s one solution for the sending code.
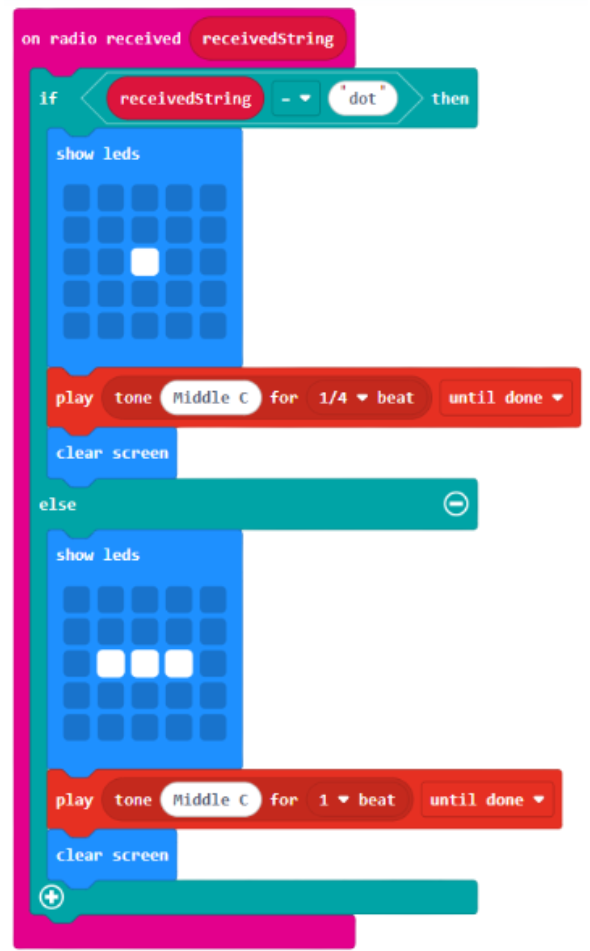
Receiving
But we also need some additional code to allow the micro:bits to receive and display the message that was sent.
Again, ask the class to have a go at converting this pseudocode into actual code.
- When the radio string is received
- If the received string is ‘dot’
- show a dot
- play a short sound.
- Clear the screen
- If the received string is not ‘dot’
- show a dash
- play a longer sound.
- Clear the screen
Here’s one solution for the receiving code.
Time to try it out.
Partner A
- Think of a 3 letter word.
- Write out your word in Morse code.
- Send the code to your partner. Leave pauses between each letter.
Partner B
- Get your pencil ready.
- Write out the Morse code as you see it arrive.
- Decode the message and work out the word.
Swap over.
Ask the class - So does using Morse code solve our security issues and make our messages more secure?
Well, it is an improvement, but its not a perfect solution.
Pros:
- Any kind of encoding is better than plain text
- You’d have to know Morse code to read them, not many people know Morse code without looking it up.
- Our program also let us send any message without having to update the code on the device (more like a real communication device).
Cons:
- Morse code is a publicly known universal code so it wouldn't be too hard for someone to crack the code and work out the message if they intercepted it
- It’s encoding but not encrypting the data
- There is no secret key to protect the message.
To finish
Ask the students to talk to a partner about their success with the projects today. Consider these questions:
- What kinds of data did we send with the radio function?
- Did we really send the duck image through the air? Why?
- Which block is essential for making sure that your partner receives your message and not someone else’s?
- Why were our text messages vulnerable?
Finish by revisiting the lesson objectives and asking students to consider their success and understanding. Invite any questions or requests for support if needed.