
Getting Started With Sketchup
3D Design - Lesson 1
Objectives
- Navigate a 3D environment successfully
- Create simple 3D models
- Become familiar with some of the simple drawing tools in Sketchup
Lesson Resources
- Lesson Slides
- Sketchup Fundamentals learning centre - tutorial videos - Log in to access the free learning content.
Lesson 1 - Getting Started With Sketchup
Lesson 2 - Building Furniture
Lessons 3 & 4 - Building Houses
Lessons 5 & 6 - Topic linked design
Introduction
Begin by discussing with your students their art and design experience so far;
- What kinds of art and design have you done before?
- What kinds have you done on computers?
- Have you done anything on other devices?
- Can you name any websites or bits of software/apps you’ve used?
What does 3D mean? Has anyone done any 3D design before? In non-digital art this could be anything from model making, Play Doh, plasticine, Lego or even sculpture!
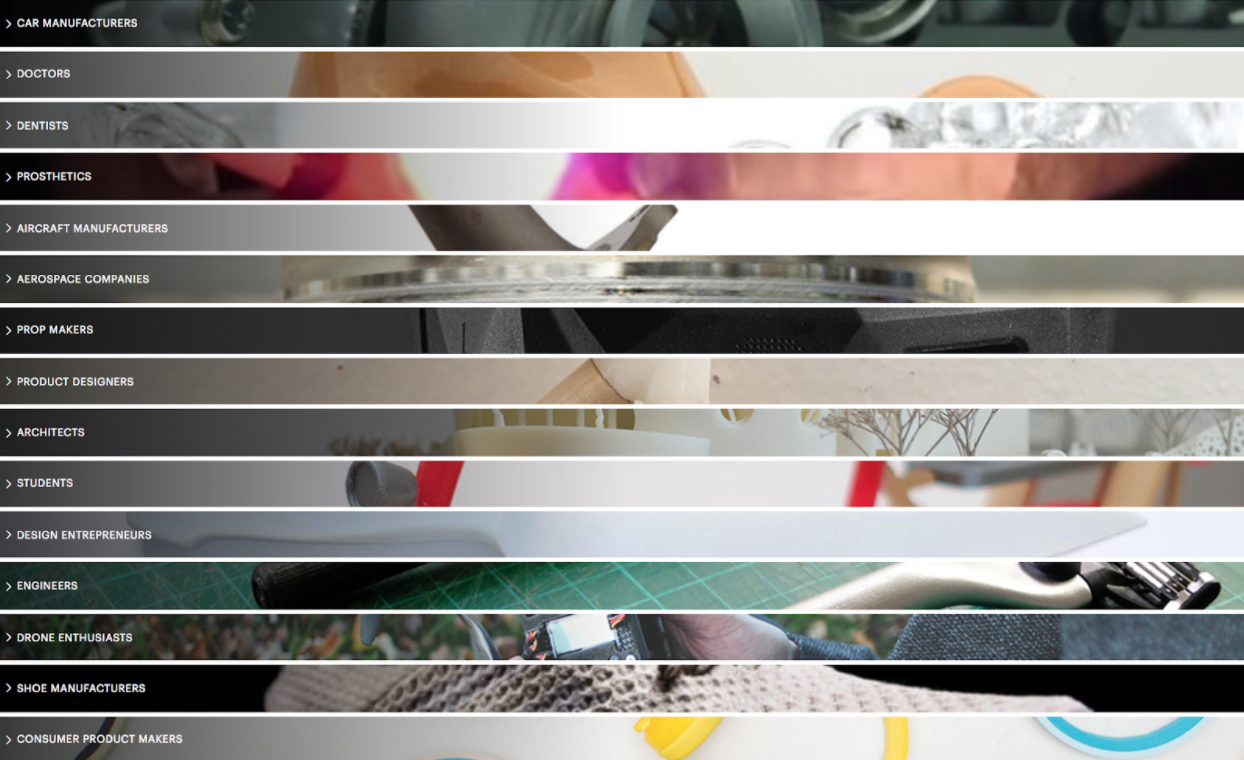
What kind of jobs might need to work and design things in 3D? Here’s just a few:
- artists
- architects
- animators
- engineers
- graphic designers
- car designers
- doctors
- dentists
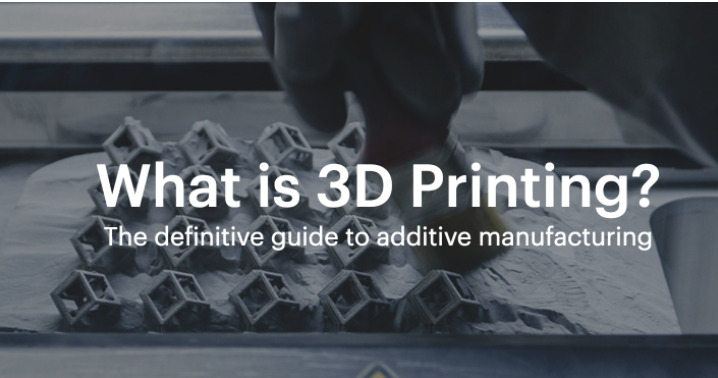
What is 3D printing and how are people using this amazing technology? Take a look at this video from Mashable to find out.
Amazing stuff isn’t it?! The technology is developing rapidly and allowing the creation of things that just weren’t possible or would be too expensive with previous manufacturing methods.
This website explains even more and has a great selection of different examples to show how 3D printing is being used for many different things now.
3D printing, and the design process for many other things that are created in other ways, starts with a 3D design. There are many different tools available for doing this, and we’re going to be learning about one of them, called Sketchup.
(Sketchup is fully compatible and ready for 3D printing if you have facilities available to you for this. You can find out all you need to know HERE.)
Explain that we are going to be developing our 3D design skills and applying them to a number of contexts over these lessons.
Versions of Sketchup
There is a pro version of Sketchup that is used by a wide range of professionals to design real products, buildings and structures.
For schools, there are a number of versions out in schools. Older versions of Sketchup were downloadable and could be installed on a network. If you have one of these versions in your school they still work great and can still be used. The basic tools have not changed very much through all the versions, so even if the screenshots you see in this plan look a little different, it should all be possible with any version.
The downloadable version is no longer available as Trimble try to move users to a new browser-based online version: Sketchup for Schools. This version is free and can be used in a browser, including on Chromebooks, without installing any software. It is also connected to your Google Drive or Microsoft OneDrive so all files are automatically saved there, ready for sharing. Great if you’re using Google Classroom. If you have your own Google domain an administrator will need to add the app to your domain for all users.
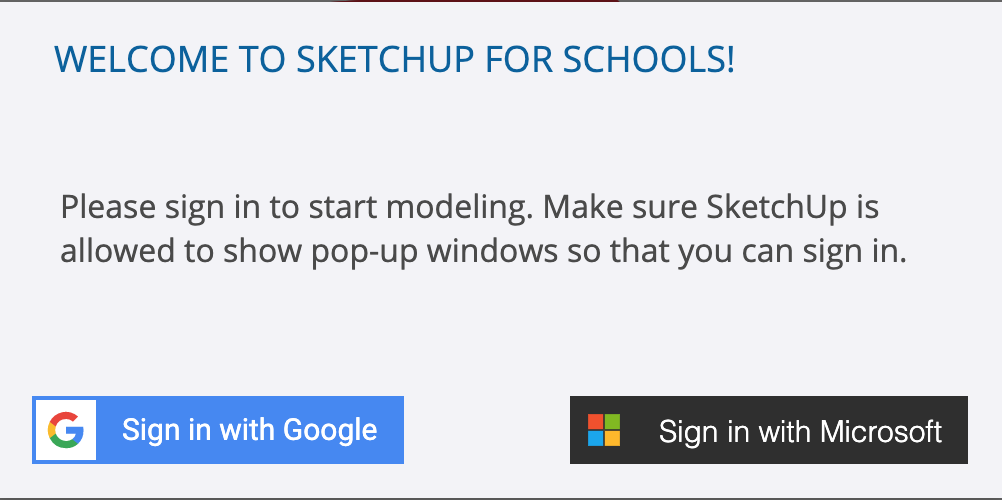
Getting started with the web-based version
The first time you and your students access the web version go to the website (www.sketchup.com/products/sketchup-for-schools) and click Get Started.
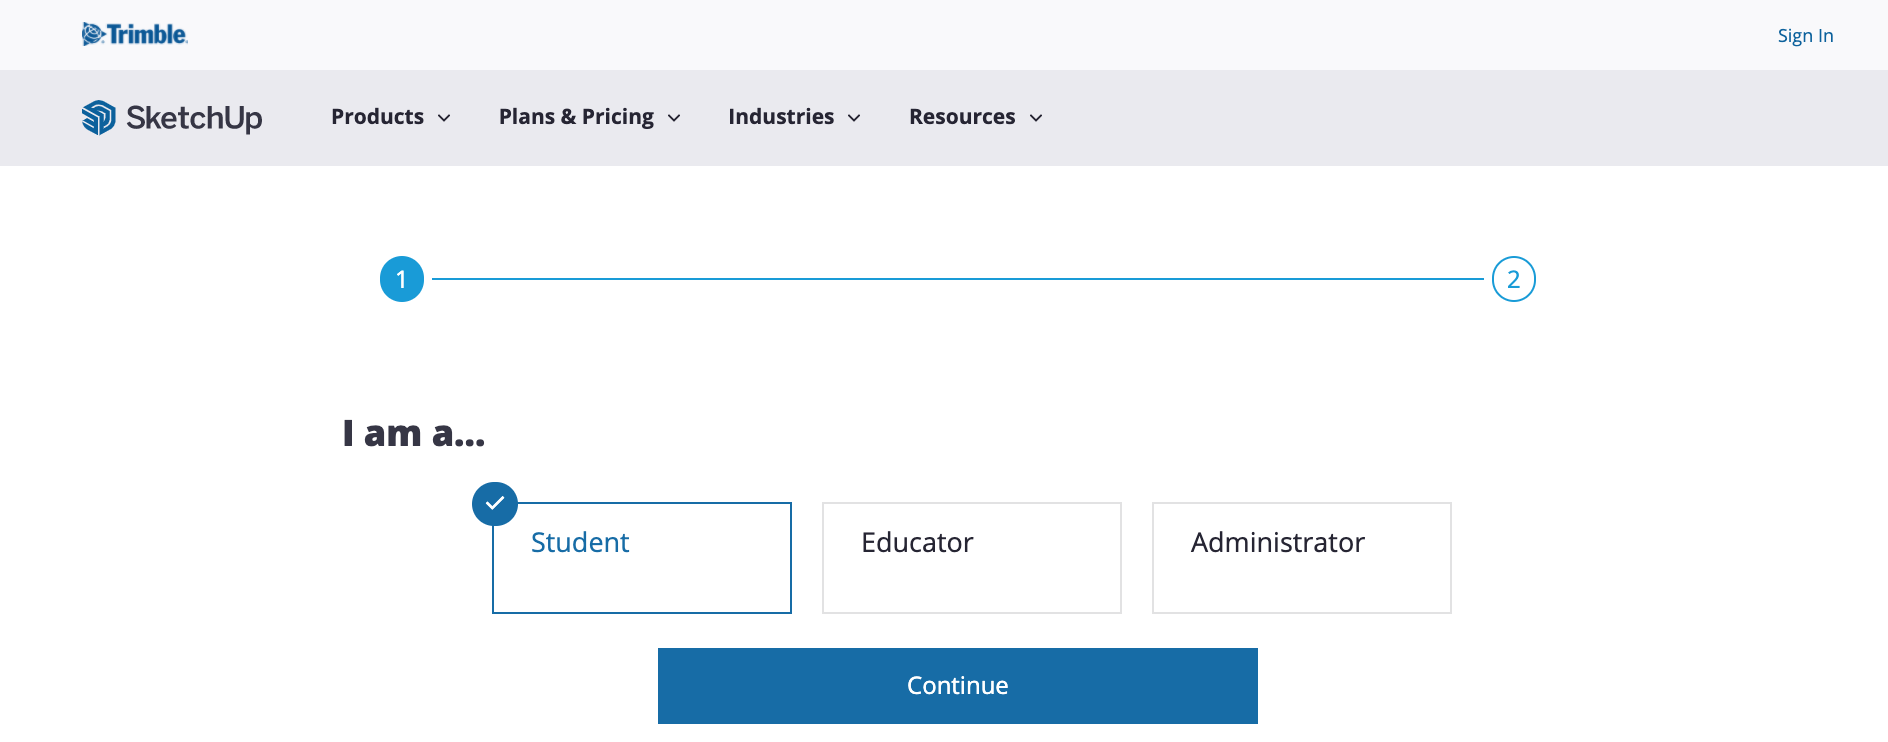
Then confirm your role and click Continue, the Launch.
You will then be asked to sign in with your Google or Microsoft account.
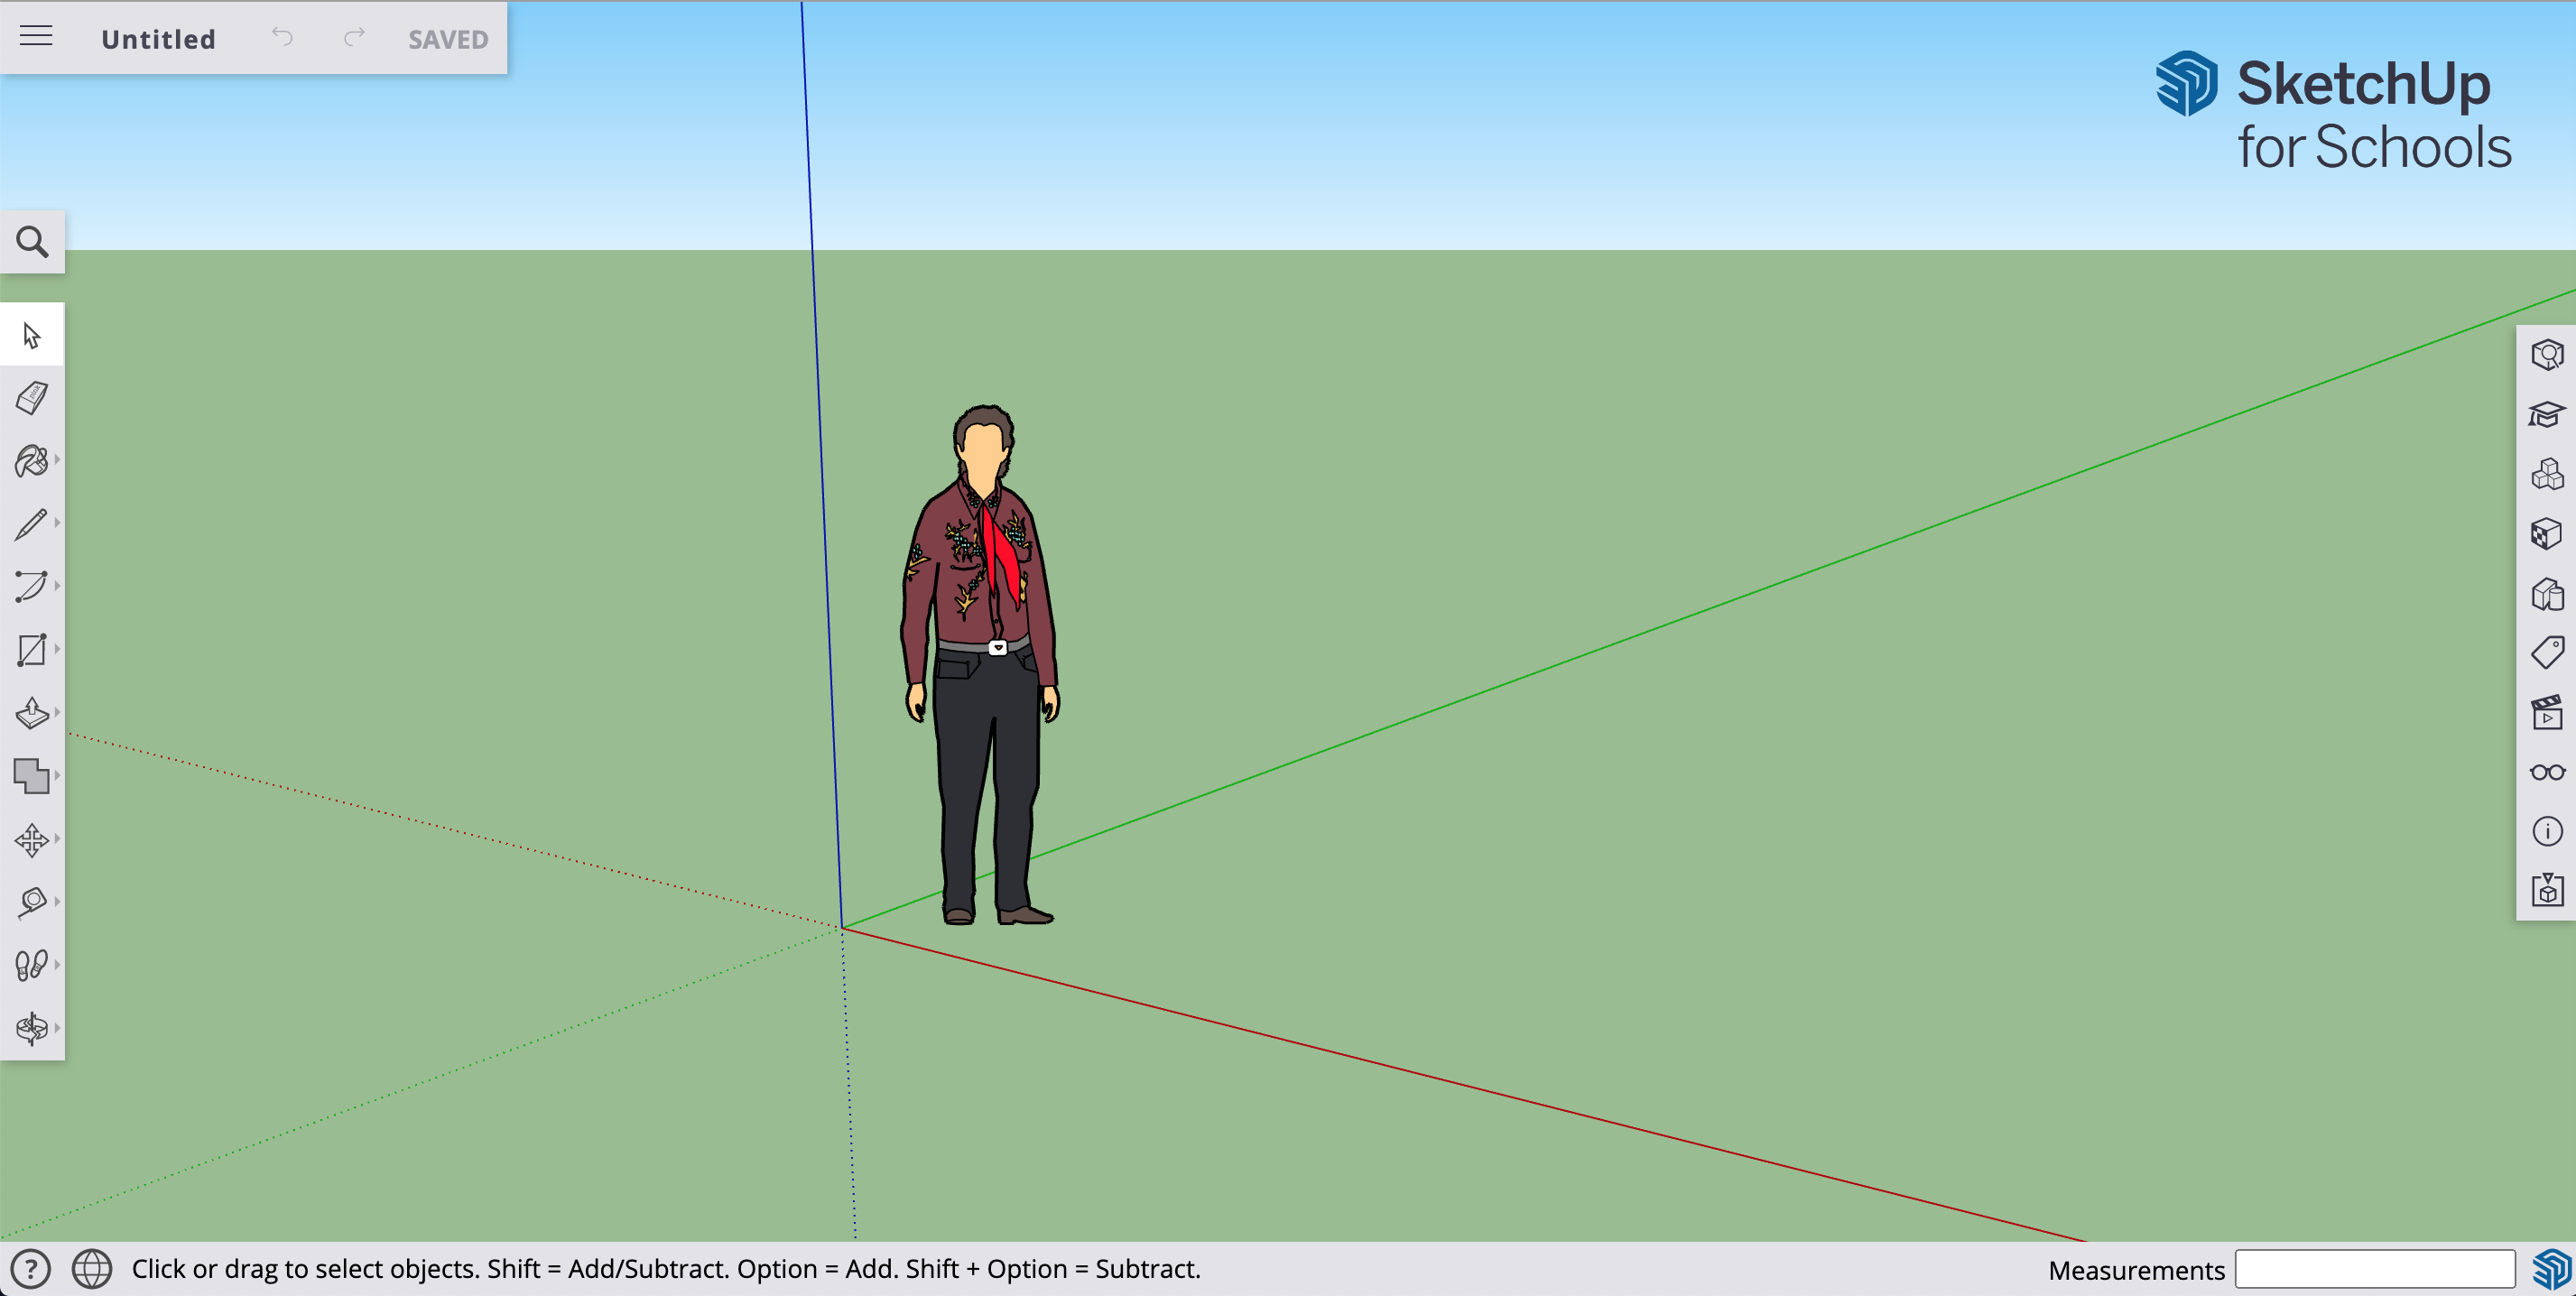
Once complete, you will be taken to a new Sketchup project window where you can start modelling. All files will be saved back to your Google Drive or OneDrive in a folder called Sketchup for Schools.
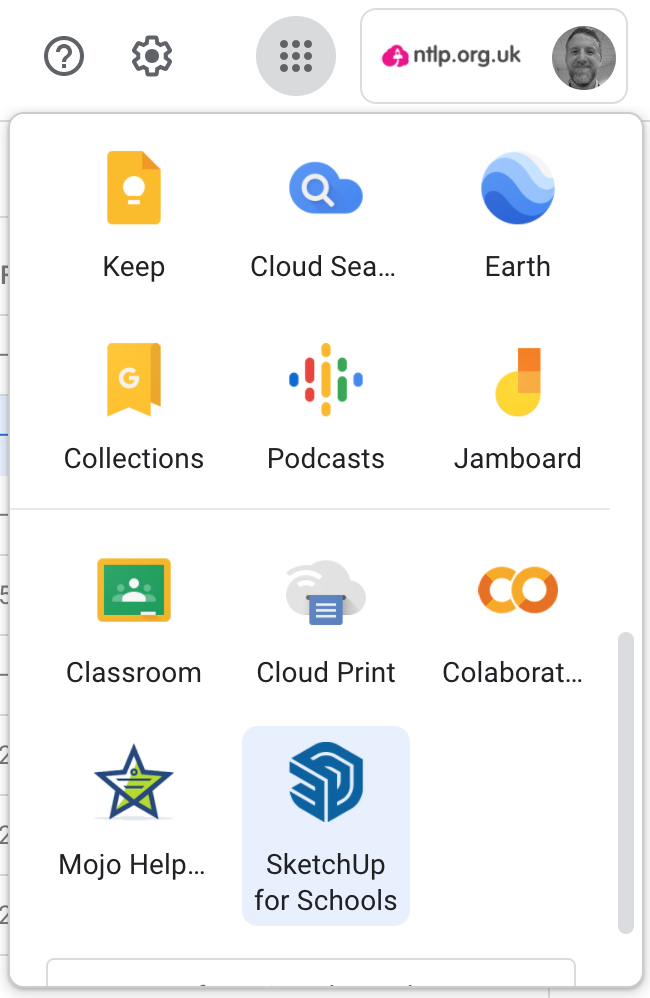
You can also open Sketchup for Schools directly from your G-Suite account. Sign in as normal and open the app selector from the 9 dots in the top right corner of the screen. Scroll down to the bottom and choose Sketchup for Schools.
(Please note - if you are not an NTLP user your Google domain administrator will have to add the Sketchup for schools app to your Google domain from the admin dashboard > Apps > G Suite Marketplace apps > add app to domain install list > Search for Sketchup for schools and install it)
If prompted, confirm the account you are using and allow the app to access your Google Drive.
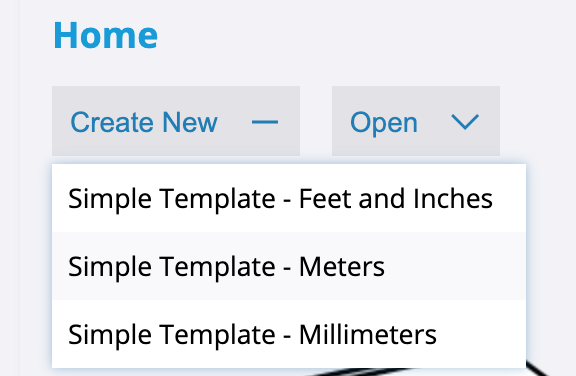
Then you can start a new project from the homepage. Click on Create New and choose the Simple Meters template
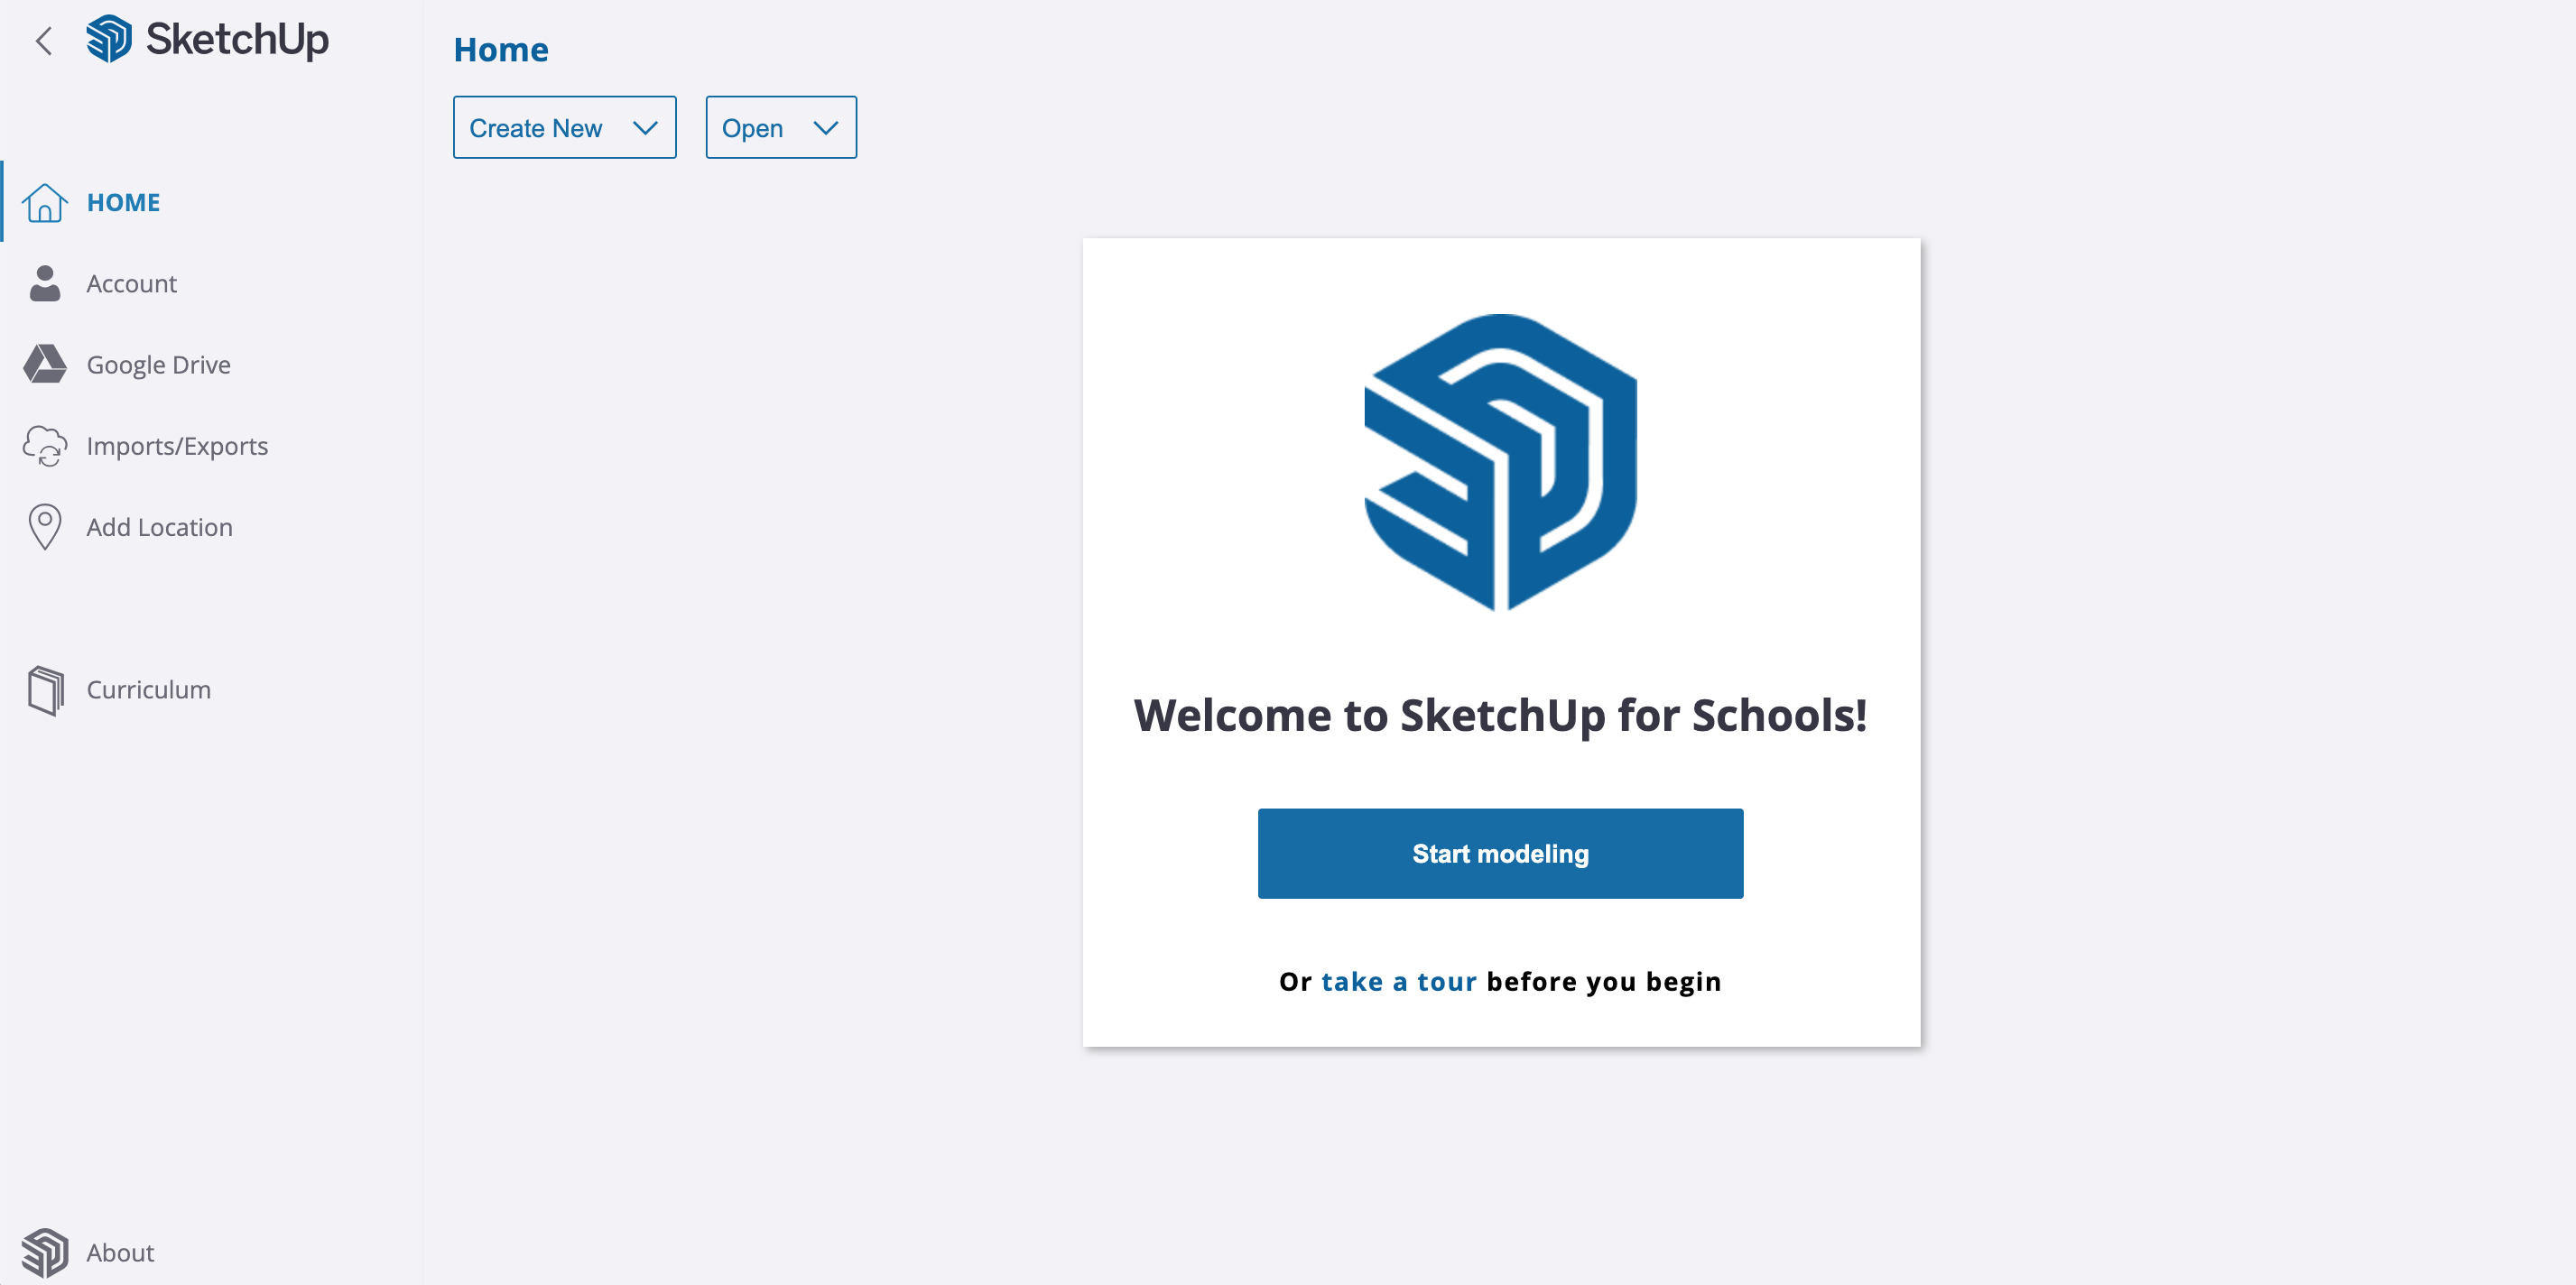
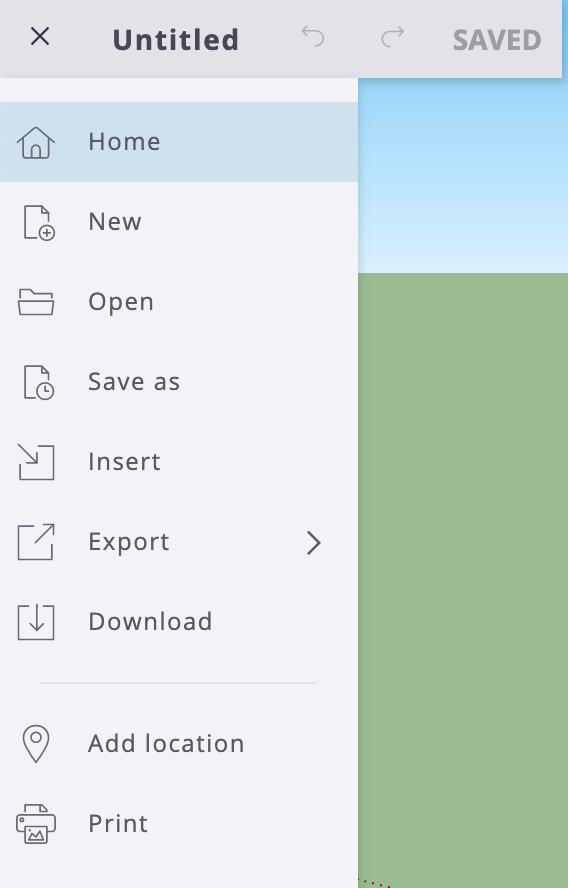
You can get back to the Sketchup dashboard (Home), as well as manage your file from the three lines menu button in the top left of the modelling screen.
Getting started with older desktop versions
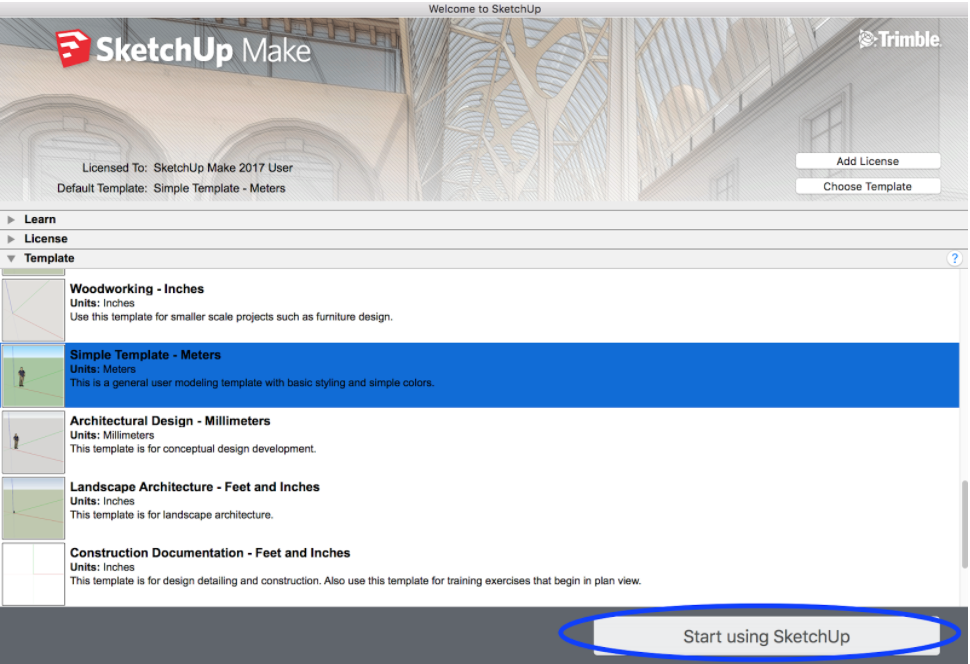
Open Sketchup and choose a template.

Select the metres template and then Start using Sketchup.
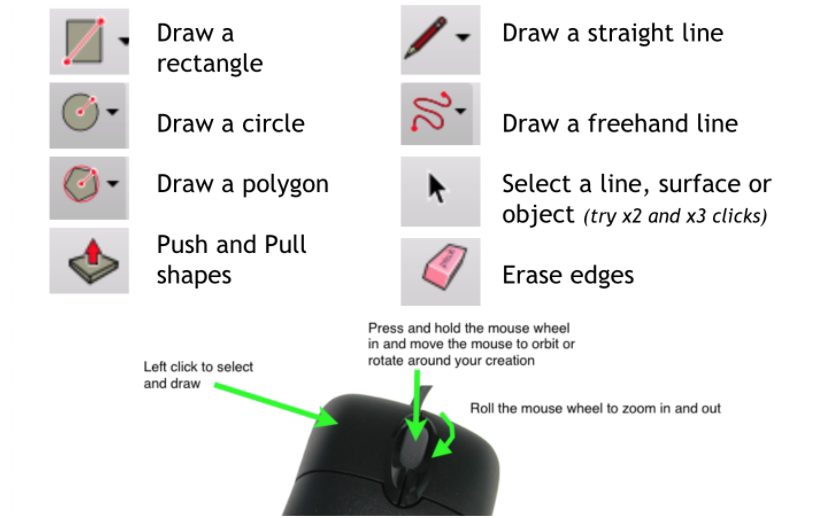
The basic controls
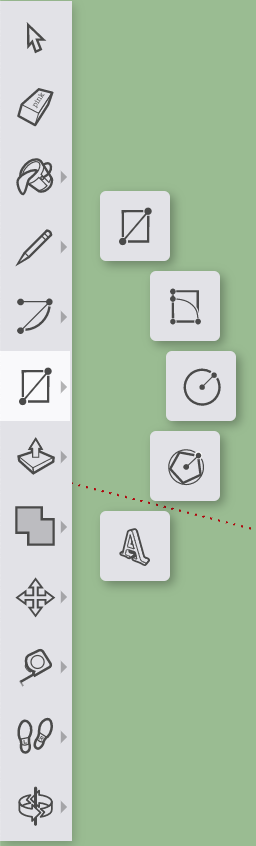
The main tools are across the top of the screen in the desktop version, and down the left-hand side of the screen in the web-based Sketchup for schools. The same tools are available in al versions, it will just look slightly different.
Desk-top version tool bar
![]()
Web-based version tool bar

In the web-based version, some tools are grouped together which hides some of them until you click on a button.
Students often ask about the figure standing by the axis as you open Sketchup. The figure’s appearance varies in different versions, but its only purpose is to give an idea of scale, as if you are drawing something next to an adult human you can roughly gauge how big to make it. This will actually be quite important later on as we tackle larger models like buildings, so ask the children to leave it in place and make use of it.
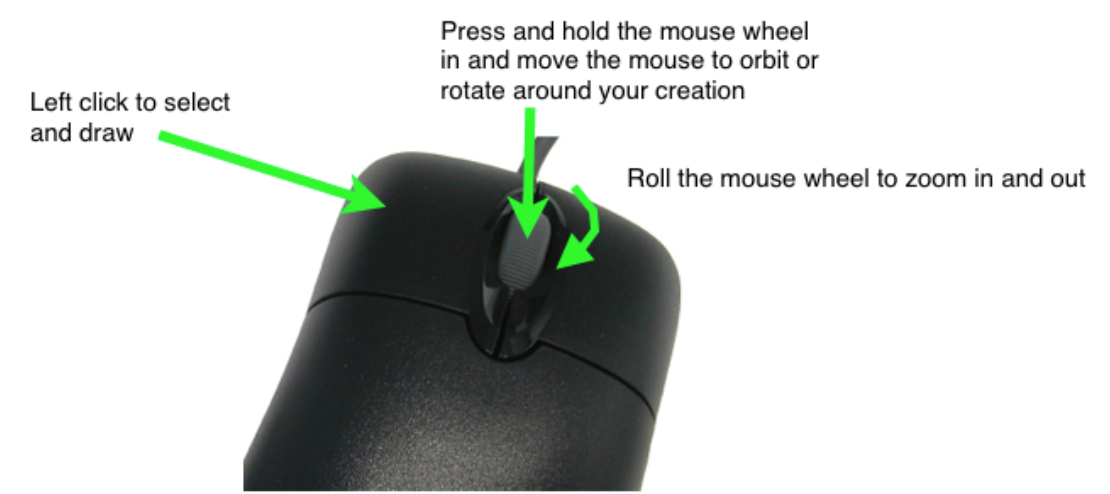
Introduce the basic mouse controls to the children, illustrating the 3D nature of the program as you rotate the environment.
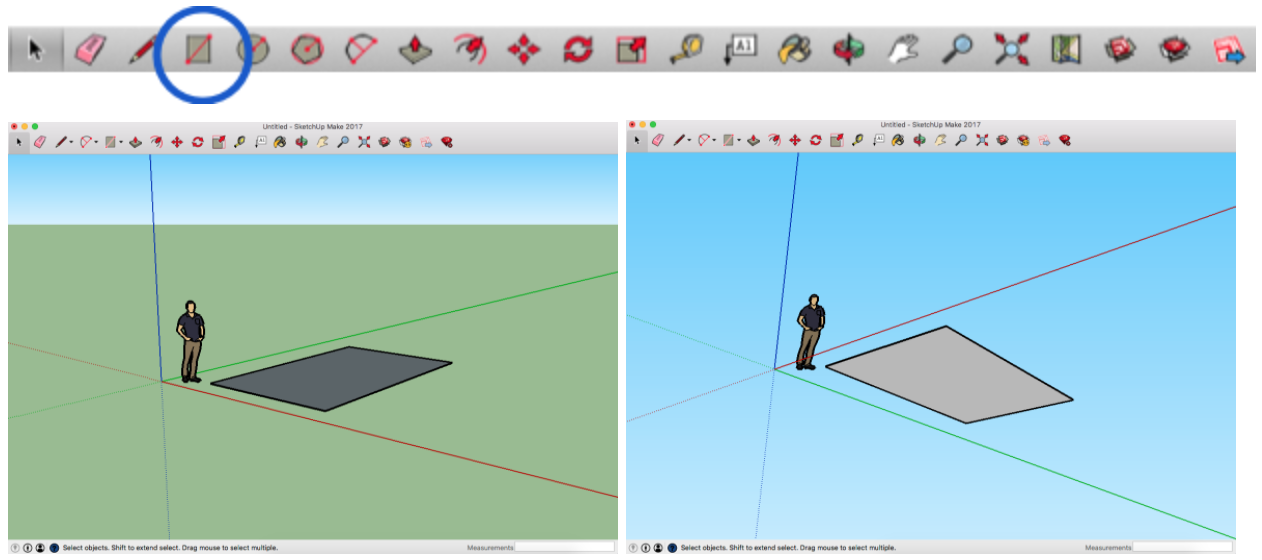
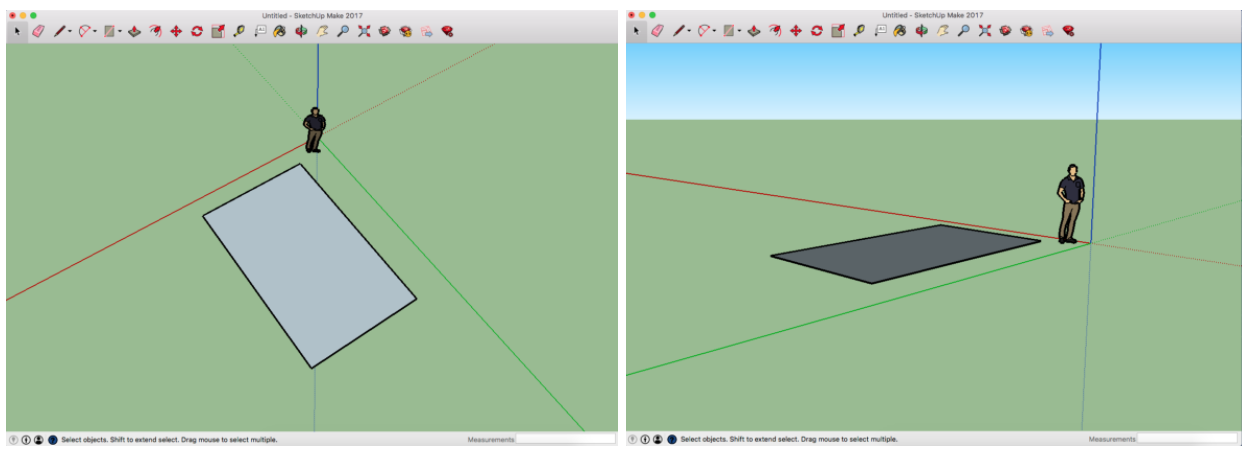
Explain that the three coloured lines on the screen are axis lines (like on a graph - but this one has three as there is a third dimension! (front to back). They show which plane you are working on and you may notice your model’s lines changing to the colour of the axis sometimes to show you are parallel to a particular line.
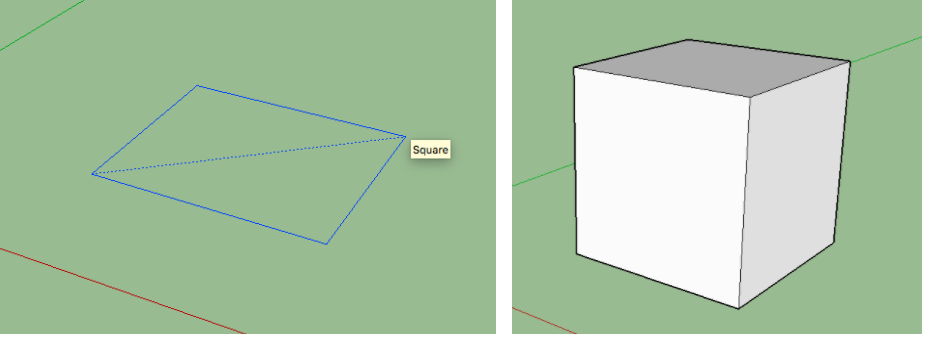
Show how to add a rectangle to the floor and again rotate around, above and below it.
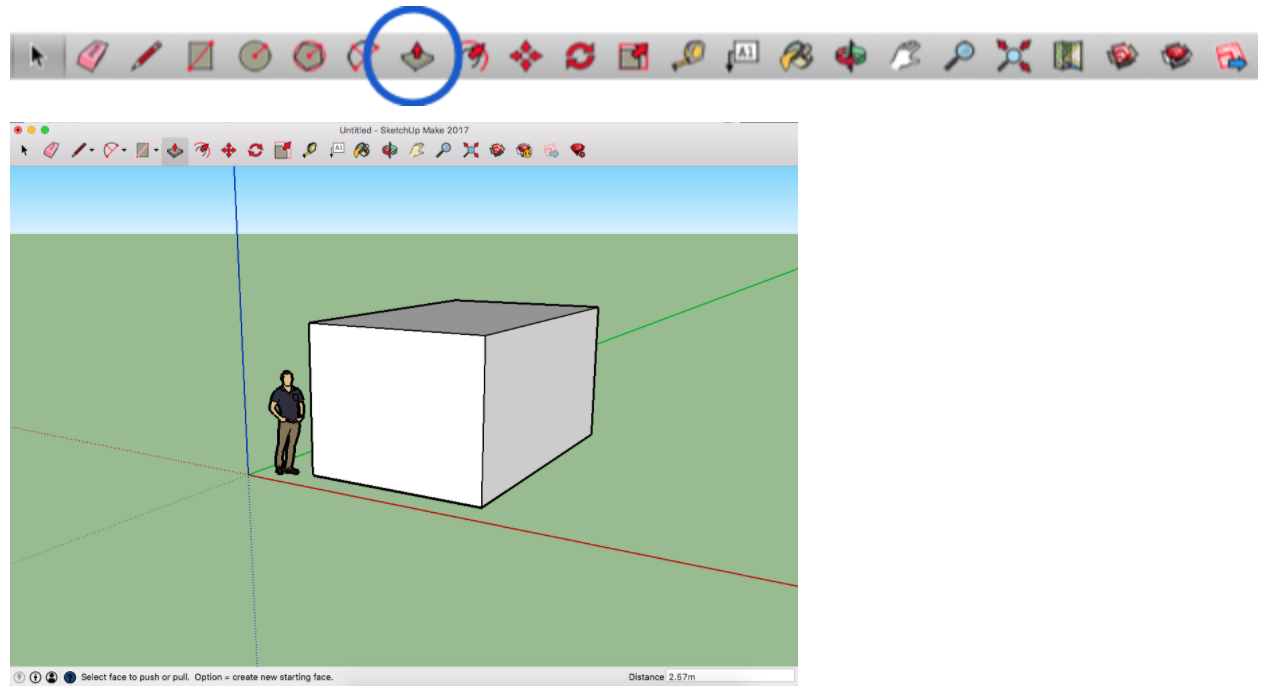
Then show the push and pull tool and how easy it is to create a 3D object. Just click on any flat surface when using this tool and drag it outwards or inwards.
Ask them to open the software and create a cuboid in the same way you did, practise:
- orbiting - by pressing down the mouse wheel and moving the mouse,
- zooming in and out - by rolling the mouse wheel
- dragging the screen - by pressing down the mouse wheel and moving the mouse while they hold the shift key
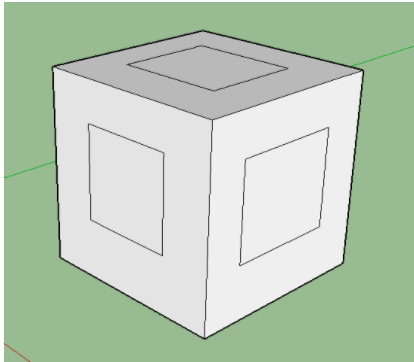
Show how you can add another rectangle to one of your cuboid’s surfaces and push and pull the new surfaces that have been created (if it’s a flat, sealed shape you can push/pull it)
Add more rectangles and see what happens!
Give them time to experiment with these features.
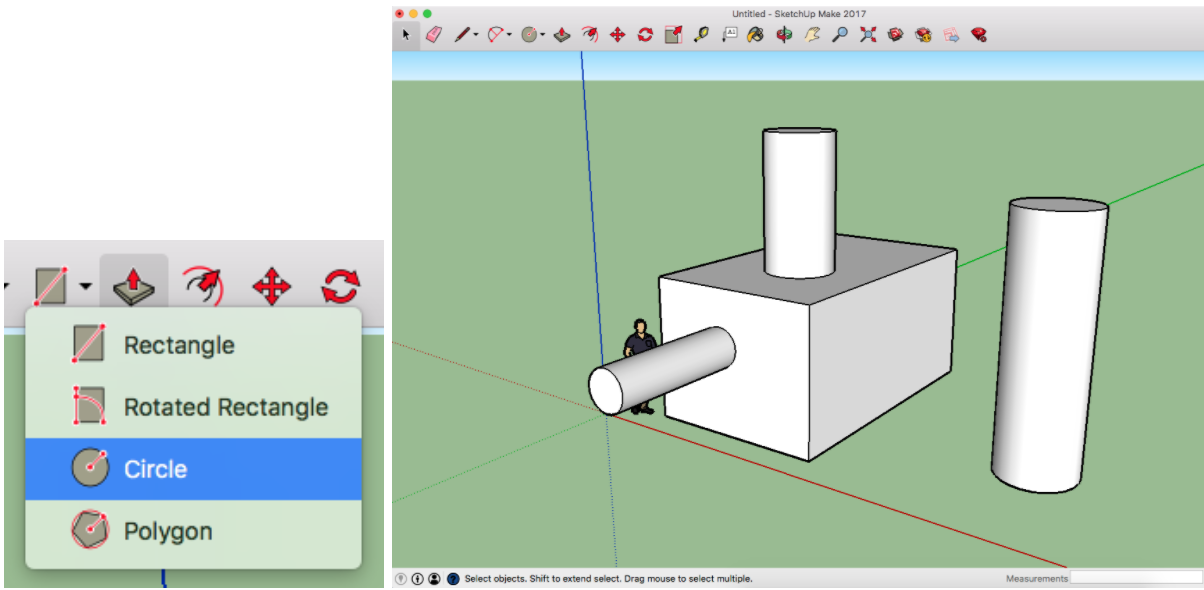
Next introduce a few other simple drawing tools. The rectangle tool also has a dropdown menu for creating other shapes. Take a look at the circle tool which works in the same way, just click and drag out the size of the circle, which can be push/pulled into cylinders.
The polygon tool can be used to make any other regular 2D shape that you like. Before drawing, on your keyboard type a number, followed by ‘s’ (for sides) and then the enter key.
For example;
- to draw triangles type ‘3s ENTER’
- to draw a hexagon type ‘6s ENTER’
- to draw a decagon type ‘10s ENTER’
As you press enter you’ll see the shape change and you can draw with it just like the rectangle and circle tools.

The Pencil tool is also a very versatile tool. It can be used in Line or Freehand mode. Line lets you click point to point with straight lines to create any straight sided shape you like and also single straight lines, or lines that join up two other points that already exist.

Freehand lets you draw curved lines in any shape you like. As long as the shapes you draw on a surface are closed (join up all the way round) they can then be pushed/pulled to create some interesting effects.
The question of deleting things is also likely to come up. There are a number of options for this. Undo is a very handy thing and can be done from the Edit menu or by pressing Ctrl+Z together on the keyboard. You can go back quite a long way with Undo in Sketchup so it’s really useful for quickly getting rid of a mistake you’ve just made. Things can be put back (if you undo too far!) with Redo (Ctrl+Y). Point out that these are universal keyboard shortcuts and work in almost all software, so definitely worth knowing about!

The select tool lets you click on things and then press the delete key on the keyboard to remove them. This can be used in different ways.
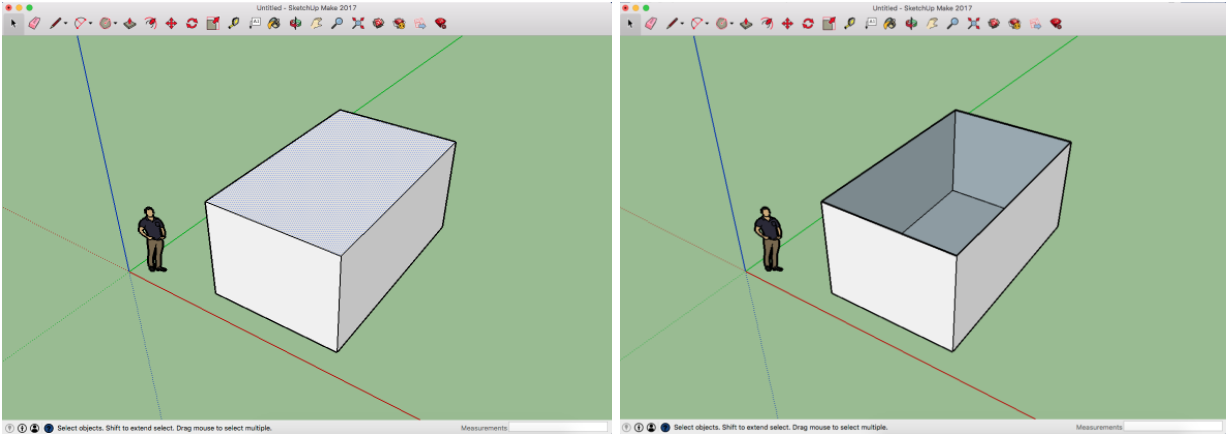
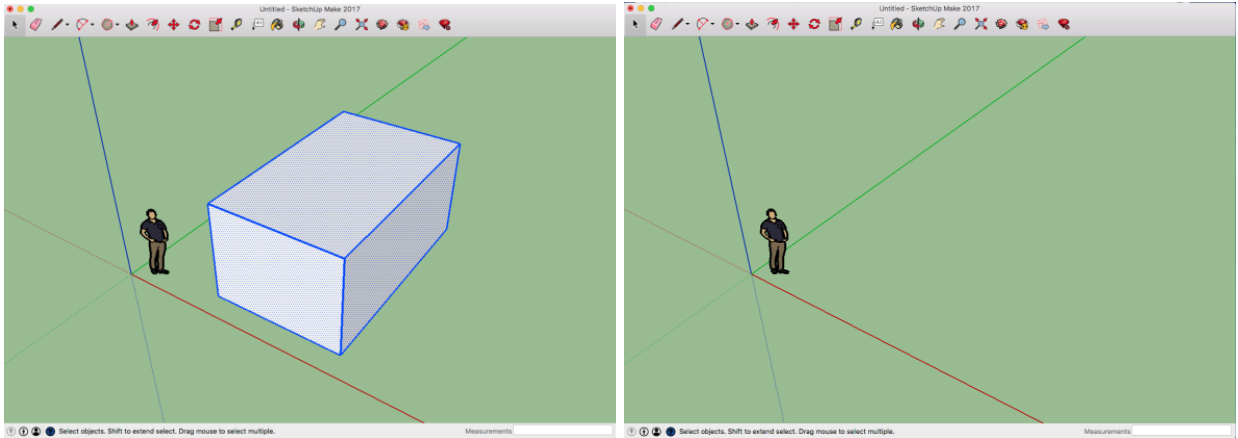
For example, click on a surface and delete it (look for the speckles on the surface you select) and the surface is removed, in this case, opening up the box:
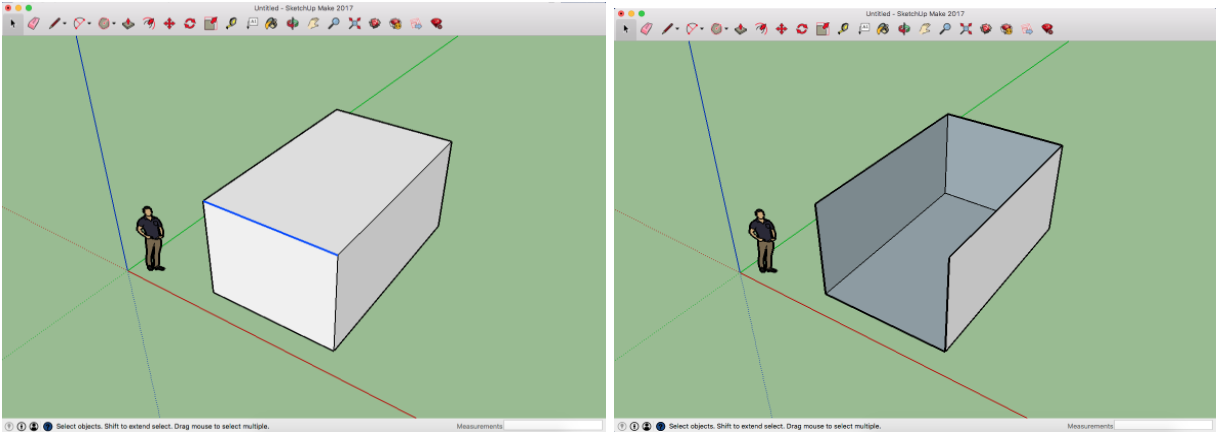
Click on a single edge (it’ll go blue) and delete it and the two surfaces that were attached to it both disappear!
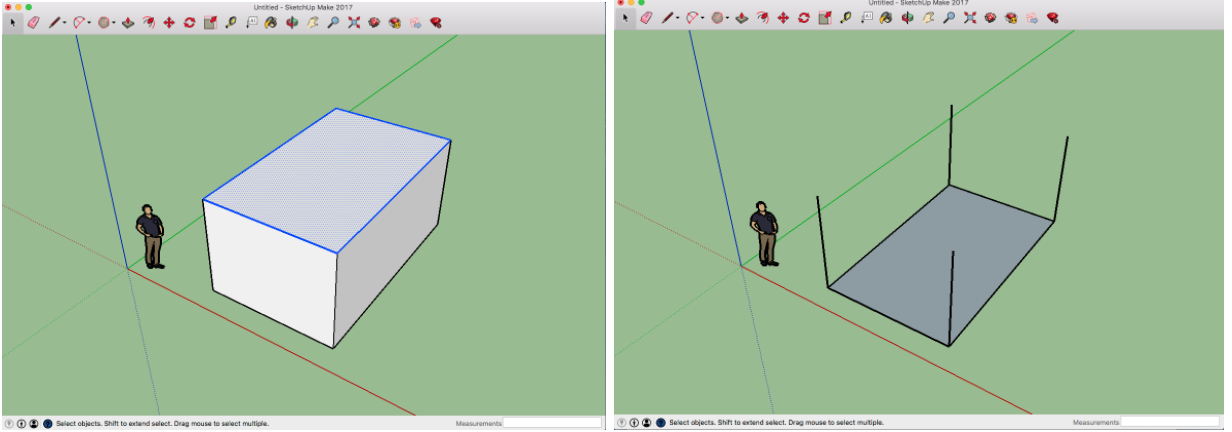
Double-click a surface and it selects the surface and any edges attached to that surface (again, it will go blue), in this case, all the top edges of the cuboid. When delete is pressed the top and sides all disappear as they were all linked to those edges.
Triple-clicking an object selects the whole object (all surfaces and edges go blue), pressing delete removes the whole thing!
You can also select a group of objects by dragging a box over all of them with the select tool, like this:
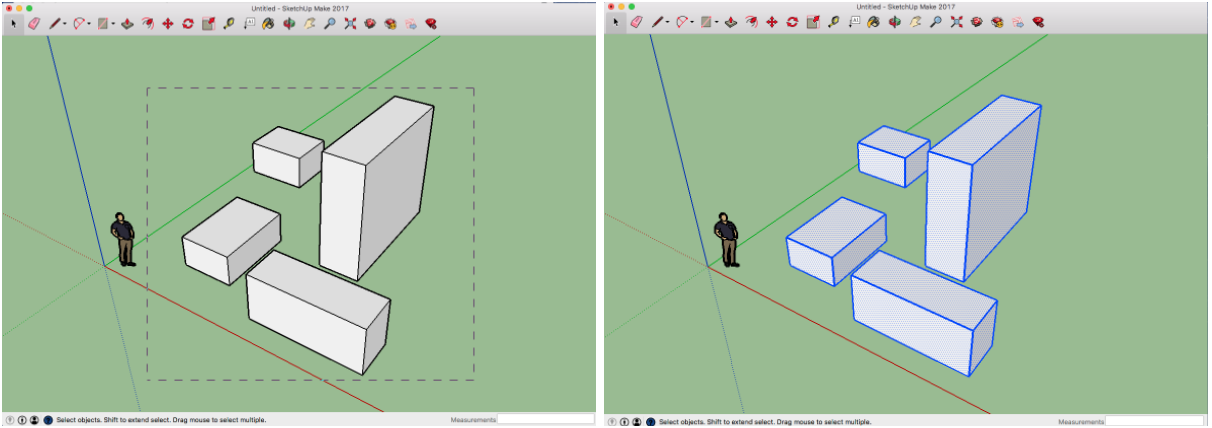
As you release the mouse button, anything in the box you drag will go blue, and can then be deleted.
The eraser tool works in a similar way and can delete edges (not surfaces) just by clicking on them. You can also right-click on surfaces and delete them from the menu that appears.
![]()
Finally, you can of course always start a new file! Go to File > New to do this and decide if you want to save what you’ve done.
Give the student some time to experiment with all that we have covered here, emphasise that it doesn’t matter how things end up looking, and that they are not trying to make anything in particular at this point, just ensure they try out all the different tools we’ve looked at.
Slide from the teacher presentation
Main task
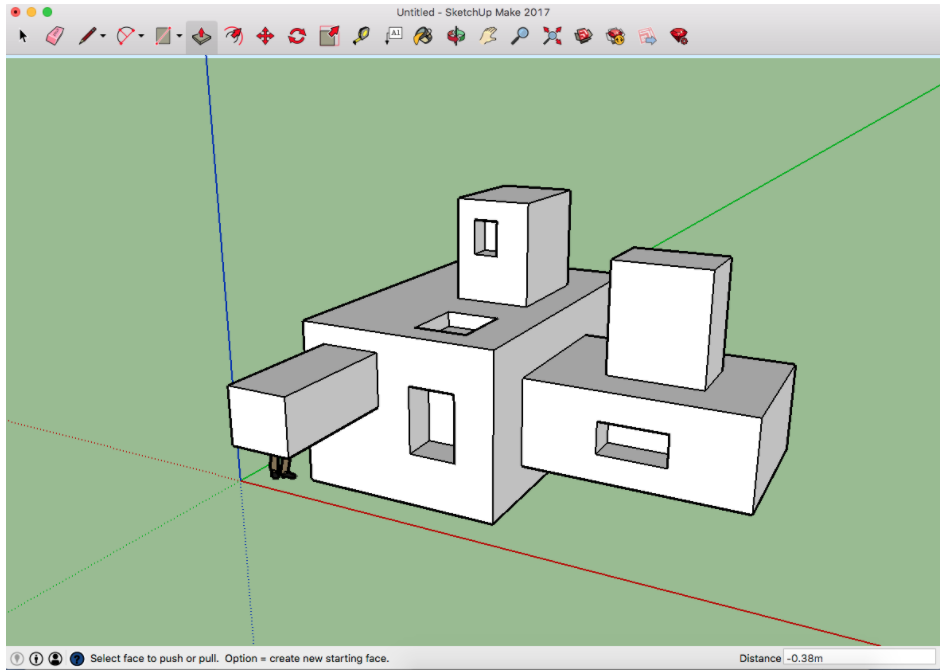
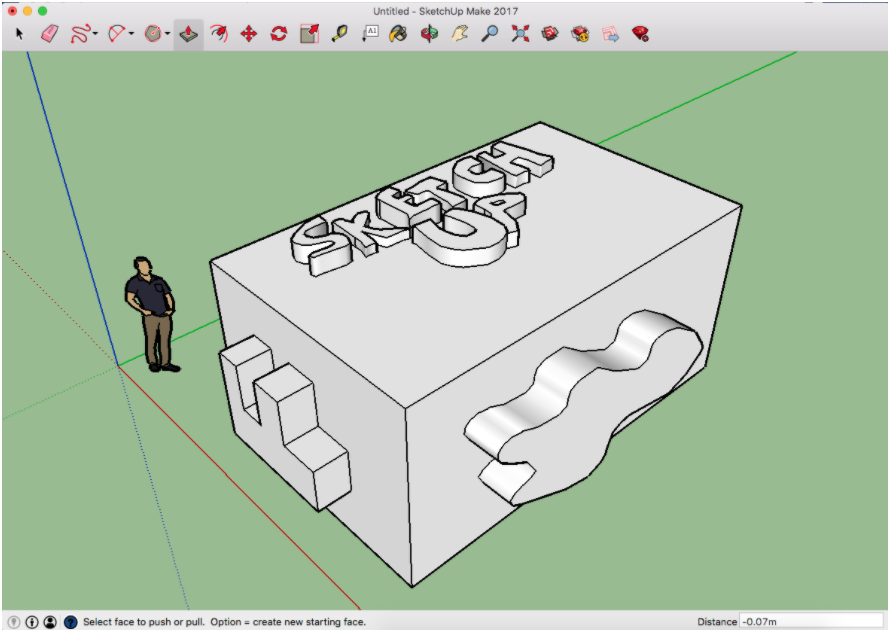
Ask the student to delete their experimental drawings, or start a new file and take a look at these four Sketchup models:
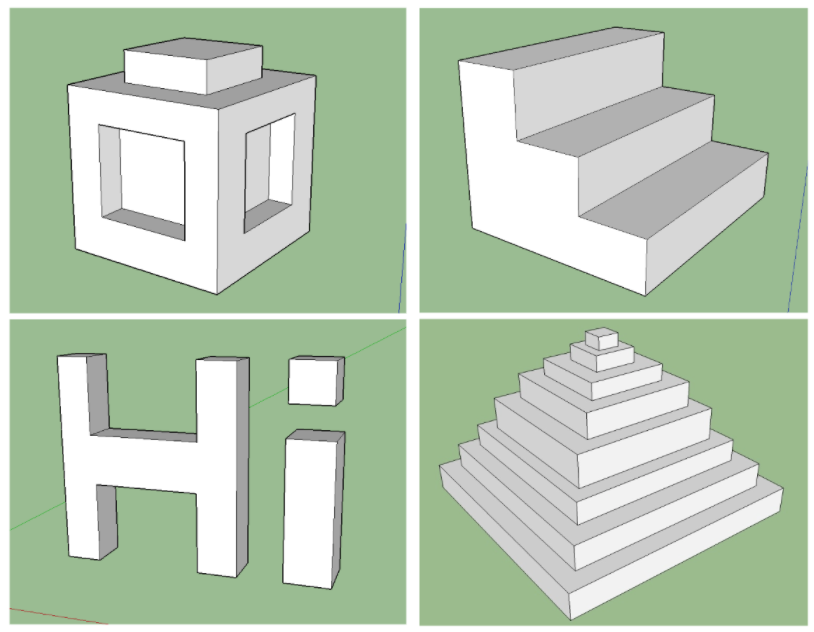
Sketchup isn’t like building in reality, for example, there is no gravity in Sketchup so things can hang in midair unsupported. So the students need to get used to considering where the best place to start with a model is. You don’t always need to build up from the bottom as you would with LEGO, for example. This challenge should help them learn that there's usually an easy way and a hard way to draw things, and it's not always obvious when you're getting started, where best to start.
All four shapes were drawn with just the rectangle and push/pull tools. The students should choose any of the four models to begin with and have a go at creating it as close as they can to the original using just those two tools. Don’t give any advice or guidance at this point.
When they have created one, they can try any of the others, hopefully getting all four done by the end.
Discuss each one after a few minutes; Where was the best place to start? How did you make it?
Demonstrate the most simple way(s) to build each shape and ask them to compare each method to how they did it. Following this, give them some time to have another go, utilising some of the techniques demonstrated.
The ‘Hi’ model is probably the most challenging as students often try and build upwards from the bottom, in parts, which doesn’t really work. The others are fairly straightforward, but be sure that students will approach them differently, which is always interesting to gauge their spacial awareness and problem solving abilities.
Here’s one way to draw each model:
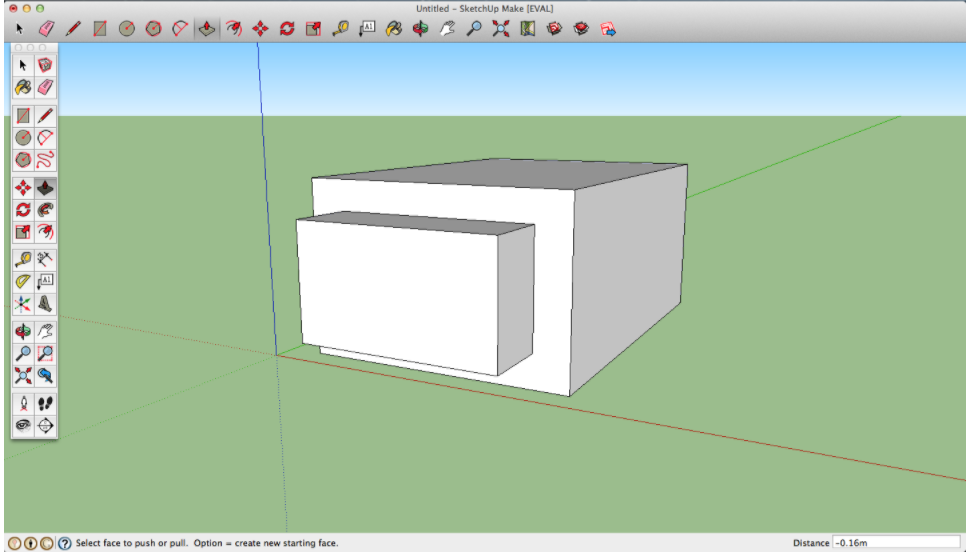
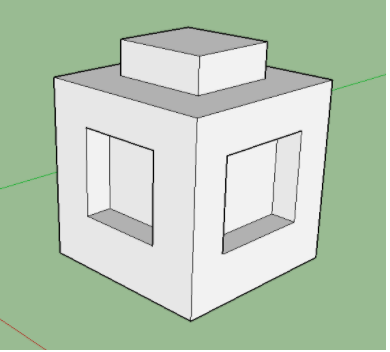
Boxes in a box
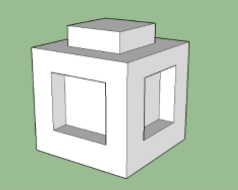
1, Draw a square on the floor and pull it up into a cuboid.
2. Draw three more squares on the three visible surfaces, turn the camera each time to look straight at the surface to make this easier.
3. Pull the square on the top horizontal side upwards. Push the other two squares on the vertical sides inwards.
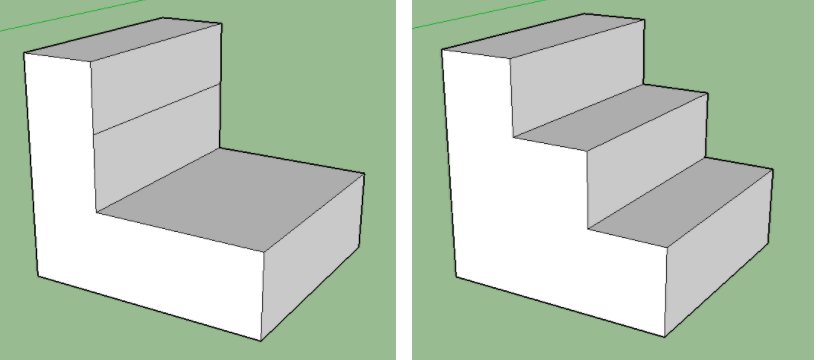
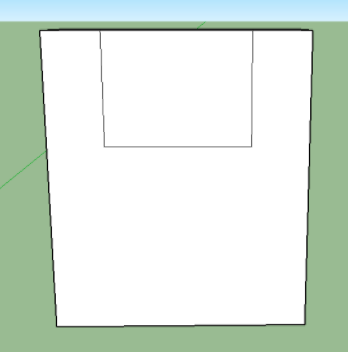
The steps
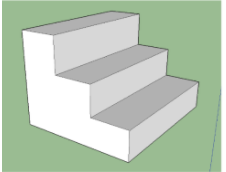
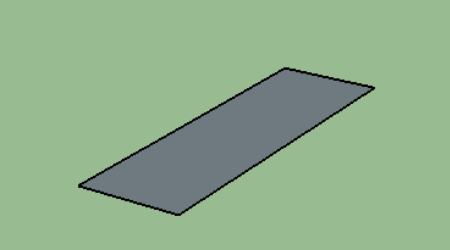
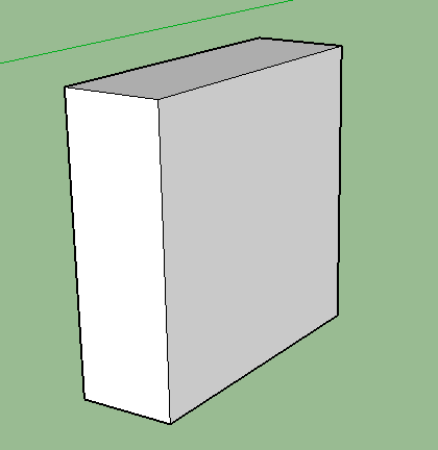
1. Draw a long, thin rectangle on the floor.
2. Pull it upwards into a tall cuboid.
3. Starting at the edge, draw another rectangle in the centre of its front, largest surface. This should divide the surface into thirds.
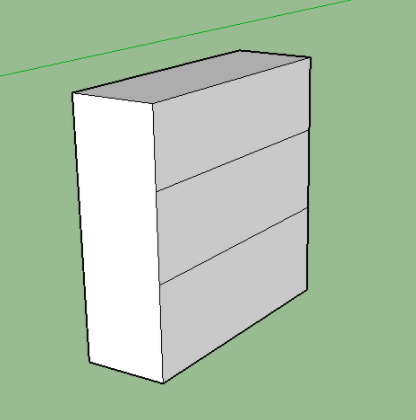
4. Pull out each rectangle like drawers to create the steps.
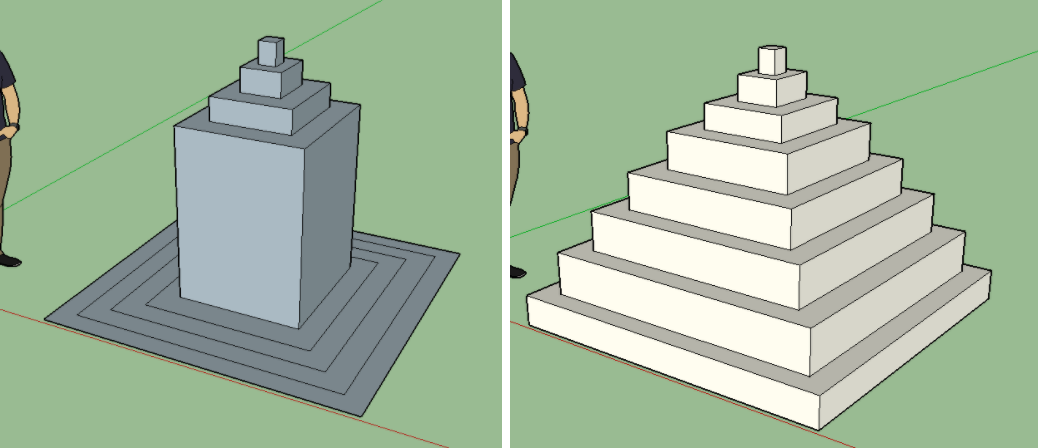
The pyramid
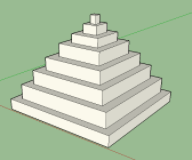
1. Turn the camera to look almost straight down at the floor and draw a large square on the floor.
2. Draw another square inside the first, leaving an even border right around the square. (You can be completely precise with this positioning using the offsetting tool, but we did say we would only use the rectangle and push/pull tools here!)
3. Repeat this process, drawing smaller squares each time inside the previous one.
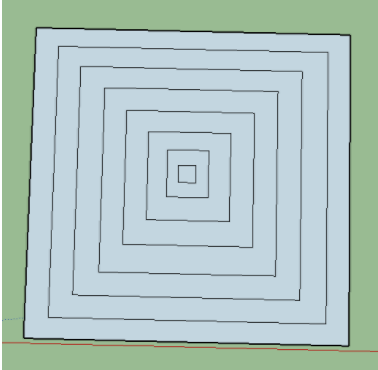
4. Turn the camera back to more of a side view and use push/pull to begin to pull up each square you have drawn, making sure the middle, smallest square is the highest.

5. Continue this process until all the squares have been raised. Adjust each level as necessary to make each level a similar height.
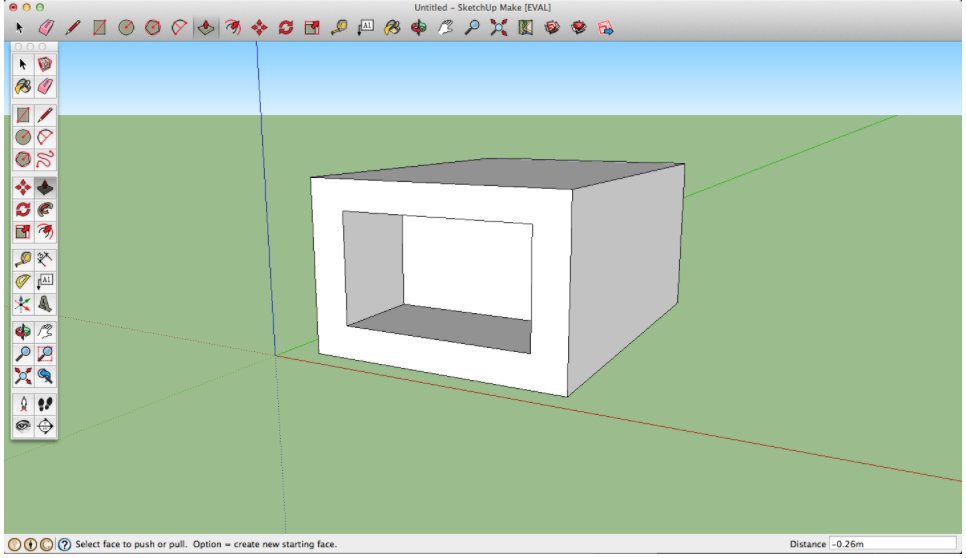
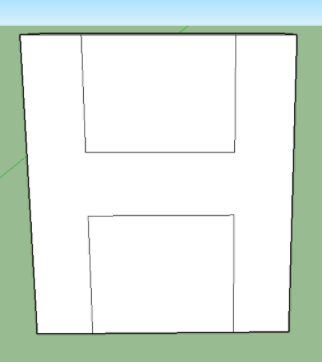
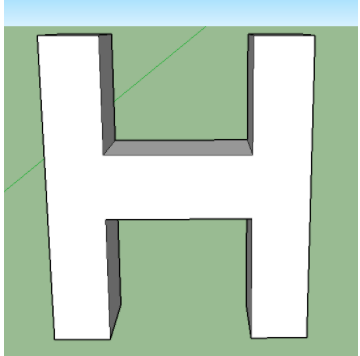
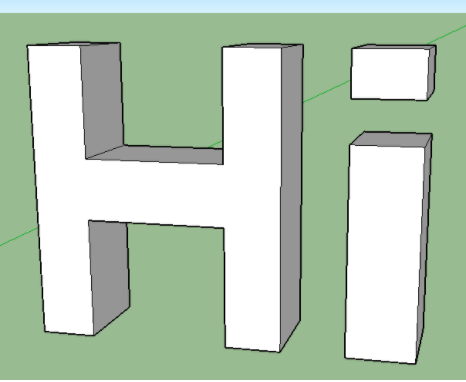
Hi
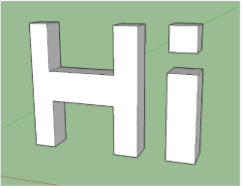
1. Draw a wide thin, rectangle on the floor.
2. Pull it up into a tall cuboid.
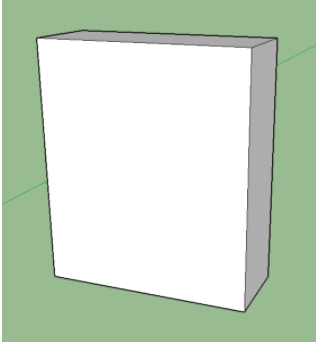
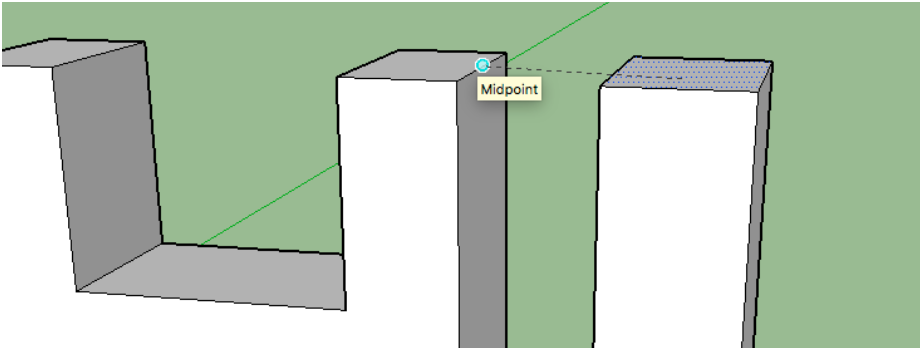
3. Turn the camera to face the front of the cuboid and draw a rectangle on the top centre of the surface, this will create the top ‘cut out’ of the H.
4. Repeat this at the bottom of the cuboid’s front surface to create the rest of the H shape. You can get them perfectly in line by hovering your mouse (just hover, don’t click!) cursor over the vertical lines of the rectangle you have just drawn before moving down to the bottom to draw the second one. You should see dotted reference lines that show you are in line. Sketchup has many useful referencing features like this that help you keep everything in line.
5. Push the top section backwards until it reaches the back surface of the cuboid. You should see a greyed, speckled surface when you’re in the correct position, then let go an the section should be deleted. If it doesn’t work and continues pushing the rectangle beyond the back of the cuboid just stop, undo and try again.

6. Repeat this for the bottom section to create the finished H shape.
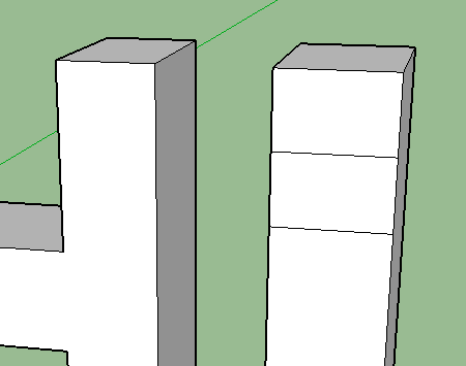
7. Next to the H draw a square on the floor. You can use the referencing technique again to get it perfectly in line.
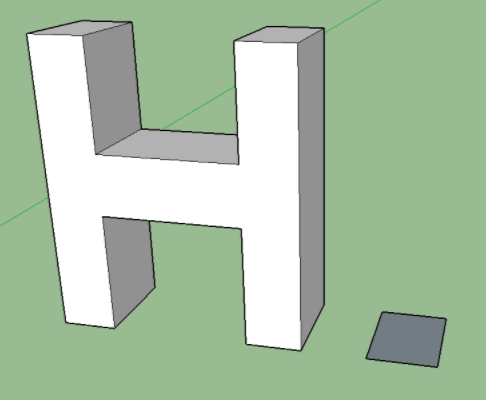
8. Pull the square upwards to the same height as the H. Again you can do this precisely by taking your mouse cursor across to the top edge of the H as you pull up the square, Sketchup will snap to the same height and show you when you are level with a dotted line linking the two shapes.
9. Draw another rectangle on the front of the tall cuboid we have just created, near the top, this will create the hole between the i and it’s dot.
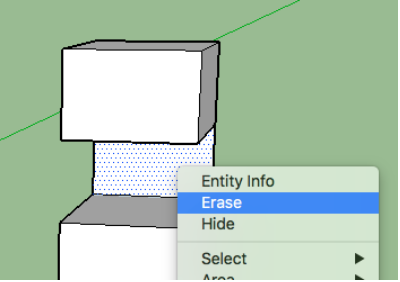
10. Push this new rectangle backwards to the back surface of the cuboid and release push/pull.

11. It will leave the back surface in place, so delete this final part by either right-clicking on the surface and edges and choosing erase or any of the other deleting methods mentioned above.
12. This will leave your completed ‘Hi’
Saving your work
It’s not essential to save all their work from this lesson, as it’s unlikely they will go back to it, but if you do want to capture or save anything Saving in Sketchup can be done in a couple of ways, depending on the version you are using.
Saving in Sketchup for Schools (online version)
In the online version of Sketchup for schools your file will auto save to your Google Drive or OneDrive account. The tool bar in the top left of the screen shows the save status of your model.
![]()
It will also show up on the Home page when you log in to Sketchup for Schools.
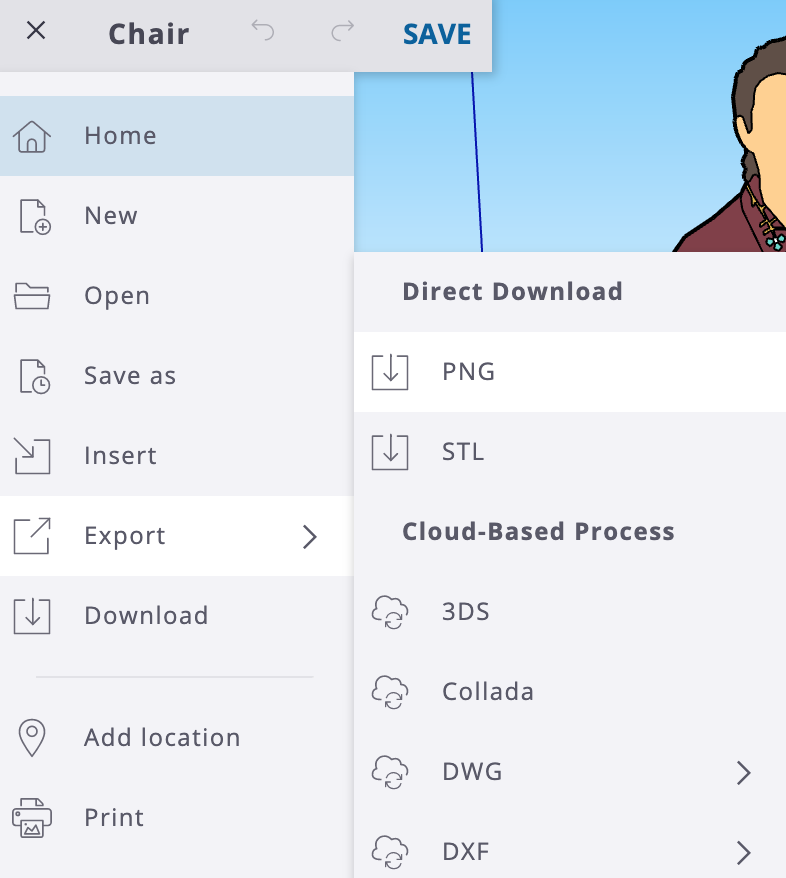
You can also export your work as a PNG image file if you want to use or display it elsewhere. From the menu button choose Export > PNG.
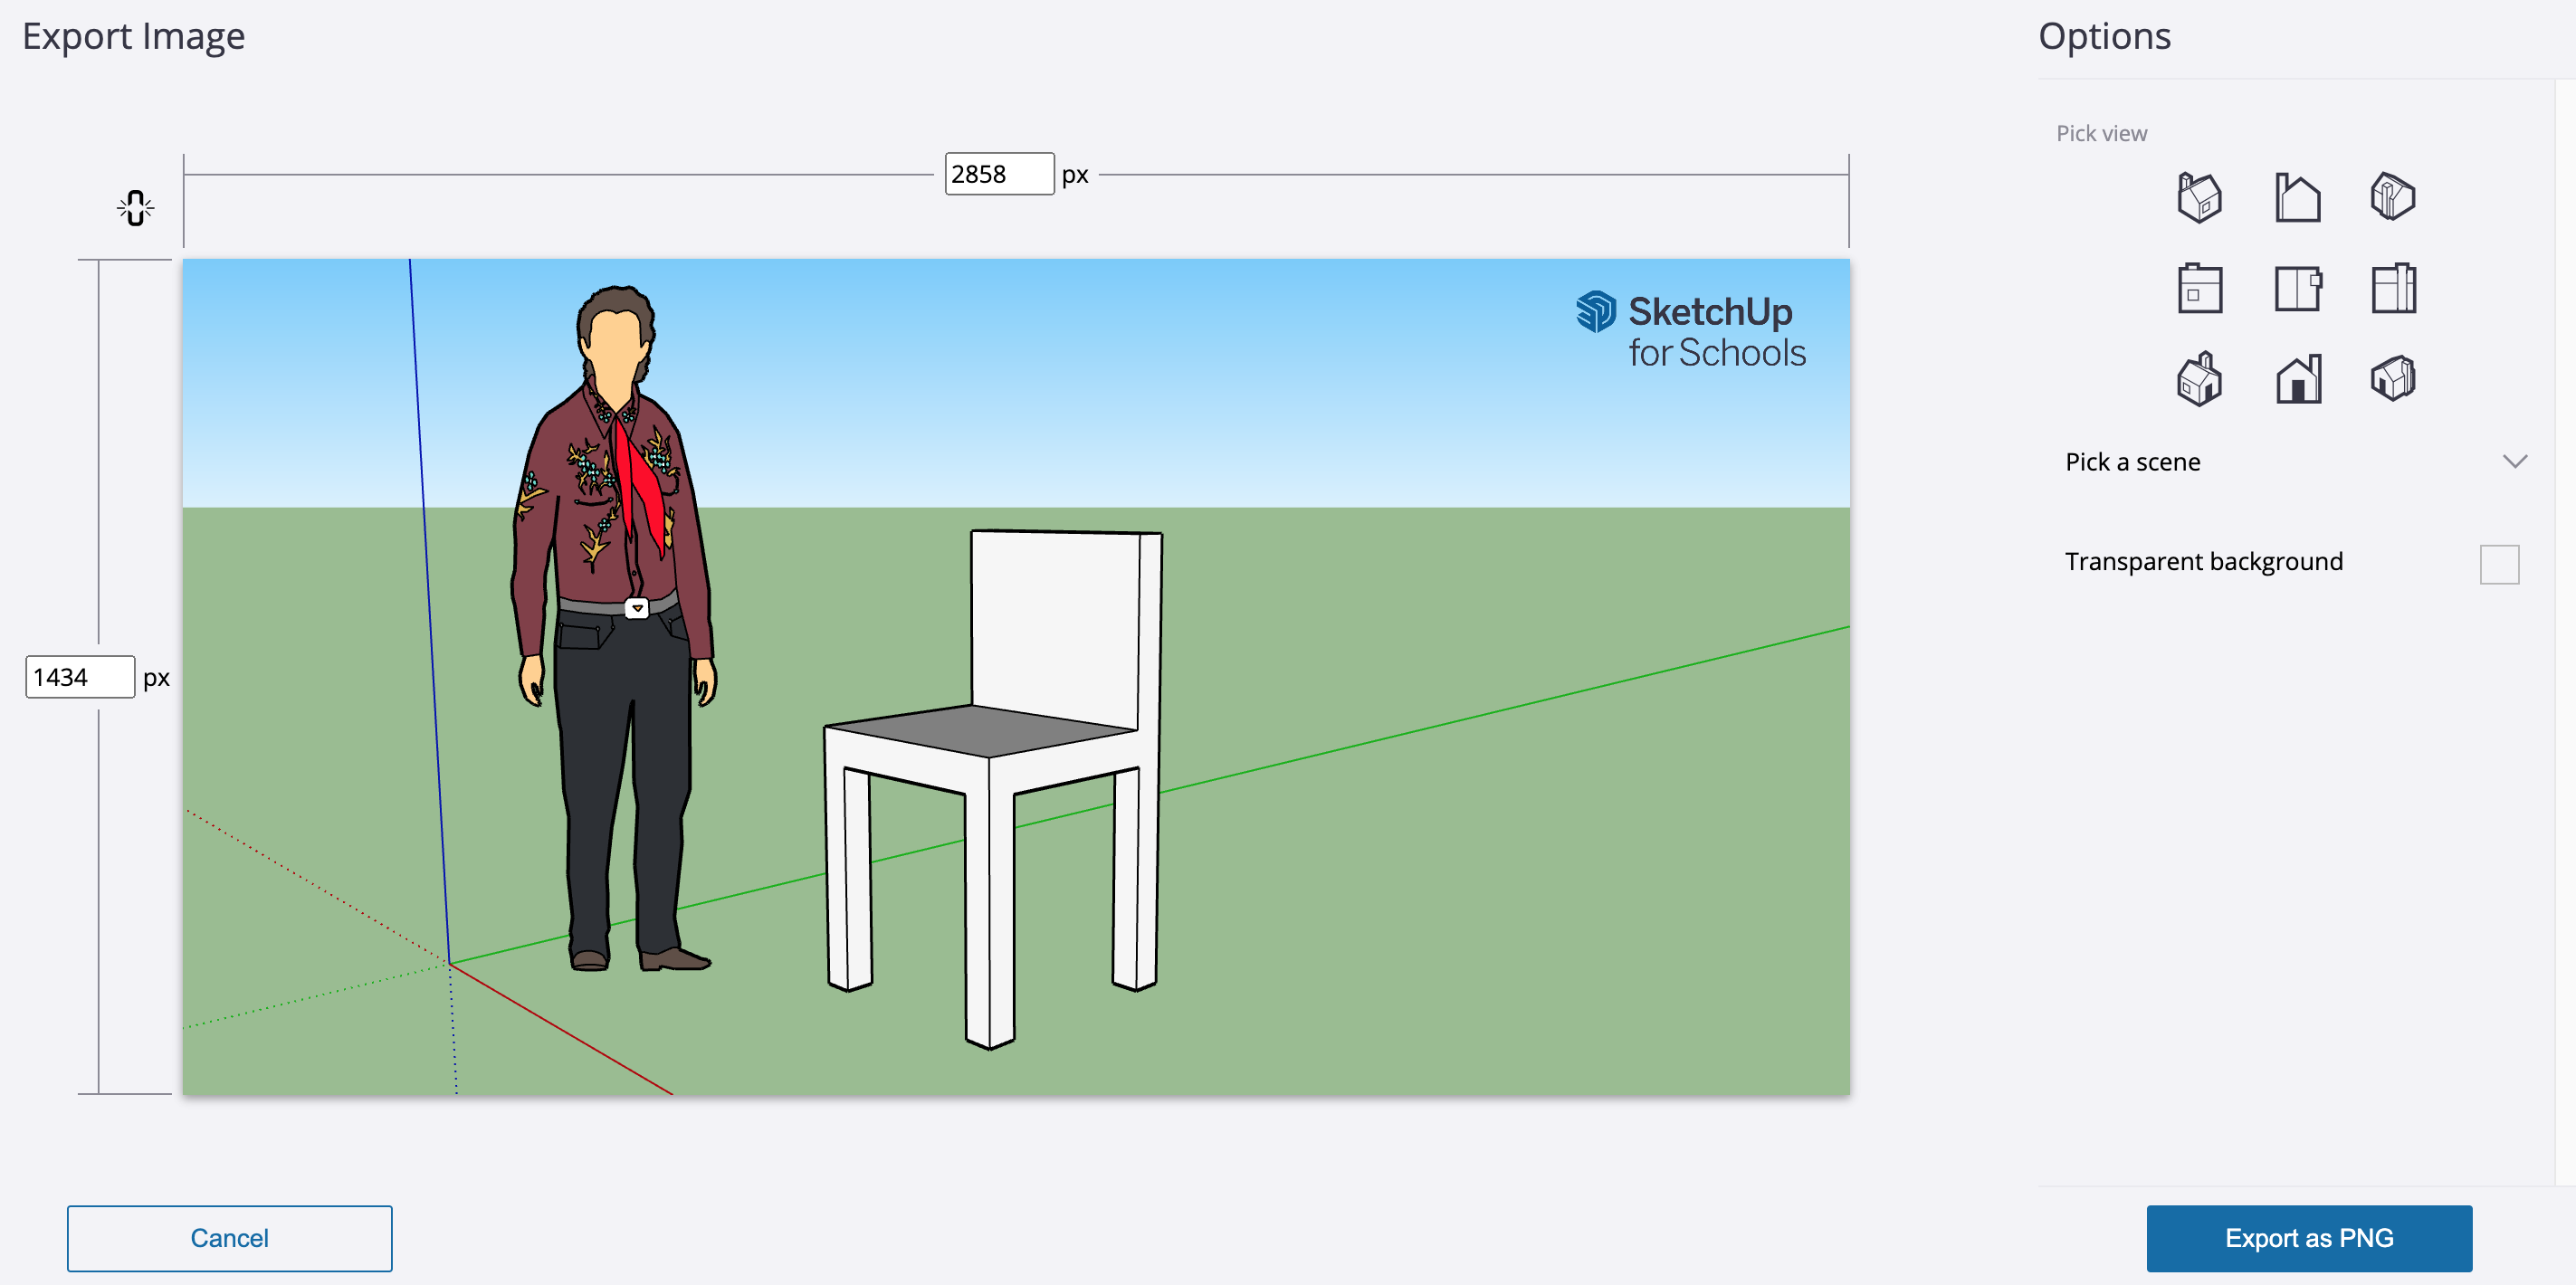
You can then position the view of your model for the image that will be exported. Click orbit the camera, hold the shift key while doing this to move the model. When you are happy with the view, click Export as PNG.
Saving in Sketchup Make (and other older desktop versions)
In older, desktop versions of Sketchup:
1. You can save it as a Sketchup file if you want to return to edit for future editing: File > Save as. This creates a .Skp file which will only open with Sketchup.
2. Or you can export it as an image file (PNG or JPG etc): File > Export > 2D graphic (note it exports the current screen view, so position your model carefully first to best show it off). This is just an image and will then open with anything that opens picture files.
Plenary
Finish the lesson by reviewing the shapes with the students and their introduction to Sketchup in general.
- Which was the hardest shape to draw? Why?
- Did your second attempt (after the demo) turn out better?
- What did you do differently?
- Have you been remembering to make good use of the camera and zoom and changing the viewpoint as you draw?
- Which tools have you learned about today?
- What do you think you did well today?
- What would you like more practise with?