
A smart light switch
Micro:bit Mastery - Lesson 6
Objectives
- To combine AI machine learning and radio sending to create a smart device.
- To innovate and improve a smart device.
Lesson Resources
- Lesson Slides
- BBC micro:bits (minimum 1:2 students)
- micro USB cables to connect micro:bits to computers
- 1 computer per micro:bit
- micro:bit Next Gen accessories for turning your micro:bit into a wearable device (or some thick rubber bands)
Lesson 1 - Conditions, variable and random outputs
Lesson 2 - Dig into the data
Lesson 3 - AI Machine Learning
Lesson 4 - Radio coded messages
Lesson 5 - More secure messaging
Lesson 6 - A smart light switch
Before you start
Before you begin, please read these important notes:
- This unit of work was created and added to our scheme in autumn 2025.
- It has been designed to follow on from our unit of work: Getting Started with the BBC micro:bit, which has been updated and moved to the Year 4 section in our scheme of work.
- If your students are new to a BBC micro:bit, we would recommend beginning with the ‘Getting Started’ unit, instead of these lesson.
- If your class have covered that unit already, or are quite experienced with using a micro:bit, go ahead and dive in to this unit, and have fun!
Micro:bit classroom

We would recommend delivering your lessons using the micro:bit classroom feature on microbit.org. This is very simple to use and gives really useful classroom management options for your lesson, such as:
- being able to send code to your students,
- view and edit their code from your screen,
- freeze their screens when you need their attention
- download a report of the lesson, including images of their screens
- save the entire session and resume it at a later date
All without the hassle of having to create student accounts. No usernames and passwords are needed.
You can find out more and watch a introduction video at microbit.org/teach/teaching-tools
You can get started with a lesson at classroom.microbit.org
Students will work in pairs in this lesson, so you may want to consider and organise that before the lesson.
Introduction
These days there are many clever ways to do simple things in our home, like turning on our appliances and lights from our phone, watch, smart speaker or other connected devices.
Today we are going to return to AI machine learning and turn our micro:bit into a smart device that can recognise physical gestures to control lights.
Ask the class:
- What can you remember about machine learning? - Explain to a partner what you think it is.
- How did we use machine learning in our previous fitness tracker project?
Machine learning (ML) is a kind of artificial intelligence (AI) where computers can learn from and make decisions based on data.
ML models are trained by humans to help them make those decisions, for example, to recognise different ‘actions’ when you move your micro:bit in different ways.
Put the students into pairs and ask them to head to the microbit website: microbit.org
From there, go to Projects on the main menu, tick the filter for AI literacy and choose the AI light switch project. That should take you to this page:
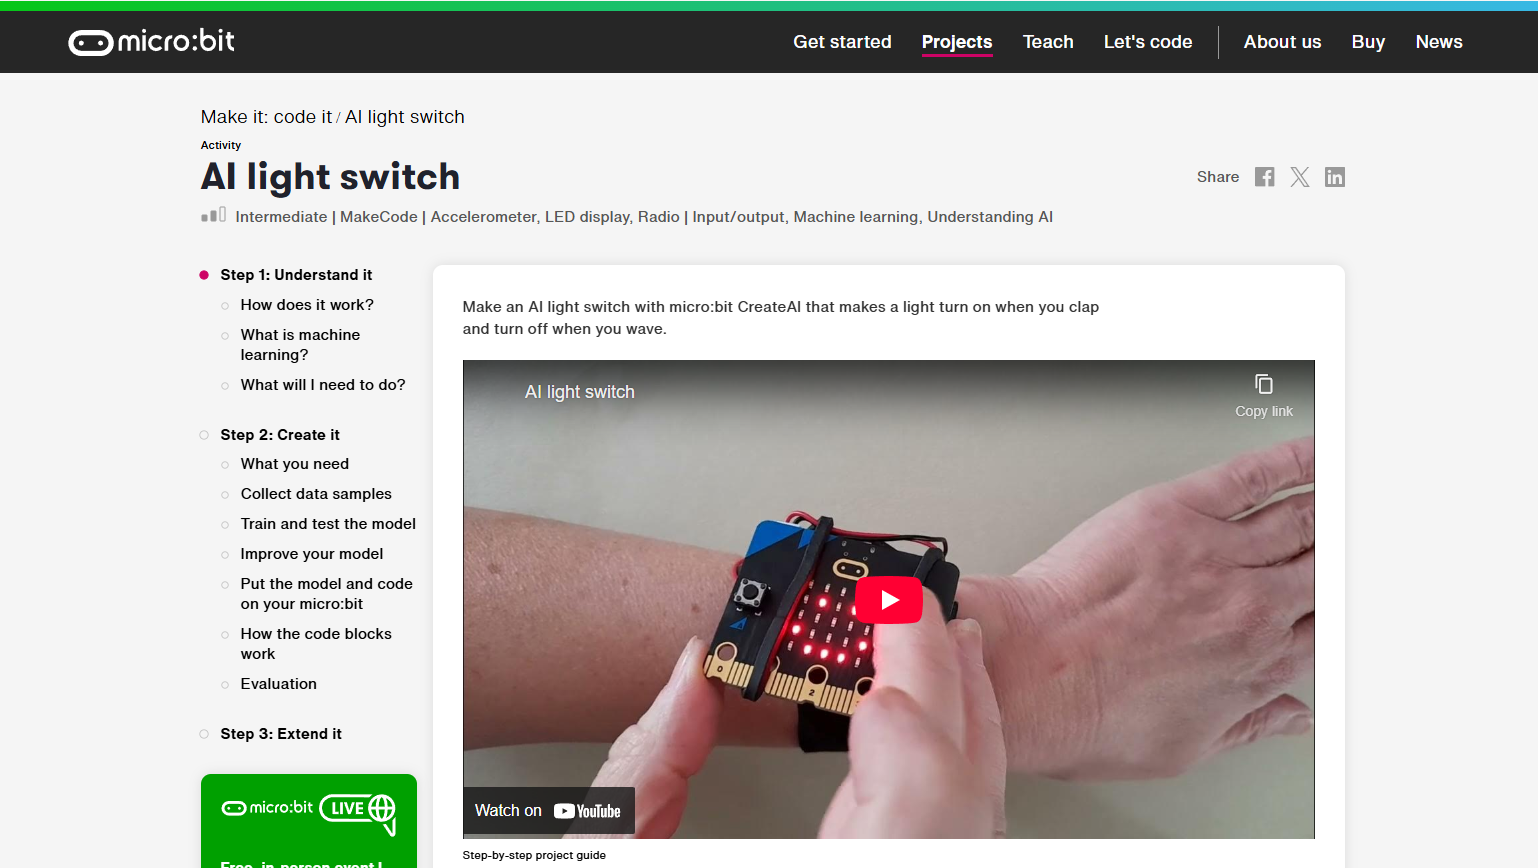
How does it work?
In this project, you’ll train a machine learning (ML) model to recognise hand gestures like clapping and waving. You’ll combine that model with a MakeCode program that sends a ‘lightsOn’ radio signal to another micro:bit whenever you clap, and a ‘lightsOff’ radio signal whenever you wave. When the receiver micro:bit receives the ‘lightsOn’ signal, all its LEDs light up. When it receives the ‘lightsOff’ signal, it clears its LED display, thus simulating a smart light switch for your home.
Collecting your data
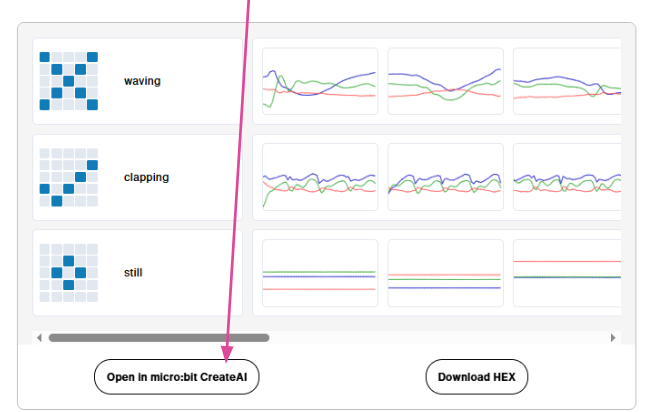
This process is the same as what the students did in lesson 3, when they previously looked at machine learning.
They should first scroll down to the Collect data samples section and select Open in micro:bit CreateAI, then Start session.
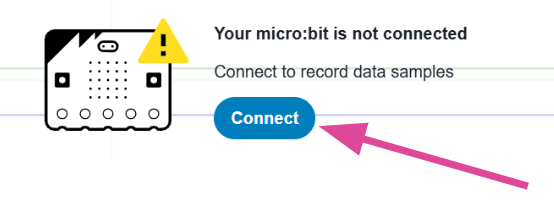
Connect your micro:bit
Next they need to connect their micro:bits. Guides for connecting your device will show on the screen when you click on the 'Connect' button. These steps are also displayed in the lesson slides (188-193). Two different methods are described for if your computer has Bluetooth or not.
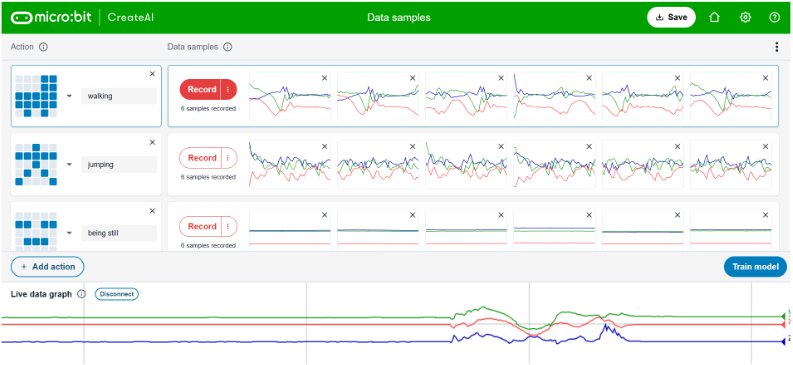
Once connected, your micro:bit will provide live data from its accelerometer to micro:bit Create AI. You'll see the data represented as line graphs at the bottom of the screen. Ask the class:
- What do the three coloured lines represent?
- Which of the micro:bit’s sensors collects this data?
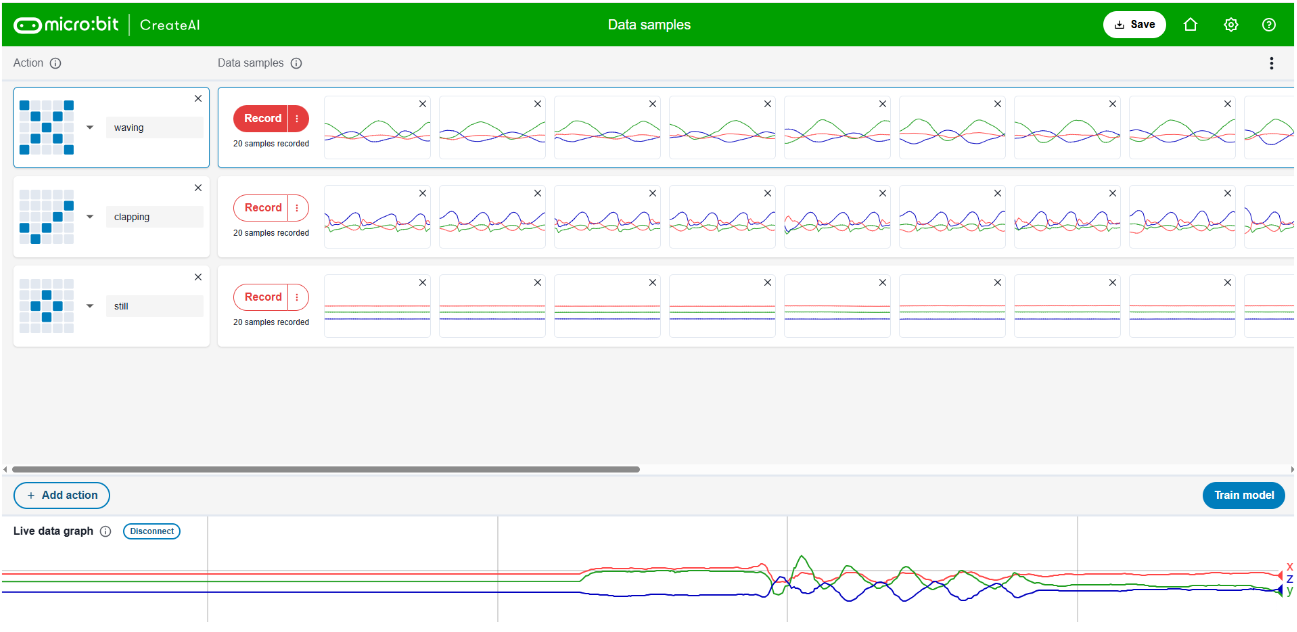
The accelerometer sensor collects data for movement on the X, Y and Z axis. This was used and discussed in lessons 2 & 3, but let's revisit this video from the Micro:bit Educational Foundation which explains a bit more about what this clever little sensor is and how it works.
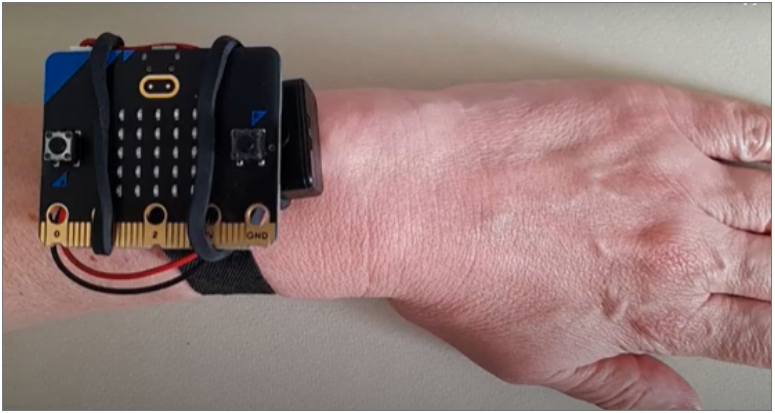
Next, attach your micro:bit to your left wrist, like a watch. If you don't have the official parts to hold the equipment, a couple of good rubber bands should do okay.
In our last AI project, we learned that the more clean data collected the more accurate the machine learning model will be.
Ask the students to add at least 10 more data samples to each of the three gestures (waving, clapping, keeping still).
Remember, you can record all 10 in one go by clicking on the 3 dots.
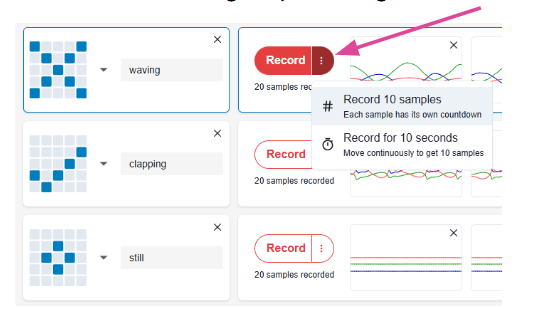
Once the data samples have been added they should check that all the data samples are clean and delete any false readings, if needed.
When you have collected enough extra data, you are ready to train the ML model.
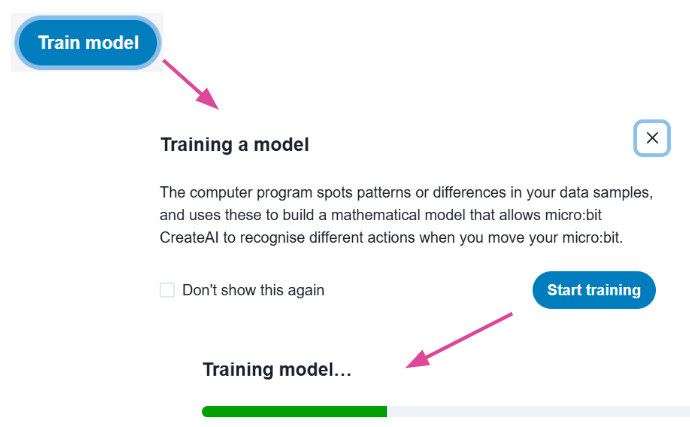
Once the model has been trained, they should test the model by performing the actions and looking at how accurately the machine learning model recognises each action. This level of certainty is displayed as a percentage horizontal bar graph next to each action.
If the model is not accurately recognising any of the actions they should go back Edit data samples and record more clean data.
When things are working well, they should open the provided code in the MakeCode editor.
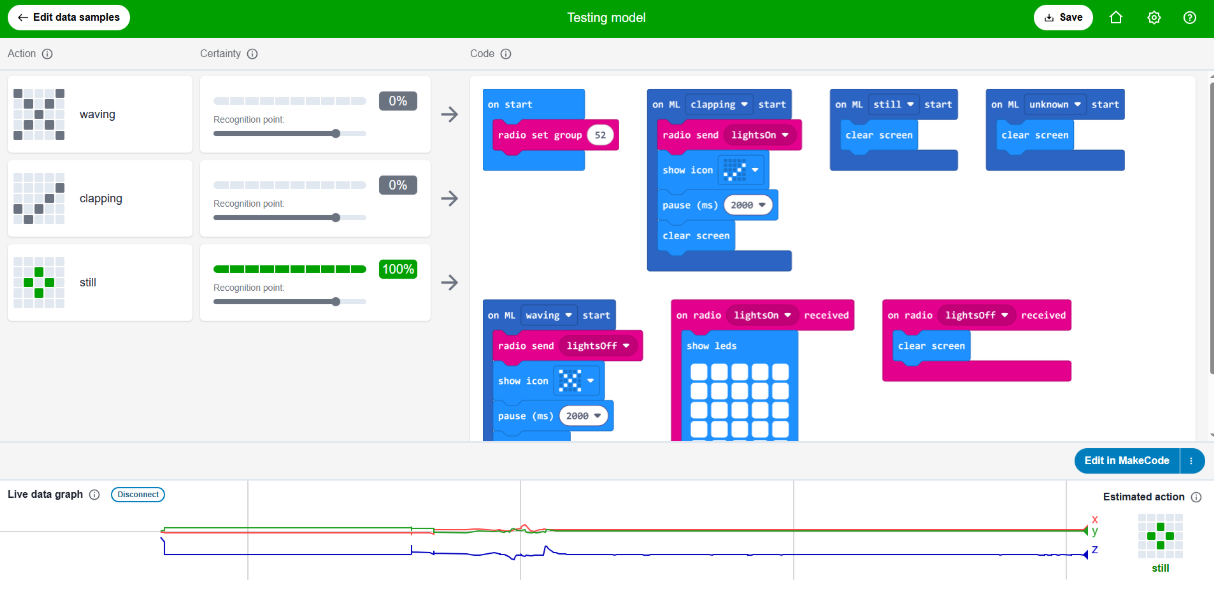
How does the code work?
The provided code will be downloaded to two micro:bits. Ask the students to: Take a look at the code with a partner, can you work out how it works?
At the start, the radio group is set to the same number for both micro:bits, so they can communicate. Remember to make this unique in your classroom and match your partner.
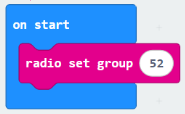
When the ML model recognises a clapping movement, it sends a radio signal of ‘lightsOn’, shows a tick icon and then clears the screen.
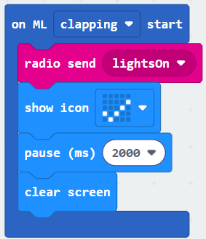
When the 2nd micro:bit receives the ‘lightsOn’ radio signal input, it turns all the LEDs ON.
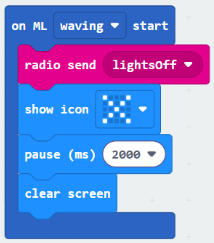
When the ML model recognises a waving movement, it sends a radio string signal of ‘lightsOff’, shows a cross icon and then clears the screen.
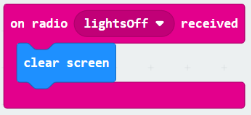
When the 2nd micro:bit receives the ‘lightsOff’ radio signal input, it turns all the LEDs OFF.
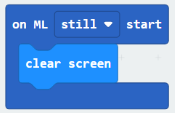
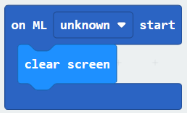
If the ML model detects that the micro:bit is still, or an unknown movement, it turns the LEDs OFF.
Download and test it
- Attach the first micro:bit using a USB cable, click on the ‘Download’ button in the MakeCode screen, and follow the instructions to transfer your AI model and the code blocks to it.
- Afterwards, download again onto another micro:bit.
- Attach a battery pack to the sender micro:bit.
- You can keep the receiver micro:bit plugged into the computer or attach it to battery pack.
Now wear the sender micro:bit and test it out.
Challenges
Ask the students to work with a partner to adapt their code and solve these challenges:
- Play and stop music instead of, or as well as, controlling the lights with your gestures.
- Add a fourth action which causes the receiver micro:bit to show dimmed lights. Use the ‘set brightness’ block, found in the LED section under ‘More’.
Improving reliability
If you have any issues, go back and edit the ML data. Deleting the sample data that comes with the project and only using data that you have collected to train the ML model is a good way to improve reliability. Your own movements might be slightly different to the original samples, which can cause false readings of your movements.
To finish
Ask the students to talk to a partner about their success with the projects today. Consider these questions:
- What do we mean by ‘clean data’ for our Machine Learning model?
- How did you solve any problems you had today?
- Did you get your smart device to control lights?
- Were you able to add a fourth action to add a dimmed light option?
Finish by revisiting the lesson objectives and asking students to consider their success and understanding. Invite any questions or requests for support if needed.