
Making it move
Getting started with a Crumble - Projects part 2
Objectives
- Design and make and test objects or artefacts that successfully incorporate the Crumble controller and motors to make the object move.
- Use sequence, selection, and repetition in programs and various forms of input and output.
- use logical reasoning to explain how some simple algorithms work and to detect and correct errors in algorithms and program.
Lesson Resources
- Lesson Slides
- Crumble starter kits (1 between 2 students)
- 3 x AA batteries (per Crumble)
- Motors
- Paper, card, sticky tape, art materials etc
- Buggy chassis cards or a DIY option (optional)
Other useful resources:
- Crumble website home (Redfern Electronics)
- Crumble Getting Started guide (Redfern Electronics)
Lesson 1 - Let there be light
Lesson 2 - Switch it up
Lessons 3 - Crumble colour codes
Projects part 1 - Illuminated making
Projects part 2 - Making it move
Credits
Many of the resources in this unit of work come from Redfern Electronics (creators of the Crumble) and the excellent work of Phil Bagge on his website code-it.co.uk. Between them they have created lots of great guides and ideas for Crumble projects in your classroom. We recommend you check them out.
The book ‘Crumble Creations’ by Phil Bagge is also available from Amazon and University of Buckingham Press.
As a result, this unit is FREE FOR ALL TO ACCESS and can be viewed by anyone without logging in to our website.
Introduction
The two project pages in this unit are not set in stone, and instead offer you a collection of ideas to inspire what comes next for you and your students on your Crumble journey. Choose the project that best suits the age and abilities of your students and the resources you have access to in school.
This second page of ideas focusing on ways that you can create movement by controlling motors with your Crumble for some fantastic art and DT projects.
Motor basics
You can connect motors to your Crumble with the connectors at the bottom of the board. These are designed specifically for motors. The motor outputs are not powered by USB. An external power source (4.4 to 5.5v), such as the battery pack, needs to be connected as shown.
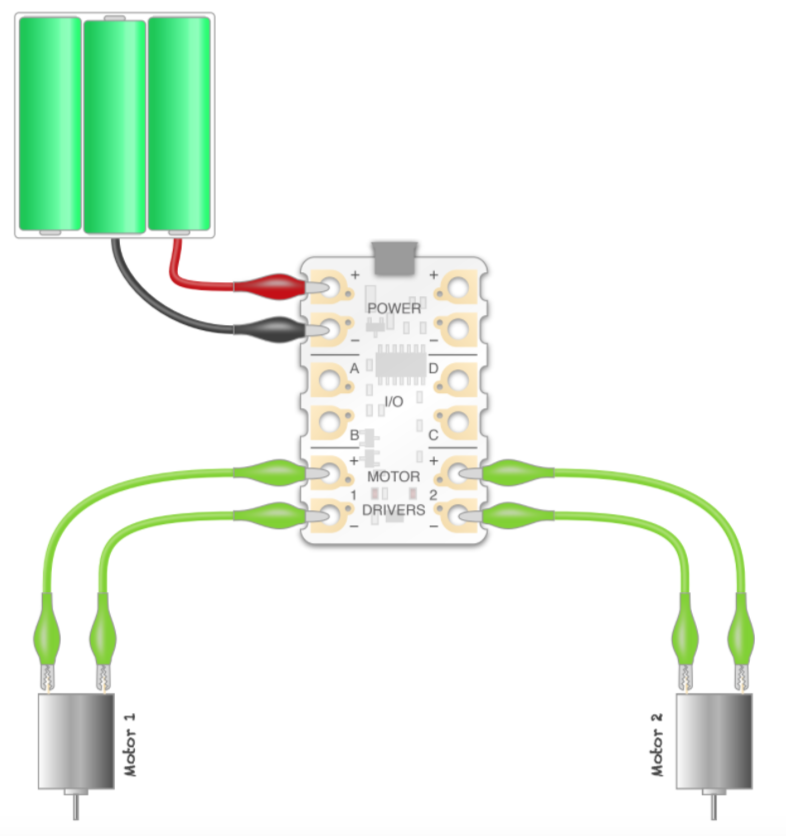
You can program the motors to go forwards, backwards or stop.


You can also control their power all with the one block. Use ‘wait’ blocks to control their turning duration.
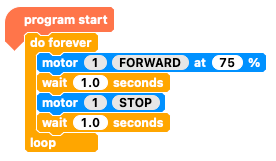
Ask the students to connect one motor to begin with and experiment with these things. They should make their motor turn at different speeds, turn forwards and backwards.
Crumble motor basics
Take a look at this vide in which, Joseph, creator of the Crumble Controller, explains how to use motors with the Crumble, and how to get started with a basic vehicle.
Controlling motors with a switch
Revisiting the switch that we previously used with the Sparkles is a nice way to extend their projects. Set it up like this:
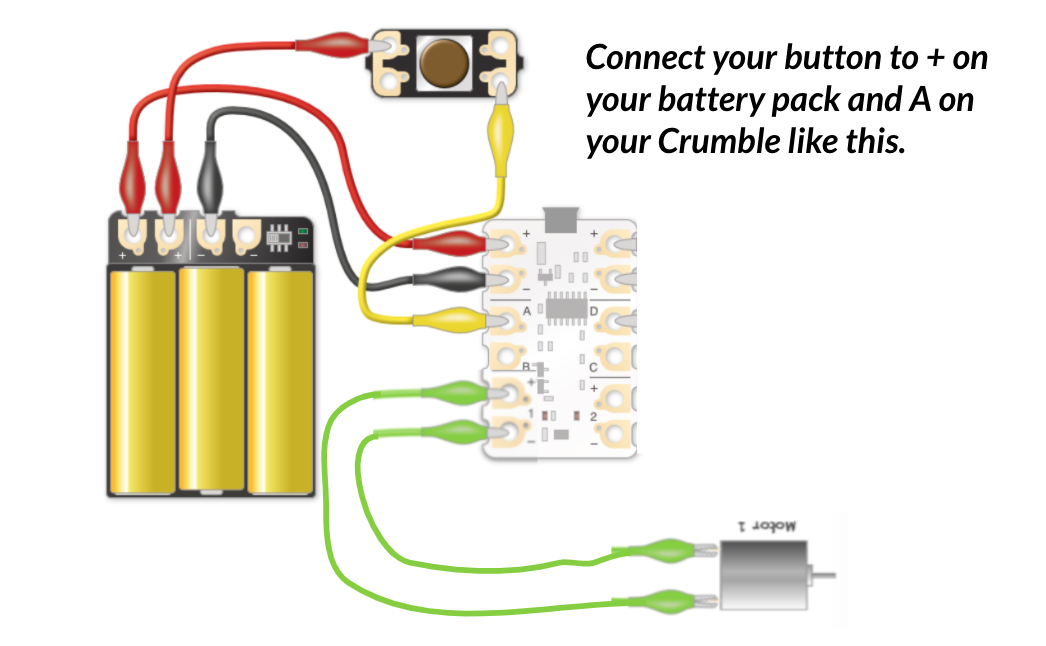
Image courtesy of redfernelectronics.co.uk
Then remind the students of how we previously controlled the Sparkles with a switch using conditions and the 'if then' or 'if then, else' blocks.

Here, the sparkle goes red when the condition is met, but goes blue when it is not.

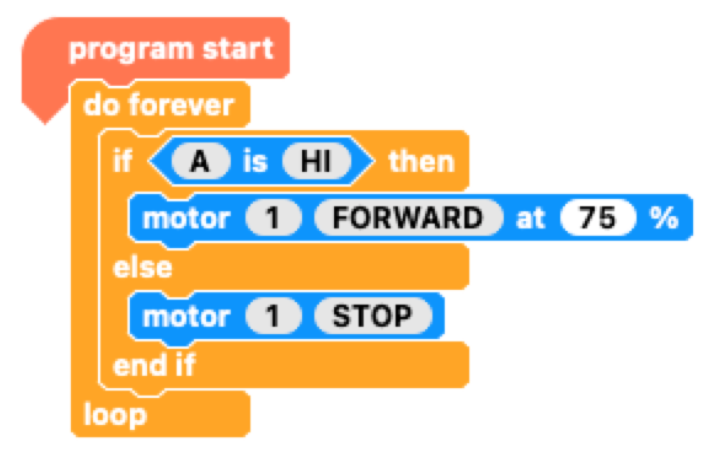
Challenge them: Can you now make your motor spin when the switch IS pressed, and stop when it is NOT pressed?
Here's a solution:
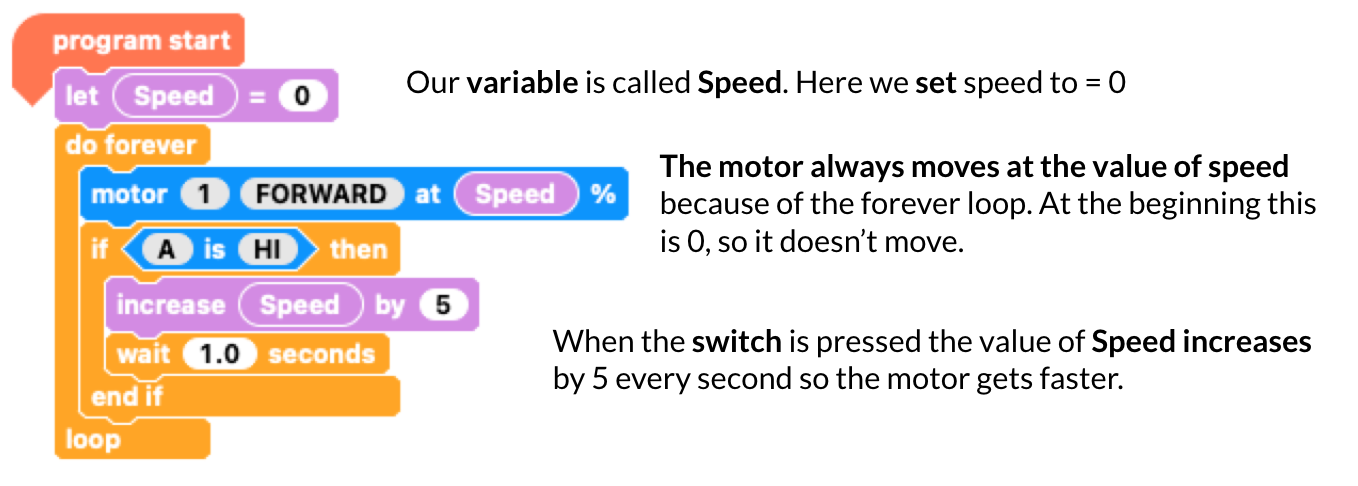
Controlling speed with a variable
This program uses a variable called speed. A variable is a place in a computer’s memory that we can name and then store some information. We can then use that information in other places in our program, even changing it as we go.
Ask the students to compare the same code with the new version of it (on the right):
- What is different in this version of the code?
- What will happen now?
- Why?

Here we've added a second 'else' condition so that now if the switch is being pressed (A is HI) then the speed variable (and therefore the motor speed) will increase, but if the switch is not being pressed (else) the speed variable (and therefore the motor speed) will be set back to 0.
Ask them to try this out.
Single moving motor models

There are lots of possibilities for making things that move, but take a look at these fabulous moving model examples from code-it.co.uk. One carefully controlled motor is enough to make them work. Mount the motor inside the box, then a good lump of Blu tack is usually enough to attach paper or card to the motor.
Flapping Angel Project

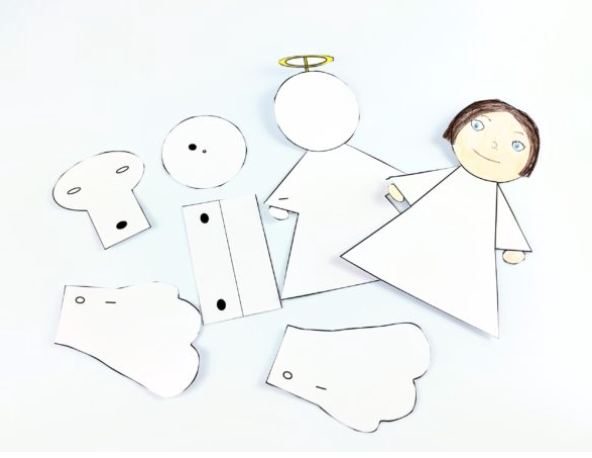
This lovely project from Redfern electronics could easily be adapted from an angel to animals or mythical creatures if you re-design the template. All the resources and teaching materials needed can be found on the page (click on downloads at the bottom).
Crumble carousels
Crumble robots
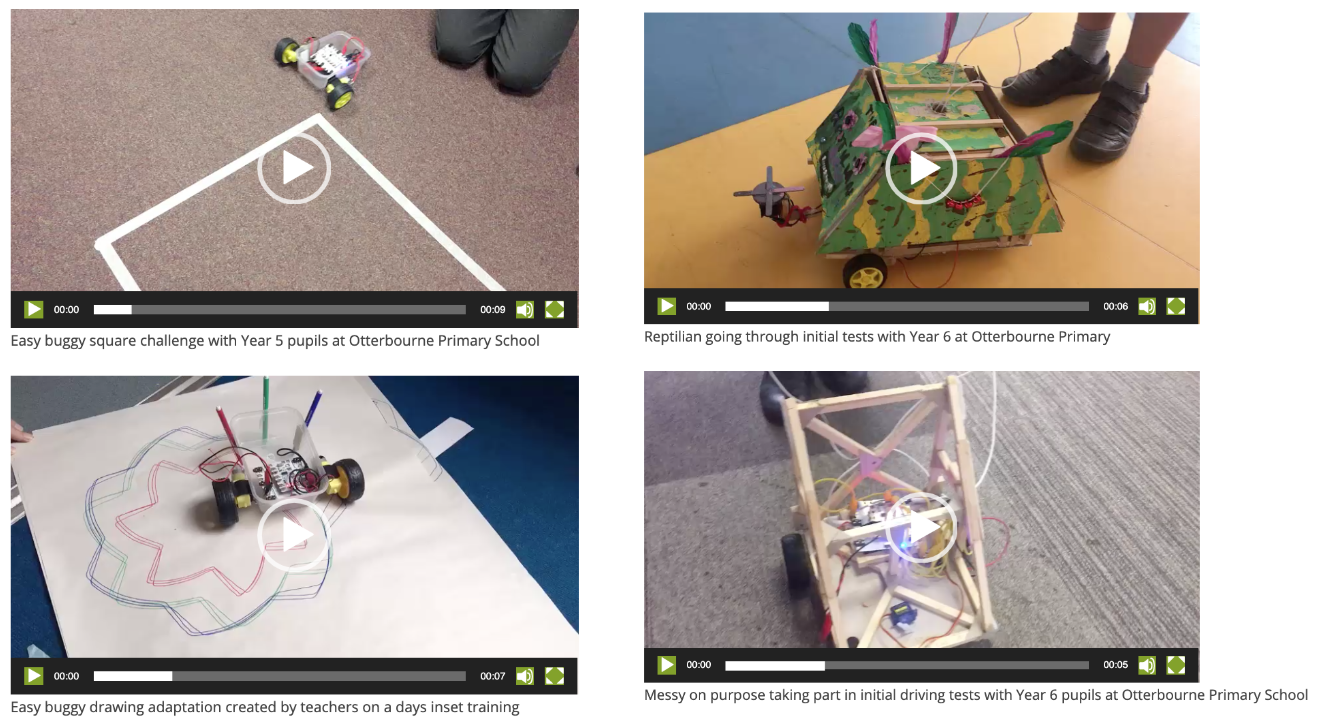
There are lots of ways to go about making your own Crumble robots. You essentially need a simple container to house the Crumble, batteries, wires and motors, plus some wheels to attach to your motors.

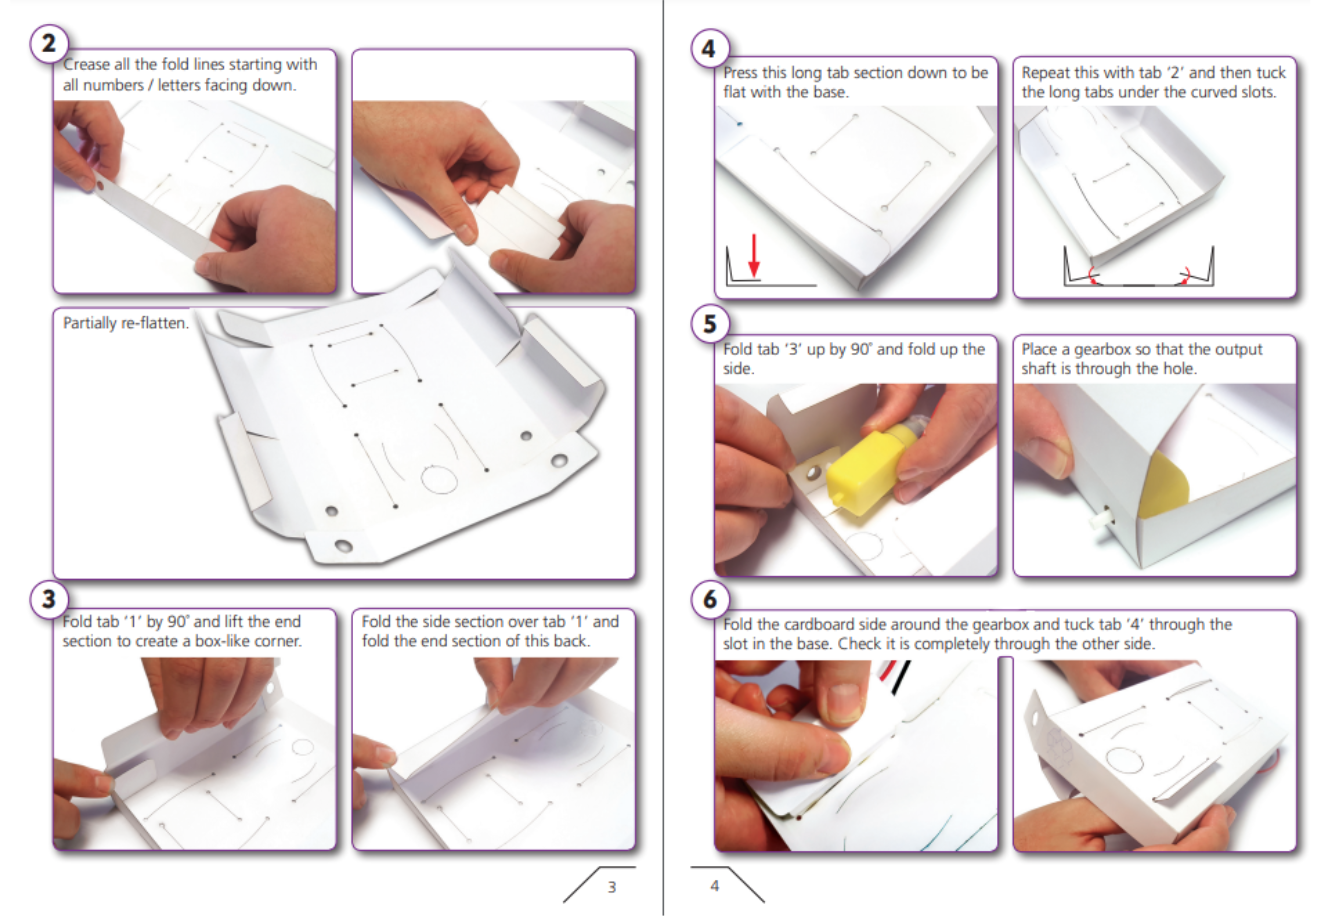
These press out chassis cards from Redfern electronics are very reasonably priced (pack of 10) and great for a base to create your own vehicles. Simply press out, fold and fix the cards and insert your components. You could then design and create a net to fit the top to cover the components and make it resemble all kinds of vehicles.
You don't have to use these though. You could use small boxes or even design your own!
if you choose to use the cards, first carefully press out the parts and fold it up into the chassis containing your motors, then add the wheels, battery pack and Crumble.
A step-by-step guide is provided with the cards. it's worth making a copy of this for the students and also demonstrating each step, perhaps under a visualiser or using an iPad camera mirrored to your board so they can see how each fold is done up close.
As explained in the video above, there's a slight quirk in that the motors are facing opposite directions when inserted into the chassis. For this reason, to get them both to move forwards (without having to use a reverse block) the polarity needs to be reversed on one of the motors so forwards becomes backwards and vice versa. This is easy to do, simply switch over the positive and negative wires on one side.

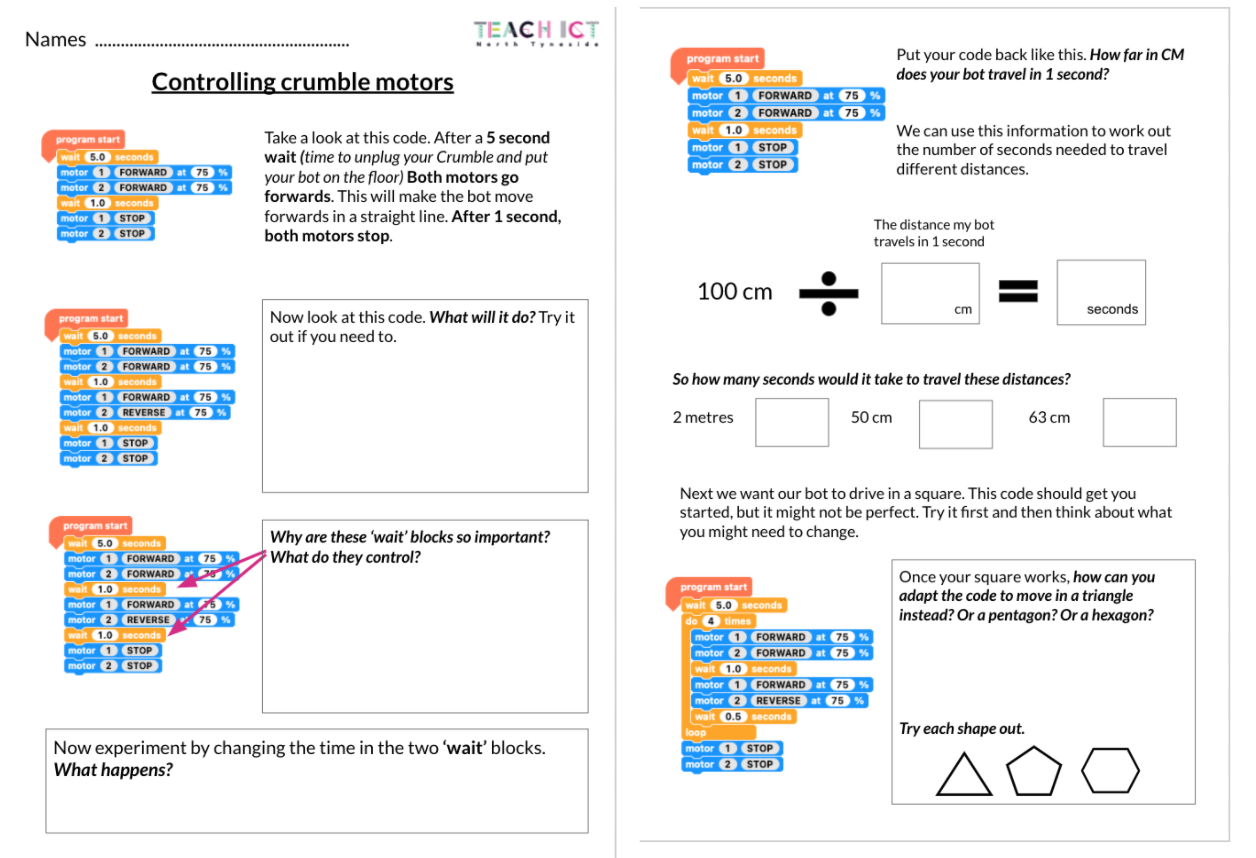
Crumble buggy challenges
We've created this worksheet for your students to work through. You may need to explain sections of the sheet (especially the second side) before they start, but try to let them work through it as independently as possible. They will require measure sticks or tapes and access to a calculator (an online one will do)
Navigating mazes
You could also set your students the challenge of navigating different mazes. Below are some example layouts. You can use masking tape on the floor or get them to draw them out on the biggest sheets of paper you can find. Can they create the correct sequence of commands to move for the correct distances and perform the correct turns to get through each maze?

Other Crumble robot ideas
This fantastic example from Cullercoats Primary School was the culmination of an excellent STEM project combining DT with computing to design, make and program an emergency vehicle. They students worked to design and build the chassis using wooden dowling, card and glue guns in their DT lessons, added the motors with a pulley and belt mechanism and then added the code to control the motors and Sparkles in their vehicle.