
Switch it up
Getting started with a Crumble - Lesson 2
Objectives
- To safely and accurately set up a Crumble and Sparkle LEDs
- To understand, explain and apply conditions in a program using 'if then' and 'if then, else' statements.
Lesson Resources
- Lesson Slides
- Crumble starter kits (1 between 2 students)
- 3 x AA batteries (per Crumble)
Other useful resources:
- Crumble website home (Redfern Electronics)
- Crumble Getting Started guide (Redfern Electronics)
Lesson 1 - Let there be light
Lesson 2 - Switch it up
Lessons 3 - Crumble colour codes
Projects part 1 - Illuminated making
Projects part 2 - Making it move
Credits
Many of the resources in this unit of work come from Redfern Electronics (creators of the Crumble) and the excellent work of Phil Bagge on his website code-it.co.uk. Between them they have created lots of great guides and ideas for Crumble projects in your classroom. We recommend you check them out.
The book ‘Crumble Creations’ by Phil Bagge is also available from Amazon and University of Buckingham Press.
As a result, this unit is FREE FOR ALL TO ACCESS and can be viewed by anyone without logging in to our website.
Introduction
Begin by recapping the last lesson. Ask the students:
- What is a Crumble?
- An microcontroller electronics board.
- How did we set it up last time?
- We used crocodile clips to connect up a battery pack to provide power. We also attached a Sparkle LED. We paid careful attention to the polarity of the circuit and where the + and - connector were on each component.
- What's the best way to attach the crocodile clip wires to the components?
- Clip through the holes, not over them.
- How can we make sure we are being safe while using it?
- See below
 Working safely
Remind the children that we will be working with electricity in these lessons, and while the amounts are very small and safe, we should still be careful and aware of the dangers. Make sure they follow instructions carefully, have clean dry hands when handling the equipment and touching something metal that's anchored to the ground (like a table leg) is good practise as it will discharge any static electricity from our bodies, which has the potential to damage electrical components.
Ask them to work with a partner to set up the Crumble with the battery pack and one Sparkle as they had it in the last lesson.
- Can you remember how to get your Sparkle to flash different colours?
- How did you get it to repeat the code and continue the colour cycle in different ways?
- Why are loops useful?
Adding a switch
One of the components that comes with the Crumble starter set is a switch. In this lesson we are going to investigate how to add it onto our circuit and how to code it to work in different ways.
Ask the class, what do you know about switches? Where do we find them? Do you know of different types of switch?
There are indeed many different types of switch design, but they all basically do the same thing; control the flow of electricity through a circuit, which usually turns something on or off or changes how it works.
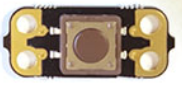
This Crumble switch is a push button and it is an input device. An input sends a signal message to a machine where it usually creates an output of some kind (something that happens as a result).
This button sends information to the Crumble. The information it sends depends on whether the button is pressed or not. We can make different things happen based on the button press. But let's add it to our circuit first.
Show the students the diagram on slide 24 of the lesson slides, this shows how a switch can be added with two more wires. It doesn't mater which way up you have the switch, it can be connected in any orientation.

Image courtesy of redfernelectronics.co.uk
Show the students this code and ask them, what's new in this code?
Here we’re using a condition or another term for it is selectionAsk the class what is a condition?
They are rules that dictate what happens and when it’s allowed to happen. For example, someone at home might say to you:
“You can play out with your friends on one condition, you must finish your homework first.”
This is the condition.
Then this event will happen if the condition is met.
There are two common types of condition that you will find in most programming languages, they are know as 'if then' and 'if then, else'.
In the Crumble software, Scratch and other block based languages, they look like this:

With an 'if then' block, we add a condition to the hexagonal gap and the event we want to happen when the condition is met inside the block.

An 'if then, else' block gives us two possible outcome:
- An output that occurs if the condition IS met
- A second output that occurs if the condition is NOT met (else)
Here's an everyday example:

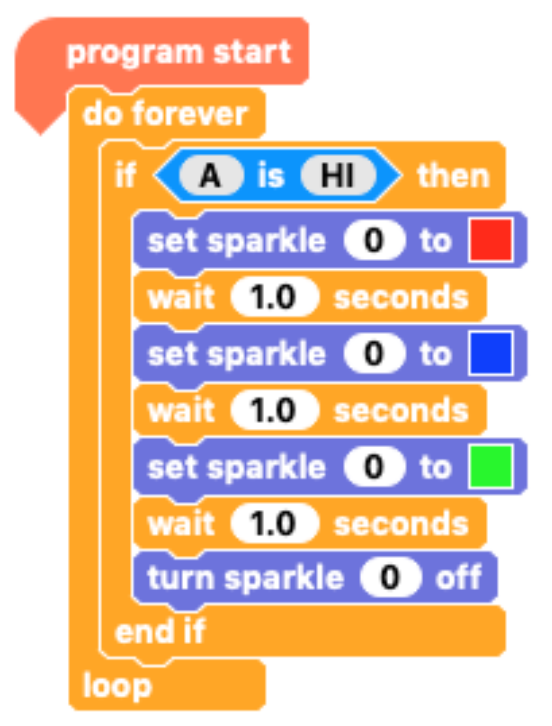
The condition in our Crumble code is to do with when an input is received from the button being pressed
The A in the input block refers to the terminal on the Crumble the input is connected to. We wired the switch up to port A so we use that in the block.
HI = Input received (button pressed)
LO = No input (button NOT pressed)
![]()
![]()
Ask the students to build and test the code. What do they notice about the way the button works? Is anything surprising? The code will only run when the button is pressed (and held down). It does not function like a light switch which stays in an on/off state until pressed again.
When you release the button with this code the sequence will complete and then stop.
Conditional switch challenges
Ask the students to think about the conditions we've discussed and consider how they could solve the following challenges using the switch:
Challenge 1
Can you make your Sparkle go RED when the button is pressed but BLUE when the button is not pressed?
Challenge 2
Make your Sparkle flash FAST when the button is pressed and flash SLOW when the button is not pressed
Ask some students to explain their solutions. Here's one way to do both challenges:
Challenge 1

Challenge 2

Look at one more if/else example from the lesson presentation (or create one of your own), what would this code do?

If the button IS pressed the Sparkle will flash RED and then BLUE. If it is NOT pressed it will light up GREEN.
More Sparkles!
You can add extra Sparkles to your Crumble by daisy chaining them with more wires, as shown below. Again, make sure the students orientate the Sparkle correctly and make sure all three wires match up at both ends (+ , - , and D).

The first Sparkle remains as Sparkle 0 when we refer to it in our code, the new Sparkle is Sparkle 1.
The Sparkles can be controlled all together or independently.

Ask the students to take a look at these three examples, can you explain to your partner what the code will do in each example?

The students can then take some time to experiment with controlling two sparkles in different ways. Can they solve these challenges?
- Can you make both sparkles flash the same colour?
- Can you make the Sparkles flash different colours?
- Can you make the Sparkles swap colours as they flash?
- Can you use your switch to control both Sparkles?
Randomising inputs
Finally, let's look at how we can randomise the output of our Sparkles.
This first example will randomise which Sparkle will light up, as we have replaced the Sparkle number with a 'pick from random range' block. You can find this in the operators section.
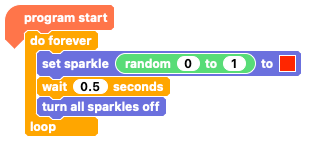
This block lets you choose a colour by specifying how much red, green and blue are used (remember the light colour mixing from lesson 1?)

Because it lets us create a colour with a numeric value, we can also randomise those. The number range for each colour needs to be 0 to 255 to get the full range of possible colours.

Plenary
Finish the lesson by reviewing the students' understanding of the main things covered:
- What is a condition?
- What types of conditional blocks have we used today?
- What is the difference between 'if, then' and 'if, then, else' statements?
- What is an input?
- Which piece of equipment did we use as an input device today?
- How did we control two Sparkles separately?